scrappystickyinkymess


2 Comments

Flowers, for a change

I have been so lax in my blogging, sorry about that.  Life has been busy.

I had a discussion with some book fold-ers who like adorning their book fold projects with kusudama flowers  – the ones like THIS:

and shared an easier version that still looks quite nice.  It has only four petals, usually and looks like this:

5easykusudama


The steps are so simple, much easier than the standard version.

Fold a square on the diagonal, then bring the lower corners up to meet the point.

easykusudama

Open up the folds and fold the sides in to meet the crease

Flip it over and fold down the points, then unfold them

2easykusudama

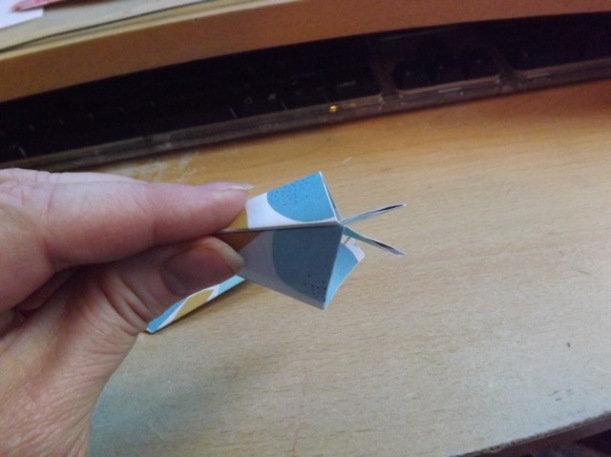
Stick the unit together where the arrows point to, like this:

3easykusudama

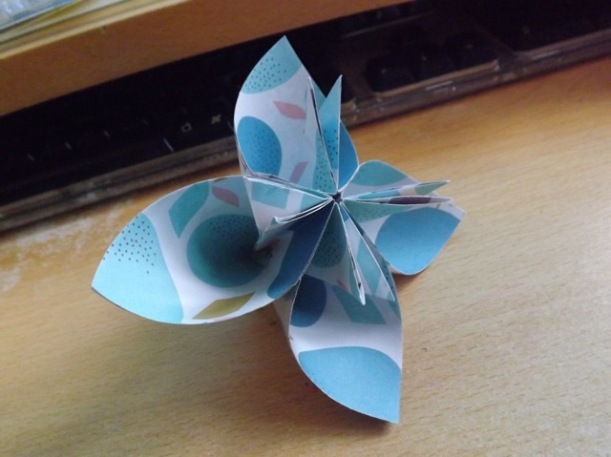
I like to use Fabri-tac glue – hot glue or some other strong, quick-set glue works best, rather than a tape runner or double-sided tape.  Stick the units together into a flower shape

4easykusudama

As shown, you can do four or five units as you prefer.  You can leave the little points as they are or fold them over flat or open them out to make the “rabbit ear” inner petals.

6easykusudama

and you can even fold five units and join them for one that looks like THIS:

5petal2

Long time reader know me – I am all about the easy LOL!  I had a look and there is a video that might help:

You might be able to use the same principle to make a flower ball, using the simple version, but I can’t say that I’ve done it myself.  YMMV.


7 Comments

Sunday-right-here – Word Rosettes

Enough people commented yesterday that they liked these that I carried on playing and made a PDF of some useful greetings.

I’m going to assume you know how to score and accordion fold rosettes.  If not, there are loads of YouTube videos for that, mine is just one. I would suggest using thinner patterned PAPER and not cardstock – I think that will be too thick, but hey, give it a go and let me know if it works!  Also if someone has the TH rosette die and wants to see if this can be made to work with that, I’d love to know.  I think the scores are 1/4 in that but don’t know for sure.  I am pretty sure the longer words won’t work but will any of them?

I use the Martha Stewart Score Board. To make these I use the BLACK lines (1/4 inch spacing) and the PDF is designed to fit that.  But lots of things may affect your attempts.

I thought about adding this as a PSE file, but frankly I think that wouldn’t work.  For a start, if you don’t have these fonts installed they will all appear in whatever your default font is.  And each font I used is sized to fit and they are not all the same point size.  I must have printed 20 test sheets, and scored them, then made tiny adjustments to try to make sure the text fell as it should. See my “scooch” notations?

At the bottom of this post I’ll give you some guidance as to HOW I did it so you can make your own file if you don’t like my greeting and font choices!

  • if your printer adds a margin the PDF of text might be shifted down slightly.

Solution: line up the first groove so it falls just at the top of the first word (a SMIDGE above) then carry on scoring.  It SHOULD match pretty closely.

  • it still doesn’t match, you say? 

Solution: Try to use the thinnest stylus you can.  My thoughts on this are that we are dealing with tiny increments.  As the stylus pushes the paper down into the groove, in is imperceptibly shifting it a teeny amount.  20+ score lines and it adds up. If you are scoring a STRIP, and not the whole page at once, you can shift the paper left or right as need be so the score line falls where you need it to.  If you saw my decorative edged Rosettes thing on YouTube (well over 2 years ago) you will see IT DOES NOT MATTER if your lines are all 100% the same.  Once you flatten it out, a smidge this way or that won’t affect the look by much.

There is some flexibility in the width you cut your strips.  But, they must be between 1 inch and 1 1/2 inches.  If you make them wider than that, because the PDF is based on an A4 sheet of paper (but made to accommodate  US letter paper) the text strip is no longer than 11 inches.  If you cut it wider than 1 1/2 inches, the paper may tear as you flatten it.

In general, I keep the aligned edge of the words pretty close to the edge of the paper, leaving the empty area on the other side.  Especially for the longer ones, like ANNIVERSARY, it keeps most of the word visible once you form the rosette.

As I mentioned, you can score the entire sheet and then cut your strips and fold.  The you will have a stash of rosettes for when you need them.  If you want just one, copy the word strip into another file and print, or print once, cut strips from a number of papers, adhere them to the first print and print again so you have each set of words on different papers.

The other issue is the centers.  You will need to use something fairly small for all but the 1 1/2 inch strip, or the decoration will obscure the words.  See what I used for guidance.

At the back I add a circle of cardstock covered in adhesive – that plus the brad thru the middle holds them just fine.  A dollop of hot glue in the middle works too.

Here you can see the 1 1/2 inch, 1 1/4 inch and 1 inch rosettes:

I thought about trying to make a set to fit a strip edged with a scallop punch, but there are so many on the market, so many measurements of scallops, and life is too short!

How I did it, in case you want to make your own:

Easy Peasy. This is the program I use, and you can see how the words are arranged:

  • Open a file in whatever you use for this sort of work.
  • Trigger the GRID, making it .25 inches (1/4 inch)
  • Type your text.  Make sure each word is centred within the grid lines top and bottom
  • Leave a blank grid.  So Happy then a blank 1/4 inch, then Birthday. Repeat to fill the length of the paper.
  • Select all the text and either CENTRE it or ALIGN RIGHT (or left, I suppose it doesn’t matter)
  • Print the strip of words and make your first score line just over the text.  Then, as I say above, you SHOULD be able to score at 1/4 inch all along the strip.

There may be a bit of trial and error to the process (there was for me) but you’ll get there. I hope you have fun with this!


3 Comments

Cards come home

When Scrapbook Inspirations ceased publication, I still kept in touch with Jenny, the editor, occasionally.  She carried on editing Papercraft Inspirations and somehow I was still getting copies long after my link with SI was severed.  Usually it was me seeing some really cool card idea on t’internet and sending her a link, saying This might be cool for the mag. Thing is, she usually liked the idea but nearly always tossed it back to me and asked did I want to do the article.  I would always try to squirm out of it, but in the end, at least a few times, I said fine.  Usually the agreement was because it was MY idea and not someone elses, because sometimes when my text submission appeared in the article I felt like it sometimes seemed, as edited, that I was claiming and idea I found “out there” as my own.  That didn’t sit well with me.  And when I would take great pains to seek out the ORIGINAL of what seemed to be a much copied idea (the STAR cards spring to mind) I worried if the URL of the original didn’t make it in the printed mag.

At some point I stopped getting copies of the mag (I assume the finally pruned their “freebies” list) so I sort of let it drop off my radar.  So I was surprised to get an email from one of the staff to say they had some samples to send back!  I had completely forgotten them. So I have no idea when they appeared and never saw the article in print.  But I do have the samples to share with you.  They were made from one of the dahlia printables but one that was a phrase across the five petals rather than a single word repeated. You can download that PDF here.

I am aware that I am all about showing the TECHNIQUE and don’t always follow thru with an actual project.  I’m trying to be better about that.

The first one was just scraps and NOT folded, the circles used to create a flower. It’s so bright and cheery it makes me smile.

The next was a bit more girly:

and the last made use of a printed design and had a window, with the dahlia inside.  Possibly my least favourite as it needed something MORE on the front and I was sure they would reject THIS one and they didn’t:

I had previously shared one of the rejects which ALSO used the circles as-is but as a strip – I liked it a lot more than the previous one:

And the original red and turquoise one:

Otherwise, today it is all about the cleaning because I find I am having to leap over things in my office to get from one side of the room to the other and I can honestly not find more than about 4″ on my desk mat to work on.  It is as bad as it has ever been, and all those now clean stamps need re-housing too. My lettering class has slipped.  I am finishing up a tutorial for an online site that I thought I said NO to back in December but with all my dodgy computer issues the word didn’t get through.  So when I got an email saying Nearly Done? Still OK for this? I was a bit OMG! and have been scurrying to sort that as I would be horrified to let someone down like that.  I will also, I think, be chasing the light around from window to window to try to get the best photo I can of something a bit tricky to capture.  More on that in…late August, I think.

So that is me for the day.  At least it’s a bit sunny so the laundry can go out.  Best grab the chance and it’ll be rain by the weekend I fear.

Cheerio!


37 Comments

Simple folded paper dahlias using printables

OK, this is likely to be pretty image heavy – be warned.

Download the PDFs. The PDFs consist of little circle motifs with a bit of text curved around them.  They are sized to be punched with a 1 inch circle punch.

The coloured version is here.

The Black text version is here

the Brown text version is here

Get a piece of printer paper – and the PDFs should work with both A4 and US letter sized paper. If you are using the coloured version, pick out papers to match the printed motifs.  Cut 2 inch wide strips at least the width of your printer paper.  I used scraps, and some were 12 inches wide, some 8.5 inches wide.

Turn the scraps over and attach the patterned side to the printer paper with a rub-off repositionable adhesive, like Hermafix.  Stick the first strip flush with the top edge, and each next strip right up against the previous one.

If you’ve used longer strips, just trim off the excess – make sure you use enough adhesive to secure the strips to the printer paper.  You really don’t want them coming loose inside your printer.  Put the paper with strips attached thru your printer to print the PDF on the strips. When you get done you will have a set of five “petals” on each strip, printed on the back of a patterned paper that coordinates.

Now peel off one strip and punch out the five petals. Position the punch so the top curve is just above the text arc.

To create the petals you just fold over one side (and I placed a bar at the bottom centre – if you fold the first side in along a line just past the letter to about the midline of the bar, then fold the other side over you should get 5 petals that fit nicely together when you stick them.  But there is likely to be a bit of difference between them as the text bits are different lengths.  So you may need to scootch your fold a smidge one way or the other.

Get another circle – and as you will see this can be a scrap and quite small or bigger and coordinating, as you prefer. Start sticking the petals to the circle and with luck and good folds they will meet up perfectly.

Top them with whatever you like – a button here, but yesterday a lovely big Prima.  And I made a lot of them in different ways.

With the plain black and brown versions, you can  print them on plain paper and then attach that to the back of any paper or card you like (and I did that with the brown one) then punch.   You can print them on a wider range of papers then add any extra  colour by adding a punched circle to the empty circle on the print-out. And they look good printed on cream card as well as white. See?

And you can also print the brown and black on light coloured card or paper – the coloured ones I think you would have to try to see if you like them.   And a smaller circle works too if you don’t have a punch the exact size of the circle.

You can see on this one my folds were a little too tight and there is a bigger gap between the petals than I would like.  I would re-fold that one to open it out a smidge.

I’ll be adding this to the printables page in the top menu and there is a YouTube video/slideshow as well, but the only thing you will see different there is maybe a few more close-ups of some of the flowers. I’ll probably add that tomorrow but I have to do this first so I can link to the printables and this post is already monstrous!

I’m also hoping to get the spacing right with a pretty font that is readable in the very small size to do a set of more scripty ones.  If so, I think I would possibly dispense with the coloured versions (although the coloured text does look cute, it’s so hard to get something that works with papers people have.  Brown and Black are pretty sure to work with most things!

Any suggestions as to words? I have: hey baby (boy and girl colours and in the black/brown sets one is replaced with handsome), adorable, sweetie and love you

I thought be mine might work and maybe valentine as that will be upon us before we know it.


2 Comments

Finally! Something new.

DS is not quite gone yet, and I am still busy with administrative tasks, but I did want to share a little something today – and I hope, if I find the time, something more tomorrow.

Now, you will surely have seen these flowers before.  The first time I saw them was in PaperCraft Inspirations, but they have been around for a few years at least.  They are simple to make, just a little punching and folding and there are 100s of tutorials on t’internet to guide you.  I’m not going to re-do one.  This YouTube tutorial is as good as any of them, and ditto this visual step-by-step.

The difference with mine is the coloured part is fabric rather than paper.  I really like the texture it adds. But at first I wasn’t sure I could do what I wanted as getting my Grand Calibur to cut through the backing on the sticky Xyron adhesive with the pinked circles was frustrating.  Laying out the sticky-backed fabric, then the die, and cranking it thru one by one for each pinked circle was just annoying.  The paper part I could use a punch for but no punch was going to cut the fabric cleanly.  But even using the GC I wasn’t getting clean cuts. And as I want to eventually try making one with all fabric, that was something I needed to solve.

I still have/buy/use punches a lot, esp. circles and scalloped circles, because I like the grab-and-go nature of a punch (v the lug-my-huge-GC nature of my Nesties.)  I was just musing to myself that I wished I had a hand-held pinked circle punch that was strong enough to cut thru both fabric and backing, when I had one of those lightbulb moments. And it worked. See how clean that punched?

All I did was put the small die in my old QuicKutz handle and punch it by hand.

The magnetic plate grabs the die and holds it in place.  A quick squeeze of the handle and a perfect, sticky fabric pinked circle results. Getting the die out does require a pokey tool or something thin to nudge it, but I can live with that.

So this means that, at least for the smaller sizes, I can take a book ring with 12 dies that I can use with the QK handle and NOT have to drag along all the dies the GC, or 12 punches. And this way I get no embossing around the edge, which for the smaller dies is more often what I actually WANT and why I have the same sizes as punches.

What fits?

Scalloped Circles Large – just the smallest.  Scalloped Circles Small – smallest two

Pinked Circles Large  – smallest two, Pinked Circles Small  – smallest two

Circles Large  – smallest two, Circles Small  – smallest three

I assume many of the smallest bracket or label dies will work like this (certainly the square ones, less likely the rectangles) and although you do lose the ability to place your paper or card perfectly to punch  out a motif for example, for overall patterns or cardstock it works a treat.

Hopefully see you tomorrow for WOYWW.


5 Comments

Embossed flower

I really should be cleaning, as we have a mate from the states coming tomorrow, but it’s been too long since  just had a creative playtime and I had an idea that I just wanted to try out.

I was playing with the idea from last week of brayering ink over the embossed cardstock, and I spied the new punch that I got, the one with the big holes and scallops.

I embossed a thick strip of cream cardstock, scooching the embossing folder along so the whole thing was covered.  You can see the join, but it doesn’t really matter for this.

With chalk ink I brayered over the embossing to highlight it.

I punched the edge with the hole-y scallop and trimmed ita 1/2 inch or so above the scallops. I scored it in my usual way, between the scallops and at the apex, then stuck the ends to make a circle and squashed it to make a rosette.

Topped with a button, they look very pretty.  BUT, I think they are perhaps better on a card or maybe hanging on a ribbon as an ornament.  I suppose they aren’t all that much thicker than a normal rosette but still, they might be a little bit thick for a scrapbook page.  Maybe on a band to create a napkin ring?  Anyway, it was just my first experiment with it, and as I usually do I’ll probably play around with it a bit more till I perfect it.

I like the look of the strip, punched, before it gets scored and THAT I might play around with to use as a border on a scrapbook page.  Lucky I have a crop this weekend!


4 Comments

Sunday-someplace-else – Paper tulips at Cheeky Magpie

Spring this year seems to be hesitant.  We have warm and sunny days, then it reverts to rain and cooler temperatures.  Bank holiday weekend, and all we want is a nice sunny, dry day to get out and about and do touristy things and I’m not sure we are going to get any cooperation from Mother Nature! And this year, the daffodil explosion didn’t really come.  There were some, but nothing like past years, when we had multi-colour daffs all over the yard.  So when I stumbled on this tutorial for making paper tulips I though it might be quite fun and springlike for DD and I during the school break.  They certainly look easy enough to make big, but I am wondering about making them small, small enough for a scrapbook page or a card.  I may have to have a play with my pile o’ scraps and see!


23 Comments

WOYWW 100 – flowers

I am loving the look of those little stacked circle flowers – not least because they are dead easy to make.  But today I am experimenting with tarting them up a bit, and making them in different ways.

I had a go at making a crochet version (pretty basic stuff, if you crochet – I was sort of winging it, but it’s a 6-chain circle closed with a slip stitch then chain 3, 15 treble crochet {and that is the US version, wrapping the yarn twice around the hook, thru 2, thru 2, thru 2} and slip thru the top of the chain-3.  Chain 3 again. Second round is 2 trebles in each first round treble.  2nd circle is 5-chain loop, chain 3, 14 trebles, close. I don’t write crochet so I hope that makes sense!) They make a nice change from the petal crochet flowers and aren’t that much thicker than the stacked ones (see the blue one in the back?):

and I’ve been playing with some pretty pearl and crystal sprays as well.

I really like the pearl one.  You can bend the wired sprays any which way you like.  Just a bit of fun on a Wednesday!

Happy WOYWW! Don’t forget to pop over to see the amazing Julia, who keeps it all going and provides the Mr. Linky so we can all have a good snoop round crafty desks across the world.  United in chaos, we are the WOYWW Crowd.  Wowee!


7 Comments

Fast fluffy flowers using coffee filters

Regular readers will recall I have found a few uses for coffee filters – I love that they are strong when wet, but have a great texture.  I was playing around with some flowers and came up with these:


They are simply punched scallops, snipped and mica-misted then dried with your heat tool.  That is the step that makes them super easy and fast to make, because the heat makes the coffee filter paper contract and crinkle.  Once you stack them it is easy to just fluff up the “petals” a bit more and add a brad centre.

Of course I made a video for this, and you can see that here:

But that isn’t all!  Once I had loaded the video, many related videos came up.  One in particular I really like – ‘ a bit more labour-intensive, in that you have to do a bit of cutting then sewing on the filters but I like the flowers that you end up with.  They look very vintage to me.  Not sure if I have seen the brown filters here in the UK, but I never really looked for them so I can’t say for sure.

So there you go – mine are super fast and look fluffy and the others take a bit longer but look just like Primas.

I may have to have a play with the sewn version today if I get the time.


Leave a comment

Vintage shabby flower

You may recall the Dutch inspiration blog I linked to for my last Sunday-someplace-else.  There are so many great links there it will take me ages to work thru them all!  But one that really caught my eye was a shabby flower made with fabric.  I thought it was just lovely and decided to give it a go.  I picked colours my MIL will love, because it struck me a something she would appreciate.  I figure if I can just find the stash of pin-backs I have it might make a nice little lapel pin for her.  She isn’t afraid of BIG pins (or necklaces, for that matter) so I hope it will be well received.


I did it a tiny bit different than shown in the video as I built the rolled center flower on a bit of felt – I am not super dextrous and feared I would ruin the whole thing if I tried to glue and roll on the actual item.  That worked well for me.  I also didn’t have the rough fabric, but I did have some lighter weight muslin-type stuff.  I also added some beaded strands and a bit of dangly bead trim I have had FOREVER and just never seem to find just the right thing to use it on.


I need to hunt up some velvet leaves.  The one you see is from a silk flower stem and not stuck down.


It was fun to make, and the video is pretty clear to follow.  I think I would like to try it with better base fabric, but that is a project for another day.  We have a load of people coming over tomorrow for a BBQ and I have to do a spot of cleaning (well behind due to the physical complaints of the past week – I hope both my wrist and my back are up to it!) and make baked beans.