scrappystickyinkymess


Leave a comment

My butterfly mind….

It flits and lands and flits away again.

I have momentary obsessions that may stick for a day, a week, a month. I have unfinished projects all over the place. I do eventually circle back to them but it could take a while.

I was sucked into a yarn-y vortex after spending a weekend in my sewing room, sorting out all my yarn.

And at the same time kept seeing crochet things pop up in my YouTube feed – does anyone else get annoyed that Google can’t differentiate between knitting and crochet? Drives me crazy when I am looking for one not the other. Anyway, you may have seen my current obsession with the Tom Daly wavy crochet sweater. It’s lovely. I dragged out my recently sorted basket of cotton yarn and had a bash. But the more I assessed my scraps the more I realized two things. First, I don’t have enough of the handful of colours to make this sweater in my size as anything other than a total scrap yarn mish mash and two I might be too old to pull off such a youthful item. My mate assures me it is all about attitude, not age, and while I love her for that I’m just not sure. My mind flitted on to, back to my knitting machine. I’ve been cranking out tubes for a cardi, using some yarn I unearthed which looks like more than enough to make a project – except for what I wanted as a border!

I am making one a bit shorter, in DK weight yarn, and a solid colour, except for the around the neck border. I did the calculations and it requires a 360 round tube. I had some scraps of yarn in the perfect colour and weight and cranked that sucker out – and came up about 40 rounds short! Grrr. I have a potential solution in some similar but not identical yarn – I am thinking I will see if the lighter yarn and the thinner tube works and if not, I will knit to the half way point, add in the other yarn to fill in at the back of the neck, then carry on with the rest of the initial yarn. It’ll work OK, I think, and be great to use up a bunch of stash yarn. Which made me think I should just crank out tubes of random scrap yarn and make the most massive blanket even, just to use it up so I can actually buy yarn for a project that I WANT to use!

Sadly, even that goes awry sometimes, when I buy yarn I love with no firm pattern in mind. I recently bought some lovely bulky WI yarn.

Too bulky for the Addi, and I bought it to make a cardigan. The Cardigan theme? I’ve never made one before. Well, I made ones for the kids, both knitted and crocheted, but never for me. This blasted yarn has such long lengths of colour, and the transition is so abrupt, with no gradual melding of colours, it is impossible to find a good pattern to use it for. Even Ravelry, which had inspiration for DAYS for most things, I don’t think it shows a single project with this yarn, despite it being in a few people’s stashes. I keep testing out, both knit and crochet stitch patterns and nothing looks good.

I won’t even delve into the whole ATCs, Art Journal, Cardmaking and Dementia Doll knitting thing. So for the weekend I am going to select ONE thing and work on it to the exclusion of all else. Not sure I will finish but I am determined to make progress.

Wish me luck!


18 Comments

WOYWW 668 – desk? not really…

Happy WOYWW y’all. This week it isn’t so much my desk as it is taking a leaf out of Helen (H)’s book and showing you some of my floor!

I’ll probably detail my travels across the internet collecting info of the lovely Tom Daley ripple sweater that is my current obsession, maybe more for myself than anyone else (except my best mate Kirsty) but for now it is just what is all over my craft space.

There is a kit from Wool & the Gang but it is pretty expensive, and the pattern is not really a tricky one – I have a book of ripple stitches that has a couple that are similar

and there are many YouTube video tutorials as well. The construction is basically four squares. I grabbed a basket of cotton yarn (recently sorted when I did my sewing room) and had a bash:

As I was really just testing my capabilities with the pattern, I didn’t want to cut then ends, hence the massive tangle and snarl of yarn!

All my yarn is scraps, no ball bands on most of them, so I am testing out the hook size and trying to see how gap-y the resulting fabric will be, and if I can live with it. It’s not bad with a 4.5mm but may try a 4mm and see if the blue is better with that size.

I keep threatening to get back to my art journal and I will, but not quite yet. I did join the Petite Journal class that… Ali Wade (I think!) mentioned, but I can’t log in with Firefox and so far my email to the teacher has gone unanswered. I also booked a live class, then my dad fell and spent a day in hospital and I couldn’t make the Live-time so will have to catch up on the replay. Life, hey? Dad’s fine, all checked out and he’s doing well for a guy in his mid-80s.

Lastly, I’d like to direct you all back a post (or two) to check out the info on NANO TAPE (not sponsored!) and how I use it to mount unmounted or no-longer-sticky cling stamps! I can’t say enough about this useful stuff and I am sure all the WOYWWers will think of 100 more uses. I did test out the use of only a few small squares on the grey cling stuff on the back of Tim Holtz stamps, almost all of which have totally lost their stick and I cannot bring it back. Ta Dah!

OK so “stamps great” is meant to reflect the fact that all the stamp areas stamp well, ignoring how lazy I am in not wiping off the over-inkage in the background areas! And the grey cling releases, but you need to do it right away and not let it linger. I really think if you are a stamper, with a lot of old unmounted stamps, this is going to make you happy. And I am seriously considering unmounting even some of my “cling” stamps at this point as the bulk of them is so not needed if they simply DO NOT CLING anymore. We’ll see. I think we all know how bad I am at follow-thru LOL!

Happy WOYWW!


5 Comments

Mandalas for yarn bombing – free hoops!

I never really know how best to title a post.  Hopefully this one got your attention.

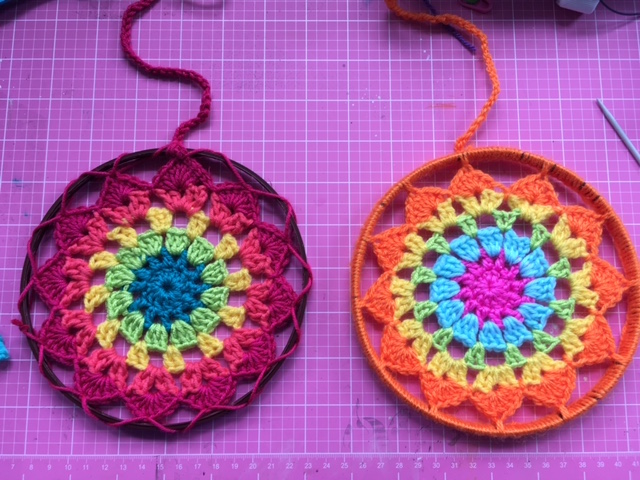
One thing I am easily able to do is sit and knit or crochet.  I can do it in the car on the way to appointments and while sitting in waiting rooms.  A couple of knitting groups locally do yarn bombing – google it, it is colourful and cool.  I’ve not made anything for past efforts but I thought I would have a go for the upcoming ones.  I liked the idea of a mandala but also liked the idea of recycling stuff and not buying anything new for the project.

I am not totally sure how the idea came to me, but in thinking of what might be used as the ring to attach and stretch the mandala I had an AHA! moment.

Aren’t these fun!?

Believe it or not, the rings are the rim cut from one of our endless supply of huge coffee cans from Costco.

And while the edge of the rim is the choice piece. you can get other rings from the lid too.

The inner rings are quite flat and less rigid, but they do more or less work.

I have also experimented with other plastic lids, like these from Pringles:

Quite small, those.  I have a tub of Fage 0% Yogurt in the fridge and that lid is just about CD size so looking forward to seeing how that works out.  I did crochet and add some mandalas to the shiny side of a CD, and covered the back with a plain white label, so I didn’t have to use two CDs back to back and crochet two mandalas and they turned out quite nice as well.

My sort of idea is to use a picture that I saw as inspiration – one that I struggle to find again.  So often the links on Pinterest that show this image don’t go anywhere or seem to go to some totally unrelated thing.  I just tried to search for the “beaded curtain” words that led me to it originally and it does not come up!  I did find a link in my search history and hopefully it will show up here:

If I wanted to make this to go over a shop door, for example, it’d be pretty expensive to buy the rings. But a lot of those rings could work as the lid-rims.  and what’s more, I might have a line on some big rims for massive pots.  Not only cheap but using recycled things too!  Win-Win.

Bearing in mind this is all for outside yarn-bomb installations and not meant to be work for sale, I am pretty happy with where I am heading!


1 Comment

Odd bits

One of those odd bits of things posts.  Firstly, remember I ordered a set of 11 Tunisian crochet hooks from China, via Amazon?  They cost about £3 (with shipping!) so I didn’t have high hopes.  When they came, one of the hooks was missing its top:

missinghook

I contacted the seller and asked for a replacement.  They offered me 50p off.  I said no thank you, I wanted the hook.  They warned it could take a month, and I said fine and forgot about it.  Yesterday the package arrived.  Now, I have no idea wh this keeps happening to me, but rather than getting JUST the thing I wanted – one 5.5 mm Tunisian crochet hook to complete my set, I got nearly ANOTHER COMPLETE SET.

2missinghook

I say “nearly” because it DOES contain the hook I needed to replace the broken one, the 5.5 mm, it has all the other hooks in the set as well, EXCEPT the 4.5mm hook!  So for £3 I got 20 hooks.  Can’t complain about that, but not sure I need duplicates of all of them.  I might offer them to my crop ladies, see if any of them are keen to try Tunisian crochet….

My MIL is such a wealth of info on all the “womanly arts” – sewing, cooking, knitting, crochet, quilting… I always have a handful of things I set aide to ask her advice one.  She grabbed my socks, the ones I’ve mentioned before, that needed only the grafting of one toe to be wearable, and sorted it for me in seconds (including, to my dismay, repairing moth holes, I’d let them languish for so long) and completed a shawl, then knitted another one, blocked and mailed it off, then knitted another one.  All in less than a week.  She confirmed my decision for the binding fabric for one quilt (phew) and gave me a great tip for the socks I decide to cast on so I could be making one and get all her tips for sock knitting while actually knitting a pair, so I’ll hope to remember them.  We popped in to Tiger on a trip in to town, and I scored some cute yarn for £1 for a 50 gm ball!

sockyarn

I wonder if I can trick DS into thinking they are shades of grey?  I may need to pop in and grab a bit more.  And see there in the corner?  £1 washi tape too!

papertape


I was rushing, and the rolls were all higgeldy piggeldy on the rack and no time to look at all of them, but the B&W dotty one was ALWAYS going to be useful so I grabbed it.

They are off on Thursday and we have a packed full last few days so all I can say is you’ll see me when you see me….


13 Comments

No-roll Tunisian crochet TSS

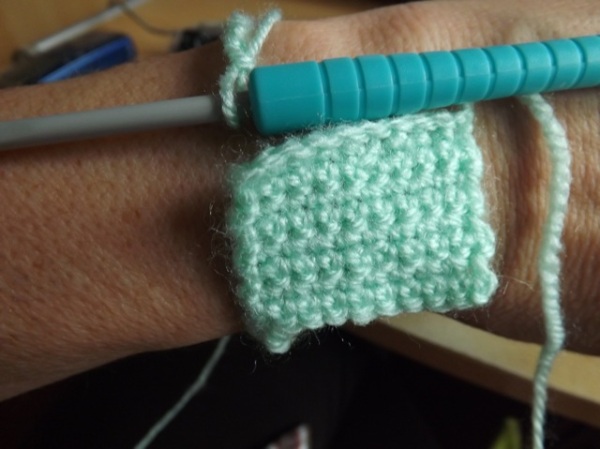
I first tried Tunisian crochet probably 20 years ago – or close to it as it was when DS was a baby and he’s coming up for 22 .  It drove me crazy, the roll.  I read about it a LOT. tried so many things to make it NOT roll and in the end I just gave up on it.  When I was decluttering I found two Tunisian crochet hooks mixed in with my knitting needles.  Times have moved on a lot, and nowadays it is pretty easy to get to grips with a new craft by watching You Tube videos and reading online tutorials.  The one things I kept seeing was that picking up the foundation loops thru the “bump” would minimize the roll. It does, a bit, but not enough for me.  I watched a LOT of videos.  To be fair, they tended to be after midnight and after a LONG day of cleaning, but still…

Let me just show a few samples. This is the standard Tunisian Simple Stitch – please try to ignore my crappy left edge.  I just cannot seem to get the hook in the right place to make it looks just right.  It’s my next thing to tackle. Anyway, you can see the bottom edge, and the side of the base chain, inserting the hook into the middle of the chain.

StandardTSS

tss

The roll is perhaps the most pronounced with this basic method.  Ever wonder why a lot of the TSS photos include, as mine does, fingers holding the edge down?  Cause when you let go, this is what happens:

2StandardTSS

DOH!

Method two is to insert the hook into the “back bump” of the chain.  This page has as good a tutorial as any so have a look – and note the fingers…

That is what I did for this small sample:

bumpTSS

I really like the edge, with the knit-like stitch on show. While this is mean to decrease the roll, when I let go….

2bumpTSS

It could be in part me and my tension – the right side does roll more than the left and the left is pretty flat but it still isn’t totally flat. Plus I find keeping the chain in position and inserting thru the back bump every time hard.  Old eyes and all that…

OK now this is the technique I discovered – first look at the three samples, all done with different colours of the same yarn brand (also probably 20 years old, and a cotton) all on the same hook.

compareTSS

I’ve lifted the hook up (Look Ma! no finger death grip!) and as you can see the middle-of-the-chain insert version rolls (pink, left) and the back-bump insert version rolls (pale blue, right) but what’s this??  the middle one is flat and hands free? But how?

I’ll do a zoom in on the photo but although I bought new rechargeable batteries for my camera they aren’t actually charged up yet, so the zoom on the above photo isn’t as good as a macro shot of just the middle swatch would have been had my camera not died. Sorry about that.

4SCfoundationTSS

But I think you get the point. I wish the batteries had held out for a few more shots but I hope these will be enough for you.

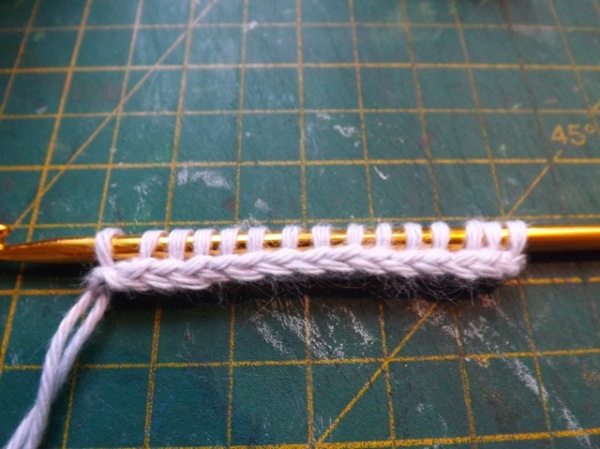
The trick is to start not with a chain, but with one of the no-chain single crochet foundations, on a slightly smaller hook like so:

SCfoundationTSS

Switch to your regular hook size and insert BETWEEN the two “rows” of stitches – like so:

2SCfoundationTSS

I wish that were a better shot – you want the full V-shape along the bottom edge, so it looks like this at the end:

3SCfoundationTSS

It will look very much like the back-bump front edge.  But the roll is going to be minimal – not NO roll, but very very little.

I think how loose or tight you hook will matter at least a bit, so try it and see – play around – you may not need to go to a smaller hook, or maybe a BIGGER hook will be better.  What I do know is that, at least for me, doing the no-chain SC base then switching to the TSS works a treat – it’s easy to do and looks good.

There is another technique which is very good – see it from Mikey at The Crochet Crowd.  The Getting Started video shows the back-bump forward/normal reverse/TPS (PURL) forward on the second row.  It does work pretty well to even out the tug of war between the rows that causes the roll  but I just found it really annoying to do.  Even Mikey stops the video so he can complete the row off camera.

I am to the point where I am doing cleaning that needs doing but I hate (like washing curtains and washing summer duvets, ready to store) and this isn’t something I’ll come back to for a while, I fear, so this post is as much for me as anyone else…lest in a month, when our guests leave, I forget everything I learned

{wink}


6 Comments

Crochet circles – little bits of time

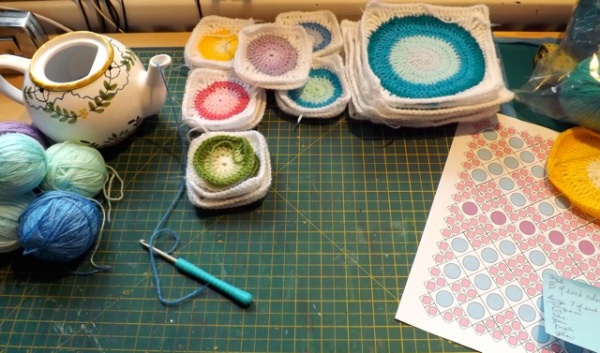
My window of opportunity to get every nook and cranny of the stuffed-to-the-gills house sorted and de-cluttered is closing.  But even so I feel I need to make a little time every day to do SOMETHING crafty.  It might not be much but it has to be SOMETHING.  The key is it has to be easily contained (cause the last thing I want to do is create MORE mess so soon) and something that can be done in small 10-20 minute blocks of time.  Making the smaller granny squares seems perfect.  I changed my mind, opting to design my own pattern for the two sizes of blocks, rather than simply copy the original.  You can see my design there to the right

grannies

The larger squares aren’t going to be just the two colours, and the smaller ones not all the same, obviously, but the basic design  is there.  And as I am using a mix of larger skeins (but only a few bought specifically for the project) and small balls of leftover yarn from in some cases quite ancient projects, I got a bit fed up with those small balls rolling al over the place.  I recalled seeing old 2-litre plastic drink bottles used to corral rolling balls of yarn but we just don’t drink those sorts of things.  I remembered reading about yarn bowls so had a look.  Didn’t take much to see an image that had all the info I needed – having sorted thru the occasionally used ceramics cupboard, and retained just ONE teapot, there was my solution

2grannies

The ball rolls around inside the teapot and the yarn comes out the spout tangle free.  Better for the outside rounds, cause hardly worth the effort when doing one round of 12 stitches, for example, but still….I have another idea I might try to set up with a couple of other things I found kicking around.  One thing about mindless cleaning, it does leave your mind free to roam….


1 Comment

Crochet hook roll

I found my crochet hooks (YAY!) and as I had duplicates of most sizes. I decided rather than putting all my hooks in one basket, as it were, I’d make a quick little roll to store them.  I figure I may lose track of ONE of my storage devices but it’s unlikely I’ll lose track of BOTH of them LOL!

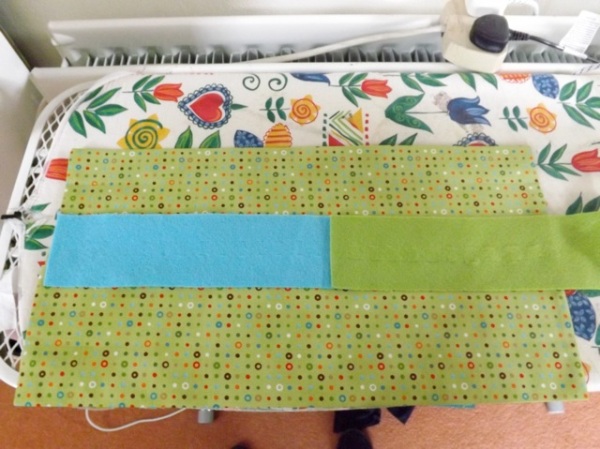
Pretty simple, actually.  I found a tutorial online for one made from felt, a no-sew version that is actually designed for storing coloured pencils. I sort of adapted it, adding some sewing.  I used a 3 inch strip of felt for the hook storage part.  Cut the felt slits first, using some ruler tape I got from the local discount store.  For the smallest hooks I used a 1/2 inch measure and about 1 inch for the super fat ones:

crochethooks

I took an 18 x 22 inch fat quarter and folded the edged in.  I left about a 2 inch gap in the middle.

2crochethooks

I sewed along the open edges.  With the gap there was no need to leave a gap on the edge to turn it right side out!

3crochethooks

I laid the hook strip over the gap and sewed that to the fabric.  I added a fold of ribbon on one end to create a tie.

4crochethooks

7crochethooks

You can see the hooks fit with plenty of room top and bottom, so I was able to fold over those edges.  That will just contain the hooks so they can’t escape!

6crochethooks

I sewed the bottom in place but added Velcro to the top part.  It might have been OK to sew both folds down, really, but it might have made getting the hooks at the ends out of the roll a bit harder.

11crochethooks

All tucked in to place- but before I sewed the bottom in place.

10crochethooks

and rolled!

12crochethooks

Nice and compact. Slipping the hooks in to place isn’t as easy as if I had sewn in in a strip of elastic then sewn channels into it, but it’s not really difficult. Slipping them OUT is no problem at all.  I’m always losing track of my weaving in needles so I stuck one of them in there as well.

Easy peasy and really took only about 30 minutes to create! Now, DD is home today and we’ve done the movie thing but she wants me to figure out the written instructions for a loom bracelet (DOH!  And I thought I had managed to escape the craze – apparently not….) so I’m off to do THAT.  Typically she didn’t pick the easiest pattern for me to figure out. Off to YouTube I think…

{sigh}


3 Comments

A different sort of crochet bracelet – Cloud knot

Firstly, apologies to my followers – I stupidly had a spelling error in the title of yesterdays post.  I corrected it, and the slug (the thing that is made up of the title of your blog post and creates the URL link, more or less, ) but that happened seconds after the post went live.  And in computer terms “seconds” might well be YEARS.  The email to followers had been sent, but when you clicked the link  it would have taken you nowhere.  I figured if you saw the email and the synopsis was of interest, you’d have been able to get there eventually.  In future I’ll first be more careful about spelling in the title or if I edit the title, I won’t edit the slug.  I did at least two monumentally stupid things yesterday and this wasn’t the stupidest, I assure you.

There will be a few links in here, tracing my meander across the internet and how this came about.  First the bracelet:

icordknot

This is made from a crochet i-cord in two colours.  The “clasp is a button and loop.

2icordknot

The sizing is easier with a single colour.  What I would suggest is you crochet the i-cord as long as you need – and this one for this knot was about 20 inches – then pull a scrap of yarn of another colour thru the three loops on the hook.  Once the knot has been made, sew the loop on the beginning end then lay it over your wrist to get the size right.  Just unravel the end of the cord then pull the tail thru and weave in the ends to finish it off and sew on the button. Start off with about 16 inches for a very fine wrist or maybe 18 for a larger wrist, then try the knot and see how close you are.  Mine was about 20 inches and I did have to unravel an inch or so.

Now the links.  I saw this bracelet using a KNITTED i-Cord and I thought it was cute.

So I went looking for a crochet i-cord.

And I found THIS.  But OMG – I am completely incapable of the whole drop-two-loops-but-hold-on-to-them part. She is clearly more adept than I am or has younger, nimbler fingers!  I kept losing one and then it would unravel and trying to pick the stitches up again was doing my head in.  Sure, I could have found however many double-pointed needles (three or four, I forget) I would need and KNIT the i-cord but that’s not what I wanted.   After fighting with it for far too long I took a step back and thought how I could keep track of those loops and my sanity.  The double-pointed needle was the key.

This does make a slightly looser cord, but if you can manage to use a smaller hook than the yarn actually requires and make sure you tighten up the tail when the two loops are on the needle, it’s tight enough.

Start the crochet as she says, Chain 3 then pull up a loop in each of the first 2 chains – 3 loops on the hook.

3icordknot

Her instructions say “drop the first two loops but hold on to them”  – yeah, right.  If you can manage that it’s a lot easier!

What I did was slip the double-pointed needle (or a short, thin knitting needle, the double-pointedness doesn’t really matter) into the first two loops and scoot them off the hook.  I found I could hold both the yarn and the needle like so:

4icordknot

The first stitch is to chain in the loop on the hook.


I did that behind the needle.  Make sure you tighten the tail so the loops on the hook are SNUG but not massively tight.

5cord

The next step is to chain in each of the other two loops.  She slips them BACK onto the hook but I found it easier and faster to slip the hook into the stitch on the needle, BEHIND the needle, then work the chain and THEN slip it off.

6icordknot

and then repeat with the final loop

7icordknot

The slip off the first two loops and repeat until the i-cord is as long as you need it to be!

8icordknot

9icordknot

You can see it looks just like a knitted i-cord, if ever so slightly looser.  Maybe.  I didn’t knit one for comparison as that would have required me finding MORE double-pointed needles!

And funnily enough when I was writing this, in going back to look for the link to the crochet i-cord so I could add it,  I found ANOTHER link that does almost exactly the same thing I show here! So not a new idea.  She does slip the loops back on to the hook the do the chain, but otherwise it’s pretty much the same thing.  Nothing new under the sun….

While I liked the original knot, the cord I made was pretty long so I went looking for other sorts of knots.  And I found this one, which is cute and slightly more complex.  And THAT is the knot I used.  Because it is from a single cord and not two, there isn’t the double side strands like the original one I saw – it’s a thinner bracelet and doesn’t need to be tied on.  Pulling it on and off that way stretches the yarn too much, I think.  And overall this knot seems flatter on the wrist.  I am dying to try it with the smooth, slightly shiny WI yarn – I think I have soft and cuddly but they also have a soft and shiny (?) version that I didn’t buy.  Have to check my stash and see if I have something similar, or get some, cause the less wooly, smoother yarn might make for a better (and certainly more summery) end product!

How’s that for a meander across the net? Pulling together knowledge from various crafters to create something inspired by them all, but at the same time, new.  MAYBE.  Who knows,  if I took more time to look, that I wouldn’t find someone else out there who did EXACTLY the same thing?


2 Comments

Crochet braid bracelet

Really, it is BRAID not BRAIN – DOH! Corrected, but not sure the email link will work as a result if the slug is edited.  Sorry.

If you read here at all you are aware that it only takes a stray comment to set me off on a quest.  At crop a few weeks back, Julia’s mate Ally showed a photo of a knitted cable bracelet, and said she wanted one.  She doesn’t knit, so I said, Oh, I’m sure if you Google crochet braid bracelet you will probably find one for crochet that you could do instead. Yeah. Right. Famous last words. I DID Google it and I DID find a fair few versions, but I didn’t like them.  You might, but to me they all support the comment knitters make, that crochet is gross – and by that I don’t mean gross as in disgusting but gross as opposed to fine.  They all seem to use a combo of front post and back post triple crochets (UK double treble I think) that just don’t appeal TO ME.

I had an idea that I thought would work but it took me a while to sort a pattern.  Do please remember I am not a professional crochet gal, nor am I experienced at writing patterns.  I hope I have made it clear, and the instructions suit ME but might not be exactly like a professional pattern.

The method is crocheting three long fingers, off a base block, then plaiting those fingers then joining them to carry on with an ending block.  It looks like this:

11crochetplaitbracelet

What I like about it is that the parts are clearly defined and maybe a bit finer than the FP/BP combos, which are pretty thick and a totally different look.

I used a US D/3 (UK 3.25 mm) hook and Baby weight yarn.  It was a scrap and the ball band is long missing, but that is my best guess. The pattern is written in US crochet terms so for UK folk:

SS (Slip Stitch) and Chain are the same in both, so far as I can tell.

UK stitch termsdouble crochet (dc) USA stitch termssingle crochet (sc)
half treble (htr) half double crochet (hdc)
treble (tr) double crochet (dc)

Pattern

Initial Block:

Chain 10

SC in 2nd chain from hook and across (9 SC)

Chain 1 (turning chain)

repeat this row till the piece measures about 1/2 the width of your wrist, ending with a WRONG SIDE row

crochetplaitbracelet

You now have 9 SC or three 3 SC groups

The Braid – this is composed of three “fingers” – the italic stitches are worked on the base, the chain up  and DC back works the fingers.


 SS in the 1st stitch

Chain 20 – 30

This might be a bit of trial and error to begin with and will depend of the weight yarn you are using, how tight you want it in the end,  as well as how big your wrist is.  As a general guide, the chain should be long enough that when you wrap the piece around your wrist, the end of the chain will meet, or very nearly meet, the beginning chain of the SC block. (astute UK viewers ignore the hook – that was a photo from a previous sample )

2crochetplaitbracelet

DC in the 2nd chain from the hook back down the chain.  BE CAREFUL not to let the chain twist.

HDC in the next stitch of the base

SS in the next stitch

That was worked over the first 3 stitches of the base

Repeat for each of the two 3-stitch groups left

3crochetplaitbracelet

Break off the yarn with a LONG tail and pull the tail thru the loop on the hook to finish off.

Braid the three fingers, just like you would plait hair! Don’t pull the plait tight, and keep the two ridges on either side of the DC flat and upwards.

4crochetplaitbracelet

You MAY prefer to make the back of the piece the front, if you prefer the smoother look of it.

5crochetplaitbracelet

Thread the ends of the fingers onto a knitting pin to keep them from moving around. You can see that above.

Chain 2 with a new strand then SC in the 2nd chain from the hook.  Working with the WRONG SIDE facing, 2 SC in the end of the first finger. You are working in the SIDE of the DC at the tip

Chain 1, 2 sc in the next finger, Chain 1, 2 SC in the final finger, Chain 1 (turning chain).  You should again have 9 stitches across the base and your turning chain on the hook.

You can now remove the pin! Sorry, I think I missed taking a photo of this step but you can see the result in the final piece. This joins the separate fingers into the plait/braid and “locks” them in place.

SC across in each SC and Chain 1 space (9 SC)

Chain 1 (turning chain) then SC across (9 SC)

repeat this until the end block meets the initial block when wrapped around your wrist, then do two more rows.

Sew a button( or buttons) on the initial block

SS in first 3 SC, chain 3, skip 3 SC, SS in final 3 SC for one large  button

OR

8crochetplaitbracelet

SS in first SC, chain 3, skip 3 SC, SS 5th SC, chain 3, skip 3 SC, SS in final SC if using two small buttons

Test the fit before breaking off the yarn.  If it is too tight, just pull back the final row with the loop/loops for the button/buttons and carry on with another few rows of SC. When you are happy with the fit…

Break off yarn and pull it thru the loop on hook to finish

Making up:

As this is going to be worn and probably washed weave in the ends (all but the long tail one) but double back on yourself a couple of times to make sure the ends are secure and won’t work loose.

7crochetplaitbracelet

This is optional – if you want to make sure your braid doesn’t twist around in the wearing, weave in that long tail loosely but take it all along the back of the braid, catching the loose fingers and securing them in place.

9crochetplaitbracelet

Again, double back on yourself a few times to really secure it.

10crochetplaitbracelet

My first attempt was with a slightly thicker wool (DK I think) and looks like this:

15crochetplaitbracelet

And I did a CHUNKY version just to see how it looked.  Might be TOO chunky, not sure.  Def. too chunky for a hot summer day LOL!.

13crochetplaitbracelet

Maybe you can see it better here:

14crochetplaitbracelet

So there you go.  It is def. DIFFERENT to the cable bracelets Ally showed me, but I think it has a charm of its own.  And def. works better for crochet, even it is it a fairly bizarre construction.  If you make one I would sure love to know if the pattern made sense to you and to see your bracelet.  I wonder if Ally would deem it good or a disappointing crochet version of a knitted project.

BTW I think this would make a cute headband as well, just by making the beginning and ending blocks longer and at least doubling the chains that make the fingers, then  adding a chunk of elastic between the two ends.


3 Comments

The Crochet calendar frame

Bearing in mind I am not a crochet-pattern writer and that often I am sort of winging things, I’m going to try to explain how to make the crochet frame.

What you need:

  • piece of mat board – I wouldn’t suggest covering chipboard as the hook going thru the holes will probably “distress” it.  Mat board, in the colour of your choice, is going to give you a better finish
  • crochet hook – sorry, I simply cannot find my zippered folder of hooks.  The one I have that works is marked 0 but it is one I got from my great-grandmother and I have no idea what that translates to in current marking terms, US or UK.  Let’s just say it has to be small enough to fit thru the hole
  • yarn – although it isn’t really right for this small hook, the yarn I used was DK and sock yarn.
  • hole punch strong enough to punch the chipboard.  The smaller hole of a Cropadile is perfect
  • yarn needle

1.Rather than sending you back to the instructions for cutting the frame, I will tell you that mine measures 6 inches wide x 6 1/4 inches tall.  Measure in 3/4 inch from each side and cut the centre out.

crochetframe

2. On the reverse, draw a line 1/4 inch in from the top and two sides.  I didn’t want the bottom edge to have the crocheted edging (I’m making some flowers to add to it) but you can carry on all around if you prefer.

2crochetframe

3. Mark every 1/4 inch all around the edge.  If you match mine, that will give you 22 holes to the first corner, 23 holes across the top (including both corners) and 22 holes down the other side.  Mine stop short of the bottom edge.

4crochetframe

Now I think you can appreciate that it is impossible to take a photo of crochet yourself.  But the first “row” is accomplished by holding the frame with the back facing you, holding the yarn as normal, behind the frame.

also bear in mind I may live in the UK but I am American.  I crochet American.  If you crochet UK:

  • US Single crochet = UK double crochet
  • UK Double crochet = UK treble
  • I think a chain is a chain either side of the pond!

Row 1

For the FIRST hole ONLY: Insert the hook, and pull up a loop thru the hole.    Catch the yarn AND THE TAIL behind the frame OVER THE TOP edge of the frame and pull thru the loop on the hook. Drop the tail. Chain 1. That just secures the tail a little till you can weave it in at the end.

For the next and all further stitches, insert the hook thru the hole, yarn over and pull up a loop thru the hole, yarn over (two loops on the hook)and pull thru both loops on the hook. 21 stitches will take you to the corner hole.

Yarn over, pull thru a loop then pull thru both loops on the hook 3 times in the corner

Repeat the basic stitch across to the next corner (21 stitches) then yarn over, pull thru a loop then pull thru both loops on the hook 3 times in the corner

Repeat the basic stitch down the other edge.  (22 stitches)

Row 2

Turning the frame over so the coloured front is facing, single crochet in each stitch to the corner (23), 2 sc, single crochet to the next corner (23), 2 sc, then sc to the last hole (23)

Row 3

I joined a new colour but you can carry on with the same one.

Double crochet in the first stitch. Skip 2. 5 DC in the next stitch, skip 2.  Repeat the the first corner (7 shells)

7 dc in the corner. Skip 2. 5 dc skip 2 to the next corner.  (7 shells)

Hope I got that count right – it’s a basic shell stitch/scallop but I’m sure there are other clusters-type edgings that can be made to fit.

7 dc in the corner. Skip 2. 5 dc skip 2 to the next corner.  (7 shells) Double crochet in the final stitch.

Weave in the ends.

To fill those gaping holes that need to be there for the hook to fit thru, thread your yarn needle with a matching, or contrasting, yarn and do a straight stitch thru each hole.  When you get to the end, go back the other direction

2015crochetcalendar2

I used a double strand, to really fill in the holes. I think you could use thin ribbon or cord instead, for a different look.

when DH gets home I may see if he would take a few photos to help you see it more clearly, but I’m guessing if you do crochet to begin with this will make sense – and if you DON’T this is probably not the project that is going to get you to take up hooking… {wink}

Have fun – and if you do make one, be sure to share it with me via a link in your comment or by emailing me a photo – pretty please?  I would love to see it.  and if you DO send a photo, LMK if it is OK for me to share it on my blog.