scrappystickyinkymess


5 Comments

Product review – Stick It

One of the UKS sponsors, Craft Obsessions, has a new product called Stick It.  The blurb from their site really says it all:

Stick It has been specially formulated for intricate die-cutting and electronic cutting machine applications and will remain repositionable for a period, becoming permanent over time.

It’s paper-thin and easy to use.  When applied to your cardstock or paper ahead of die-cutting, Stick It coats a uniform layer of adhesive to your intricate die cut shapes more easily than ever before.

I got a pack to play with, and have only scratched the surface of what I can do with it. So far, I am liking it a lot.  I recently got a few Memory Box dies.  I love them, but they are so fine they drove me CRAZY trying to stick them.  I had some rub on adhesive dots, but they seemed to get everywhere and had to be rubbed on after cutting.  What I like about Stick It is you add the whisper thin adhesive with the protective release paper still in place, THEN cut the die.  And of course my first thought was letters – it was always going to be letters….

stickit


These letter are the ones I cut more than any other. I love the font, the size, and now I have the new and improved version, how easy they fall out after cutting. But let’s set aside the letters for a moment and look at another property of Stick It – the fact that is stays repositionable for a time then becomes permanent.  What does that mean? Well for a start, once I had cut those letters, I could poke them all out, and the entire back of the waste was ready to stick.  Perfect to use as a stencil, and with the sticky on it, less spray ink soak-under

2stickit

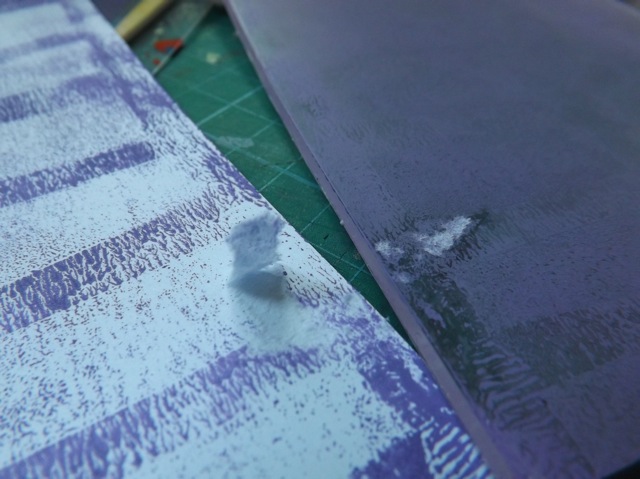
OK, I did say LESS, not NO soak under.  I tend to be a bit heavy-handed with my spraying and tend also to do it far too close.  Blame me, not the product.   That bit of card was very pretty.  But I also liked the edge where I protected the desk

3stickit

This is interesting – it is a pretty thin sheet of printer paper.  Normally, waste paper or at best to be torn up for collage.  But I don’t do a lot of collage, so it might have gone in the bin.  On a whim I added a scrap of the Stick It to the back and die cut that thin paper with that super delicate die.

4stickit

And it both came out of the die and the backing peeled away better than I could have hoped.

5stickit

I have never been able to cut such thin paper and have something useable at the end before.

I just stuck it on a card blank – I’ll use it at some point but not today

6stickit

Then I cut another super fine flower.  In the back of my mind I was thinking how I might conserve the product – could I add strips across the back rather than cover every bit?  I was looking at the flower and at the bits that are meant to fall out and get tossed in the bin. I was glad then I DID cover the whole piece because, taking advantage again of the repositionable properties I could use the die cut to place the waste and create a whole other motif.

7stickit

Then, lifting away the die I could make it stretch even further – again, because I covered the whole of the back – by sticking it to the edge, trimming, and adding the trimmed bit elsewhere.

8stickit

Without the all-over stickiness I would never have dared stick such fine cuts to the EDGE – that would be just tempting fate for sure. But because Stick It gives total coverage the die is secure. The final card is made up from all the bits

9stickit

There is a tag on the front that is raised over the are it was cut from.

10stickit

There are a couple of points to note – first, there are three crack&peel lines across the sheet I  have (the smaller size) and this is essential.  I have had peel and stick sheets before, and they were a pain to peel away to reveal the adhesive.  These peel points mean you are unlikely to end up with a piece you just can’t peel away.  But to be honest, I suspect it wouldn’t be an issue anyway – also worth noting is when I wanted to peel away the backing from the small letters, it came away quickly and cleanly with a little nudge of my fingernail.  A pin or pokey tool would work too.

Stick It is also meant to work with electronic die cut machines.  I am keen to try that too, but this is already quite long and my blade is quit dull.  I may take the plunge anyway but I have another thing I think you will like queued up for tomorrow so it won’t be till after that.

The review was not requested.  I just liked the product well enough to pass on the info.  I would buy more.  And what I’ll show tomorrow is MY real reason….


6 Comments

Creative Palette with pigment ink

I had a further play with the Creative Palette with acrylic paint the other day, and my results, no matter what I tried, were equally disappointing.  I tried a prussian blue chalk ink on it, thinking inks might work, but it stained the circle very BLUE and nothing I did would remove it. I stuffed it in the sleeve and on the shelf and decided that I would waste no more time with it.  I was going to blog all the things I tried but then I thought Why bother? I’ve already said it was an epic FAIL for me and nothing I said was going to expand on that.  But then an odd thing happened – I turned on the TV at just about 6 pm, ready to set up a recording for DD and the TV happened to be on Create & Craft.  Odd, cause I haven’t watched it for DAYS.  In the seconds before it went off the air on Freeview I noticed mention of CREATIVE PALETTE!  I went to the website to watch the show, which had been on at 3 PM, I think, and watched the bit where the guest demoed the CP with Crafter’s Ink re-inkers.  Crafter’s ink is just pigment ink that can be heat set and becomes permanent.

A dim memory surfaced.  I had a handful of little bottles of pigment ink re-inkers that I swear I bought 20 years ago, most of them had never been opened.  I dragged them out and sat down to have a play.

Creativepalettepigment

One thing the guest mentioned was that she brayers on some hand sanitizer first, then adds the pigment ink.  I did do that for the first few ones, but to be honest in the end I mostly skipped that step – the pigment ink stays wet enough without it.

It worked.

3Creativepalettepigment

That is a couple of colours, with one of my Gelli Plate anaglypta wallpaper samples pressed in to it then the print pulled.

Very Gelli plate like! But with pigment ink not paint.  Softer, chalkier.  Pretty. But worth the effort?  Maybe.

So then I tried a stamp. In general my success was only with removing the ink on the palette and letting the lighter/white space do the talking:

5Creativepalettepigment

This was a big, rubber background stamp. The tone-on-tone look is OK, I just wonder how worth it it is.  Could I get close enough to a similar effect by just stamping?

Foam stamps really remove the ink – not ones that are caked with paint from Gelli play, but fairly clean ones:

6Creativepalettepigment

The was probably the last one that I used the hand sanitizer first.  I think that and the too heavy layer of ink muddied the print too much:

7Creativepalettepigment

Still it was mildly interesting. A MUCH thiner layer of ink now, but I didn’t clean off the blue.

8Creativepalettepigment

I really liked that one.  And this one – more blue over the top, big bubble wrap, and you can still see the foam stamp impression.

9Creativepalettepigment

One of my favourites for sure.   Another foam stamp cut from one of the Die Delights.

13Creativepalettepigment

I thought I could brayer on the pigment ink from an ink pad, so I did – this is one of those multi-colour strip pads. It is very light, and as the bubble wrap still had wet ink on it I pressed that to the palette to transfer the ink for another layer

12Creativepalettepigment

Keeping the brayer in position gave me a rainbow effect when I brayers the ink on.  It is a bit more vibrant than it looks here.

I tried brayering on gome mossy green then stamped over that on the palette with some copper:

14Creativepalettepigment

Again, the photo doesn’t do it justice, but why not just brayer the ink onto paper then over-stamp?  The palette really doesn’t ADD anything to the process, except for a slight more…atmospheric look, I guess.

I then HAD to try a stencil.  I still felt that HAND CUT (so much thinner) stencils would give a better impression and they did, but still not what I would call sharp and defined.

10Creativepalettepigment

You maybe can see I first ran one of my foam shape rollers over the plate to give it some added interest.  Again, the stencil was loaded with ink so I pressed that onto another earlier attempt that wasn’t brilliant – I think I tried something I thought I heard on the show, which was that hand sanitizer would re-activate the ink.   I brayered it on over some leftover ink after that first, very un-defined foam stamp print and that gave me the background you see here:

11Creativepalettepigment

And that one was REALLY cool.

So here is the array:

15Creativepalettepigment

Some maybe worth keeping (probably great for ATC backgrounds) but I am still not convinced this is something I am going to do a lot of.   Oh, I just noticed – that single foam stamp towards the right?  Between the blue and bubble one?  Fo THAT one I simply pressed and small pigment ink pad onto the palette.  The pattern of small overlapping squares was neat, and def worth playing with.

Final thoughts on this?

  • if you are using re-inkers keep he application light – small dots of ink scattered across the palette.  Hand sanitizer first will help a think layer cover.  Too much ink produces a blotchy impression
  • removal tools (foam stamps, rubber stamps, textured wallpaper samples, combs, etc) produce the best images
  • you can brayer on or press on an ink pad rather than droplets from re-inkers but you will get a lighter colour.  AND if pressing on use ONE colour or yo will cross contaminate your ink pads.
  • stencils are best f ones yo cut from thin material – so far.  I really need to try a thick one again at some point to be sure.
  • do press whatever you used to REMOVE the ink back onto a print or even onto the ink on the plate.  Those are def. my favourite effects.
  • acrylic paint is CHEAP – I don’t think re-inkers are.

One BIG warning is keep in mind pigment inks dry super slow – that’s their benefit for embossing, for example.  But you have to put the prints aside to completely dry for a LOT longer than you would do with a print from paint on the Gelli plate.

I might try Distress ink at some point, but as the Chalk ink so badly stained my plate (but made NO DIFFERENCE and did NOT transfer to future prints) I’m kinda afraid it might end up brown and opaque at some point if I carry on.  The jury is still out on this, for me.  Except on one point – do NOT buy this thinking it will work anything LIKE a Gelli Plate.  It doesn’t. Well, maybe if you take the added step (and expense) of adding Flow Medium to every application of paint, it might, but I just don’t see the point when a Gelli plate doesn’t need that and works for paint better.

But at this point I can’t say the Creative Palette is a TOTAL FAIL.  That’s as far as I am willing to go at this point LOL!


47 Comments

Stampendous or Gelli? Monoprint plate comparison

This product was NOT provided to me to review – I bought it with my own hard earned £s.  Not that that fact would matter to any review, but I would have been happier if I hadn’t paid for it LOL!

I was quite excited when I saw there was another “gelatine” plate on the market!  It was a bit cheaper than the Gelli plate, and thinner.  It was the thinner that really got me excited.  Cause I was hankering after a round plate, and then after the smaller sized ones, and I immediately thought I can cut that! And indeed I could.  And did.

stampendousCP

I started by cutting some paper shapes to check the size, although in the end I got more than my first plan.  I got:

  • one  6  x  4
  • one  5 1/4-ish round
  • one  4  x  4
  • one  2 3/4  x  3 3/4

And looking at the scraps I had left I thought What the heck? and cut a large heart, a 1 inch circle and a slightly bigger than 1 1/2 inch circle using one of the Sizzix thick dies.  Yep. You heard me.  I die cut my Creative Palette.  And this was all before I used it for the first time.  Evidence, you ask?

3stampendousCP

This was all before I used it, cause, you see, I expected that it would work pretty much EXACTLY like the Gelli Plate.  Ha   HA   HA. The joke was on me.

Excited to have a play, I pulled a print.  I was using the Basics paint, so slightly better quality acrylic.

4astampendousCP

What? That was a simple print – bubble wrap that had a bit of purple on it, pressed to the plate.  OK so I tried the cheap craft paint, lighter body, not so quick to dry.  Better.

4bstampendousCP

OK so then I tried the craft paint and tried to pull a print thru a stencil.  WTF?!

5stampendousCP

This was NOT going as I expected.  I hopped over to You Tube to see what sort of demo videos I would find.  Found this one. What was obvious was that the techniques shown did NOT include many of the ones I love with the Gelli Plate.  So I carried on experimenting.  I tried the small shapes.  Added the paint, laid on the stencil, brayered off the paint (tried to)

6stampendousCP

Then printed with them.

7stampendousCP

Not very crisp, but possibly with some work it could be OK.

I grabbed one of my home made foam stamps and tried lifting off the paint with that – again, I’ve done this 1000s of time on the Gelli, but….

8stampendousCP

DOH!  To be fair it is hot here, but the paint dried so quickly and the plate gripped the paper so strong it tore it.

The video shows slow-drying medium, which I don’t have, but I certainly have used Glaze medium to increase the open time of paint so I gave THAT a try:

9stampendousCP

A MASSIVE DOH!

10stampendousCP

I had plenty of dried paint on the various plates so I grabbed my packing tape and …

packingtapeno

DOUBLE DOH!  I know that is hard to see but at the top left you can just about see the yellow smudge and you can clearly see the plate is still loaded with paint.

I had a look at the packaging and saw mention made that spritzing the paint with water would allow you to pull further prints.  I first tried the stencil again, this time doing the normal process – paint on plate, stencil over, thinner (printer) paper over to pull thru but gave it a bit of welly, as they say:

13stampendousCP

Then I rubbed really quite hard with my thumbnail, really pressing into the paper –  I almost embossed it, I was rubbing so hard!

11stampendousCP

And that gave me an almost acceptable print:

12stampendousCP

I then tried the water spritz, which improved things a lot – first pulling thru the stencil and then printing with the stencil removed:

3stampendouswater

4stampendouswater

Just for comparison, I grabbed my 6 x 6 Gelli plate and tried the same, with Basics paint as well – just to be fair, cause if it was the heat of the day that was causing the problem that would matter:  Nope.  Gelli plate pulled thru the stencil just fine

gellicompare

and the second pull was just as dark

2gellicompare

What have I concluded?  If you want a Gelli Plate, get a GELLI PLATE.  While I have no doubt with a little practice, and more experimentation I can make these plates work in some way, I think the unpredictability of them will make for a frustrating printing session.  I would perhaps pull the paper away more with dread than anticipation! Perhaps if I scale back my expectations I might be OK with it, but is that really what you want to do when being arty?  Expect less so you aren’t disappointed?

Why does this plate perform this way?  It FEELS different.  The surface is …firmer, I guess, and it doesn’t have nearly the give in it the Gelli plate does.  The thinness of it might be nice on one hand, but it works against it on another – when you press the paper to it you don’t feel that sense of yielding like you do with the Gelli.  I don’t think the recipe can be the same either, and I think that has to be the core reason why this was such a disappointment – it just doesn’t react with the paint the same way.   I had a lot of ideas for experimentation but the reality of it is that (as is so often the case) I, as a consumer, was lured initially by the slightly lower cost (I’ve seen them as low as about £14 ) initially, but seriously seduced by the thought I could chop it up.  In all other aspects I EXPECTED it to work just like my Gelli Plate did – and it didn’t.

So, to add to the I make the mistakes so you don’t have to …. list, I’ve tried the Creative Palette so you don’t have to. But if you have, and had a better experience with yours, please, do share.


4 Comments

Practical uses for Thermomorph – the final review

READ THIS:

One of my commenters, a qualified Electrical Technician, says:

Fire can be caused by the amount of leakage of power as it comes down the lines from the main power source in the street and what your power box dumps etc. There are 2 types of appliances in your house and earthed appliance and a non earthed appliance. Your charger for your iPod, iPhone is a non earthed appliance which means the earth that it does not use has to return to the main power source therefore leaking back into the system. If your wires are broken this leakage can happen right where the damage is and not return to it’s intended source. I am hoping you understand me here. You are forcing a leaking appliance to not work properly and causing a potential health, life and fire hazard. Please for your own sake, just chop the item and replace it with a new one. 

I don’t know if the same thing applies to USA power (two-prong plugs, lower voltage) but I would prefer to err on the side of caution and not encourage people to do anything that might be potentially dangerous.  Given that I think I will just delete the rest of the post.

=====================


Overall, my thoughts are that Thermomorph is not only useful but a heck of a lot of fun to play with!  I still have LOADS of ideas I want to try out, pairing the Thermomorph with those silicone caulk molds, and will share if and when I follow thru. I’ve done a lot with it so far, even sharing our a bit at the WOYWW crop, and I still have well over 1/2 the 500 gram tub left.  I love that it can be re-heated and reused, so there is almost no waste. I am quite sure when my review tub is gone I’ll buy myself another one – it’s the kind of thing that I would want to have around when a new idea hits me!

Product Name: Thermomorph
Price: £19.95
Size: 500 grams
Material: Polymorph granules

Thermomorph Amazon page: polymorph
Thermomorph website: Thermomorph

US readers can try this link at Amazon USA instead.


9 Comments

Thermomorph and homemade Alcohol inks

I have wanted to try making alcohol inks for a while, and when I found 30 little dropper bottles on Amazon (cost? 1p with £2 P&P from China!) it seemed like the right time.  I had a bin of old Sharpie and Bic markers, some which were a bit dry or the nibs were a bit mangled.  As I use my Copics for the little colouring in I do, these were taking up space and not getting used.

The Amazon order came in a little over a week, but I was QUITE annoyed to find they neglected to include the dropper part of the lid!

31tq700oK7L

Now I’ll have to wait another week for them to arrive. But I wasn’t going t let that deter me – nor the fact that getting rubbing alcohol isn’t as easy as it once was – I got a bottle a few years ago at Sainsbury’s but they tell me they are no longer able to sell it, even at the pharmacy.  Haven’t checked Boots or Superdrug yet.

All you need is:

  • your dodgy markers
  • surgical spirit
  • glass cutting mat and knife
  • pliers and/or scissors
  • glass bowl
  • eyedropper bottles (preferably WITH the dropper nozzle!)

AIandTM

Rubber gloves (slim, tight fit ones) would be good, my fingers are a mess because I just held the inky tube with a baby wipe.

WEAR OLD CLOTHES AND PROTECT YOUR SURFACE

Pour a few tablespoons of alcohol into the glass pot

1. Pull out the nib and cut the pen barrel open.

2AIandTM

2. Pull out the ink tube – this is a sort of sponge, with a clear membrane around it.

Cut the tube into pieces and slice into the membrane

OK, so if this all seems like a bit of a messy pain, it IS possible to simply 1/2 fill the bottle with the alcohol,and slip the tube into it.  Let it sit for a LONG time, till the sponge goes lighter, and the alcohol is coloured, then flip the tube around and submerge the other side.  You may get a lighter version, and will have to wait and wait, while keeping the open bottle safe from tipping but if you are willing to do that rather than this more messy way, go for it! I just drop the nib in the bottle and leave it there so as not to waste that bit of ink.

3AIandTM

3. Drop all the inky bits into the bowl with the alcohol and let it sit till all of the ink leeches out and the sponge is lighter in colour. This could take 15 mins or could take an hour – depending on how much ink is actually left in the marker.

4AIandTM

Looks appalling, doesn’t it?  Like brown sludge.  That was a dark purple marker.  Look at the turquoise marker

6AIandTM

True blue.  And you can better see how the sponge changes to a lighter colour as the ink leeches into the alcohol.

4.  Using a fine tip funnel, pour it into the bottle. And you are ready to go.

I also did a pink and used the three on a felt applicator to pounce it (as you do with AIs) onto glossy cardstock.

8AIandTM

What I did find was the HOMEMADE AIs don’t mix in to the Thermomorph as well as the commercial ones do, giving an altogether lighter tint.  But I did user the commercial silicone mold that finally came in the mail to mold the large flower.  I then dipped it in the ink as it was awaiting transfer to the bottle.

7AIandTM

That is the results with the brown-sludge purple – as you can see it IS purple and coloured the Thermomorph nicely.  I think I would colour the pellets by soaking them in the alcohol ink and then letting them dry, THEN melting them.

And a word about drying time – the homemade AI dries a lot slower on the Thermomorph than the commercial version – due to it starting with 95% alcohol and having castor oil and menthol added to it maybe? – but it dries just as quick on the glossy cardstock as the branded stuff does.

Check out the commercial mold and my silicone caulk-mold version.  I really DO think mine looks as good as the commercial one – better in that it was a little shallower so the rose is flatter, so better for a card or a layout.

I also applied the ink to the previously embossed and die cut Thermomorph leaf – remember this had Archival ink swiped across the raised bits?  The AI more or less removed that on pouncing so I just swiped a bit more on after the AI dried.

9AIandTM

You can see a bright lime green soaking in the background!

So that is just about it for my play with Thermomorph.  I still have one or two “real world” applications to show you but that will come AFTER WOYWW tomorrow – I meant to do it yesterday but as it needs DH remembering to bring me something from his office, and he keeps forgetting, it’ll have to wait another day.

Just to save you the trouble of going back to a previous post, here is the info AGAIN.

Product Name: Thermomorph
Price: £19.95
Size: 500 grams
Material: Polymorph granules

Thermomorph Amazon page: polymorph
Thermomorph website: Thermomorph

US readers can try this link at Amazon USA instead. 


5 Comments

Homemade silicone molds

This is fairly quick, and only peripherally related to Thermomorph.  At the WOYWW crop I had a look at Shazsilverwolf’s homemade molds.  I used a similar, although not identical, recipe for making my own.

What I used was:

  • Silicone caulk (labelled Bathroom Sealant by Unibond)
  • corn starch
  • baby oil (in lieu of glycerine)
  • acrylic paint (craft grade, so fairly thin)

molds

You can see the selection of items I used to create the molds there to the side.  The amounts I used were equal parts caulk and cornstarch, with more cornstarch depending on the stickiness when it was completely mixed (a bit like the additional flour when rolling out dough in baking – as much as is needed to keep it from sticking to the surface!) and maybe  4 or 5 drops of baby oil.

Once it is firm and doesn’t stick to your hands AT ALL, lightly coat the item to mold with Vaseline.  Press it into the molding material and allow to dry for about an hour. I found with some things I could press then remove the item BEFORE it actually dried and still got quite a clear impression.

2molds

As you can see you do, in fact, get quite a detailed impression.

4molds

The problem is getting the Thermomorph into JUST the mold area.  It sets quite quickly so you need to press JUST ENOUGH of the Thermomorph as is needed to fill the depression.  Any that squidges out needs to be trimmed off.  And THAT is a bit of a pain for very shallow molds.  I am wondering if rolling the Thermomorph thin then pressing that into the mold, with it thin enough at the edges for easy trimming, would work better.  I also have some proper silicone molds on the way and I suspect those will work better as they are deeper.  The one that I made that worked best was a rose (deep mold)  off a bracelet from Primark.

5Thermomorphcoloring

I would say that one is as quality a result as a commercial silicone mold.  I think it may take a bit more play to get the hang of it, but certainly these molds would work well with the hot glue embellishments or  for air dry or Fimo clay – those would be easier to trim than the quite hard when set Thermomorph is.  It’s a quick process to mix up the mold material and within an hour you can start using it, so it’s pretty close to immediate gratification!  I would stress that this sort of mold is NOT food-safe, so don’t use it for cake decorations for example.

Product Name: Thermomorph
Price: £19.95
Size: 500 grams
Material: Polymorph granules

Thermomorph Amazon page: polymorph
Thermomorph website: Thermomorph

US readers can try this link at Amazon USA instead. 

As an aside, I solved the problem I was having with Safari refusing to load a number of web pages – apparently it’s not just me but a more universal problem with the DNS server  used by my router – the thing that translates what you recognize and type (blog name search, url, whatever) into the IP address of the site and sends you to it.   I was not willing to switch browsers to Chrome (which uses a Google DNS server and which seems to not have this problem) so we just added the Open DNS server to the front of the list in the router so it uses that one rather than the one provided by my ISP. Since doing that, so far I have not had a single page fail to load.  Something to think about if you are getting very slow to load pages, or lots of Server Not Found messages.  It’s unclear to me if it is specifically a Mac/Safari combo problem but if you are experiencing this, you might try changing your DNS server assignment and see if it helps.


7 Comments

Colouring Thermomorph

Here is my next post on  Thermomorph.  It is easily available in the UK via Amazon.  US readers can try this link instead. 

Today I thought I would show a few of the things I’ve tried to colour Thermomorph.

The obvious is to apply colour to the surface.  I tried a lot of things that worked.

10Thermomorphcoloring

Using the samples from yesterday, I first tried Sharpies/Bic markers.  For the first sample I coloured the whole thing with the light blue then stroked the purple over the high points.  I really liked how that worked.  The alcohol ink + metal mixatives in silver is great when you want an all-over application of colour.  For the butterfly I first embossed the piece, cut it with a deep cut die, then used the Sharpies/Bic markers and my ink spritzer tool.  I also dotted black into the debossed areas.  The last one I painted with Silkies then daubed off the colour from the raised embossed part. But all it takes is a little moisture to wipe away all the Silkies.  So not one of my preferred methods!

9Thermomorphcoloring

and the spritzed ink:

8Thermomorphcoloring

I only had a chance to try a couple of mix-ins, to colour the Thermomorph BEFORE using it.  I didn’t get too much of a mottled effect even with the surface colour, but the mix-in option gives a very smooth look.  You may have to drop your Thermomorph back into the hot water, to be able to mix it totally, but although some colour came out into the water, once it was mixed in there was no further loss.

I first mixed in some cheap mica powder (came free with a mag, maybe, can’t recall) and that gave a lovely  glow, but not like proper mica on card, more subtle and soft.

Thermomorphcoloring

I didn’t time it but it felt like the mica added in delayed the hardening of the Thermomorph very slightly.

2Thermomorphcoloring

Embossed and die cut, it makes a nice embellishment.  I swiped Archival ink over it to hit the high points and it was good.  When it dried, it didn’t wipe off.  Staz-on works too, but not Distress or Adirondack – or at least for me they wiped off even when dry.

3Thermomorphcoloring

I put the pellets in a small paint palette and dripped on some alcohol ink.  I let it dry for a bit, but even so, the ink came out in the hot water – well some of it did.  But mixing it in well I got a lovely smooth uniform and translucent colour.  Really pretty.

4Thermomorphcoloring

and the molded flower?

5Thermomorphcoloring

I also grated a bit of Inktense and mixed THAT into the hot Thermomorph.  It ended up slight mottled, but when I dipped it into the hot water again, to be able to mix it together for a bit longer, nothing much came out. The final bit was interesting, less uniformly coloured than the alcohol ink, but still nice.

6Thermomorphcoloring

I ran that thru an embossing folder of leaves, then cut one of the branches with scissors.

7AThermomorphcoloring

By dipping the leaves and middle of the stem into the hot water I softened it JUST enough to curve the leaves over a paintbrush handle and then to press the two together and make the leaves stick.  Heating the back of the flower with a heat gun helped make the join more solid.

7Thermomorphcoloring

I did try Stickles but that didn’t mix in at ALL.  I think glitter might work, but I don’t think it would ever be a very smooth and uniform colour.  Maybe glitter WITH something else might work, but I’m not sure I’d like it on its own.   Overall, the mix-in is for when you want to get messy, and the surface colouring for when you want to stay clean LOL!  The Inktense gratings and the Alcohol ink stained my fingers A LOT, the mica powder not at all, but it did float around in the air a bit.  As for the surface colouring, paint and other ink/re-inkers may work too but I just didn’t get around to playing with them. Copics or Promarkers should work, but the Sharpies and Bics are cheaper so I went for them.

I am waiting for a delivery, and once it gets here I’ll do a further review.  Once again, here is the product info:

Product Name: Thermomorph
Price: £19.95
Size: 500 grams
Material: Polymorph granules

Thermomorph Amazon page: polymorph
Thermomorph website: Thermomorph


11 Comments

Thermomorph – first review

Here is my first review of  Thermomorph.  It is easily available via Amazon.  I have a few ideas to try but rather than create one enormous post I thought I would do a few of them.

If you’ve ever use Friendly Plastic, Thermomorph is a bit like that, with the advantage that you can achieve a larger piece and that you can colour it yourself. It has many applications outside of crafting and I’ll talk about them in a later review.

The LARGE tub of Thermomorph will provide you with many, many play sessions.  For the pieces I made today I used a small scoop that holds maybe two tablespoons. Best of all, if you mess up a piece or have leftover bits, so long as you haven’t coloured them you can simply pop the hardened piece of Thermomorph back into the pot to reheat and reuse at a later date!

Turning the pellets of Thermomorph into a moldable wad is simple – it only needs a suitable container and a kettle of boiling water.  I use an old plastic food storage container – I would mark this as your Thermomorph tub (some bits stuck to the bottom) or use a glass bowl.

Let’s go thru it step by step.

My first technique is rolling the Thermomorph out thinly and first embossing it with an embossing folder then cutting it, either with scissors or with a deep cut die.

What you need:

  • tub of Thermomorph
  • hard brayer

2thermomorph

  • craft mat – or in my case two silicone cooking sheets from the £1 store

3thermomorph

  • suitable container
  • kettle of boiling water
  • tongs – ideally silicone tipped ones
  • embossing folders
  • die cut or embossing machine

1. Select your embossing folder.  The ones I really liked and the ones that are best if you don’t have a deep cut diecut machine and the thick, heavy dies, are the ones that divide the design into identifiable pieces, or ones where part of the pattern can be used. Here are some good examples:

thermomorph

2. Spoon a couple of tablespoons of the Thermomorph pellets into the container and cover with boiling water.

4thermomorph

Let them sit for about 2 minutes, till you can see the pellets go clear and clump together.

5thermomorph

Fish the wad of Thermomorph out with the tongs – I didn’t have trouble handling it immediately but you might, so poke it with your finger to make sure it isn’t too hot before committing to grabbing the whole wad!

3. Gently stretch then press the wad of Thermomorph onto the craft mat.

6thermomorph

4. Cover with the other craft mat – and if you don’t have two you can either put the wad on half and fold the other half over it.  I also had success using freezer paper and the peeled away contact paper liner.

Brayer firmly over the Thermomorph.  You want to get it fairly thin and flat.

DO NOT try to brayer over the Thermomorph with a rubber brayer without a protective layer between.  Trust me – it will take you HOURS to get the brayer anywhere approaching clean of it – ask me how I know…..

8thermomorph

See the folded over bit at the left?  The Thermomorph turns milk as it cools and hardens.  In order to get it thin you can refresh your tub with a bit more boiling water and carefully slip the piece back thru the hot water again to soften it and repeat, till you get it thin enough.  I didn’t measure it but it was thinner that the thickness of the embossing folder side.

9thermomorph

5. While the piece is milky but still slight pliable, pop it into the embossing folder – there is no right or wrong side so just get it in there and run it thru your machine.

Now, a bit about that – I only have the Grand Calibur.  I found that the best sandwich was the raspberry plate and the pink embossing or the grey base plate.  Depending on the thickness of the Thermomorph, maybe adding a shim or two. I took the tub to the WOYWW crop, where Julia had a Big Shot and that worked too.  The problem is that the thickness of the piece is going to vary from one play to another, so a few warnings:

  • start it thru YOUR machine, but as soon as you hit what you worry might be risky resistance STOP.  Your Thermomorph can be reheated and reworked, you aren’t going to “waste” it
  • have some shims handy so you can add them if you find you need them

With the Big Shot I did emboss a piece when it was harder than I would have done in the Grand Calibur and it worked fine.

6. Once your piece is embossed you can cut it.  I had no trouble, with it rolled thin, using scissors or a scalpel style craft knife, and thicker pieces cut with a box cutter. You can’t see it here but that thinner piece is a circle.  My camera didn’t seem to have saved the straight shot of it but you’ll see it again later.

11thermomorph

You can cut the embossed piece with a deep cut die, but even a very thin piece won’t cut  with thin dies, like Nesties.   You can run them thru to mark the shape then trim with scissors, if the shape is a simple one (I did a circle) but with the Big Shot (or similar) and deep cut dies you can get a fair bit of detail.  I did this piece at the crop last week but can’t recreate it at home since I don’t have that sort of machine! Here is the photo from last week – the leaf was embossed then die cut on the Big Shot and the other pieces cut with a box cutter (they were pretty thick)

2woyww260

and here are some from today’s play, which I cut with plain old scissors, albeit big ones

10thermomorph

You can choose either the EMbossed or the DEbossed side, as you prefer.

You can see from the sample above a couple of your colouring options, including a swipe over the raised areas with an ink pad, pounced on alcohol ink with metal mixatives added, and a swipe with Versamark then Pearl-ex.  I’ll be doing more on that next, and give some guidance on the type of inks that I think work best and WHEN to colour (pre- or post-melt) and how that differs.

I thought it was just the most fun! Although I was asked to do the review, and provided the product, I hope you know from past reviews that I wouldn’t give it a positive review if I didn’t like it.  And I DO like Thermomorph, quite a lot.

Let me repeat those links for you here at the bottom of this LONG review:

Product Name: Thermomorph
Price: £19.95
Size: 500 grams
Material: Polymorph granules

Thermomorph amazon page: polymorph
Thermomorph website: Thermomorph

Just to tip you off, once I test out a few colouring ideas I will get to the obvious – molding Thermomorph pieces with molds (homemade and commercial) – and show you a real-world application that I know will save us a fortune and that we will use over and over again.  Stay tuned….


13 Comments

Staedtler Gel Crayons – Gelato option?

I am determined to reign in my acquisition of new stash.  I bought a set of Pan Pastels and while I do love the look you can get with them, and love a few techniques, I also now know that they are not a go-to supply.  Given what *I* do with them, they were expensive for the use I will get out of them.  In 2014 figuring out ways to use them for MY type of crafty work is top of my list.  Having said that, there are other things, like Gelatos, where I can see the possibilities immediately.  Still, I thought I would have a look and see what cheaper options there might be.  My rational is that spending less up front, to experiment and see if the TECHNIQUES are ones I would use often,  makes sense.

A couple of things to note.  I had a LOT of Amazon gift money, so that is where I got these.   I saw Lindsay (The Frugal Crafter) do a comparison of Gel Sticks v Gelatos (both by Faber-Castell) so had a look for them first.  Amazon has the Gel Sticks but they are over £40! They have another set that is proper Gelatos, about £25 for 12. The colours are within a sort of floral palette, rather than a good basic range, to my eyes.  Critically no black, and they seem to ship from the USA.  There is an even cheaper version from The Early Learning Centre for under £4 for 6 but it’s unclear how they might compare.  We have an ELC in town locally so I may see if they have a set to try out.

Then I found these – Amazon is so helpful, showing alternatives when you are looking at a product LOL!


OK so these are the “for dark cardstock” ones but they also have a Basic set with more standard colours (some of these are a bit…neon) and a Glitter set, and the sets are under £7 for 6 pens.

Here they are:

staedtlerHard to see but for each little scribble sample I smeared with my finger UP and dragged DOWN with a waterbrush.  One set includes BLACK and one WHITE but I didn’t do samples of them.  Aimed at kids, much like the Gel Sticks, they don’t come in the shaded selections like Gelatos – but then the Gelatos shaded sets (in the UK) run in the £12 for three range.  It’s a trade-off, cheaper for the basic colours,  but limited selection.  For ME, to try this supply out, that was fine.  It may not be for you.

When I first opened them I had a moment when I thought the little tip showing was all the gel there was! That would have been a disaster.  But no – twist the bottom and the gel extends:

2staedtler


Yes, it goes back in if you twist the other way LOL!  It’s about 2 inches of colour:

3staedtler

The light has been rubbish the last week (hey, at least we HAVE lights now!) so these may not be the most informative photos but you get the idea.  I did three things with them just quickly, as this is a busy time for me with UKS stuff.  First I rubbed the gel on a stamp and stamped it.  Then I rubbed it one the stamp and wet it, for a more watercolour look:

4staedtler


Both worked fine.  But I let the gel dry for 5 minutes or so to check the water-proof properties.  If you look at the left photo above you can see the smeared areas – that was from running the waterbrush over the stamp.  Note below that running the waterbrush over the DRIED stamped image, there is no further smearing.  Once they are dry they won’t reactivate with water.

5staedtler


I had a go at just smudging on some colour and blending it with my finger.  MOST of the colours worked basically as I have seen Gelatos work, but the PINK didn’t blend out very well:

6staedtler


You can clearly see the “ghost” of the smudge in outline.  It’s marginally better if you blend IMMEDIATELY and a heavier application seems to blend better than a light one.  I want to try it with a make-up sponge, for example, to see if it helps. Also this is on not-great cardstock.  I think that may matter too.

So this is my point – yes, the Staedtler gel crayons are LIKE Gelatos, but a LOT cheaper,  and I would say that if you THINK you might like using Gelatos, you could get away with a BASIC set of 6 for about £7 and give them a go.  If you find you like using them,  the basic set won’t give you enough colour options.  THEN you can look at true Gelatos, which have shaded ranges.  BUT if you find they don’t suit you, you don’t like the effect or find you don’t go back to them again and again, well then you haven’t wasted much money finding that out! And if the ELC crayons share the same properties, £4 for 6 in a good basic range, is even better for an initial experiment.

Happy I did find something to say and to close out 2014 with my 1200th post! Happy New Year to all…..


4 Comments

Cricut Mini and Craft Room design tool – a re-cap

If you read only one of my week’s worth of posts on the Cricut Mini and the Craft Room design tool, read this one.

Would I buy a Cricut Mini?

No. Not until the price comes more in line with the price I see on the US sites of £50 (ish) with free shipping.  £120+ is just out of line for my pocketbook.

Setting aside price, What functionality is missing from the Mini that informs this decision?

The Cricut Mini can only be used with Craft Room.  I can see no way to plug-in a cart and make it cut.  There is no keypad for selecting the design. So if you buy a Mini you have no CHOICE but to use Craft Room.

Would I be happy to use Craft Room on the Mini or any other Cricut machine?

No.

Using Craft Room has some built-in issues, I have to assume by design, that limit your use of carts you buy.

  • to get the most out of it you need to register your ownership of the cart in Craft Room.  That offers huge benefits – you can use it without plugging in the cart, you can cut a design you created using elements across many carts, and your carts are always available to you, even at a crop, provided you bring a laptop or have an internet connection to use the online-only version of Craft Room. (not tested.) Plus there are the freebies Cricut provides each week.

and to update slightly, I’m told via a UKS comment that you can’t CUT with the online version of Craft Room, only design!

  • registering your cart in all probability kills the resale value of that cart.  Once YOU’VE registered it, can a buyer then register it?  Based on what I have read about a similar situation with the Gypsy, no. So only the original buyer can register the cart in Craft Room.
  • you cannot import a design from any other source (including your font library) and trace>cut nor can you export a design in anything other than the proprietary Cricut .ccr format.

I should mention that the Cricut End User Agreement for cartridges would SEEM to state that you are not allowed to sell a cart on (or share it with a friend, or cut a design for someone else, if my reading of the legal-ese is accurate):

2.6 Transfer of Cartridge and Content. You and Your users will not sell, rent, lease, or transfer, or attempt to sell, rent, lease, or transfer, the Cartridge or Content or any portion thereof (including operating a software‐as‐service, application service provider, service bureau or equivalent service using the Cartridge or Content to any other person, without the prior express written permission of Provo Craft) in any manner whatsoever.

I’m not going to comment on that other than to say I am not aware this has actually been tested in court.  But be aware of it.

Using Craft Room with an old Cricut that runs the original firmware (1.1 for sure and maybe 1.2) that lets you use SCAL (Sure Cuts A Lot – purchased before the legal prohibition on its sale) MAY force your Cricut to update the firmware, making SCAL unusable.  Once you update your firmware I am unaware of any way to revert to the older version. I have a call out for confirmation from anyone this has happened to to get in touch so I can state this is the case unequivocably, rather than state it MAY happen.

NOTE:  I can update this slightly!  a comment on the UKS thread says:

I’ve tried using Craft Room with a Cricut Create that has firmware v1.54 on it. Craft Room will detect that there is a newer version (1.65 for the Create), and gives the option to either upgrade or skip the upgrade. I skipped the upgrade, and was able to cut to the Create without any problems.

Still no confirmation from the original source to say whether the original firmware that works with SCAL ALSO offers you the option to skip the upgrade or not, although the original comment I was seemed to say with that version it upgraded automatically.

Final thoughts:

Have I enjoyed playing with the machine?  Absolutely.  Have I enjoyed playing with Craft Room.  Absolutely. Am I impressed with the ability to create my own unique stencils and stamps in addition to the usual paper cutting? Absolutely.  Why then would I not buy a Mini and buy into Craft Room??

Putting aside everything else, both the machine and the Craft Room Tool are fine, good even.  Problem is I CAN’T put everything else aside.  And the devil is in the details, as they say.

The bottom line is that the reason I have had such a good experience with the Mini and Craft Room  is because I was lent the machine  (at no cost) and more importantly access to virtually every single image on every single Cricut Cart (at no cost.)  I had the entire (impressive) library of images to play with.  Had I had to BUY every cart I used in my play it would have cost me £100s.  My pockets are simply not that deep. Had I been limited to the carts I do own (four, old ones) would I have enjoyed it anywhere near as much? Probably not.   Is Craft Room good enough to give up the increased functionality I enjoy from SCAL? Nope.

Who MIGHT want to buy the Mini and buy in to Craft Room?

  • People who already own a lot of Carts may love Craft Room as it’s the only real way to “design” with carts. Craft Room supports many versions of the Cricut. Craft Room is a decent design tool.  Sometimes it’s slow to enact commands, but what you can DO with it is pretty impressive.
  • People who are happy with the limited use of carts and the price structure, and never plan on selling their carts on
  • People who want to design ONLY with Cricut cart images, and don’t have any other design tool  or machine
  • People who need to replace their old Cricut machine with a new version – the Expression is £350ish. The Mini is clearly a cheaper option at £120ish.  The Mini cuts fine.  It’s not hugely loud, the cuts are clean and accurate, from my experience, and the size of the machine is perfect for my room.  It works with a Mac – that is huge for me.

If you have read all this and nothing that I see as an issue is an issue for you,  you will probably love both the Mini and the Craft Room design tool.  Go for it and enjoy it.  I hope all my comments have at least made you think about the machine and the design tool rather than jumping to a quick decision. If I’ve done my job, at least you will be making an informed decision!