scrappystickyinkymess


5 Comments

Back to Gelli – check your kitchen

Taking a break from quilting for a moment while I plan to go to the fabric shop for backing material (nearly impossible to create from scraps) so I had time to test out something on the Gelli plate.

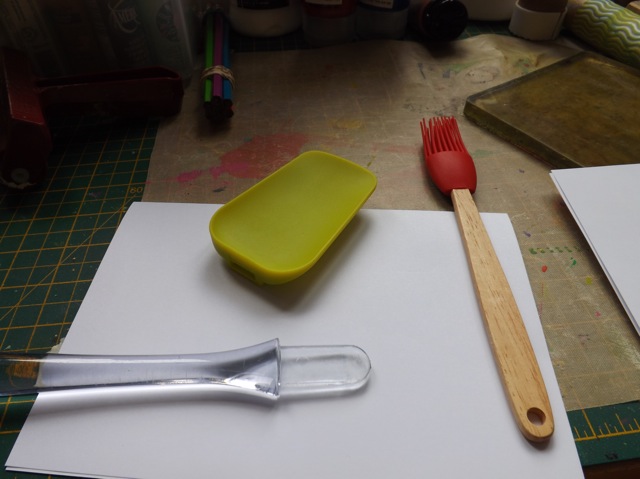
I have been annoyed recently because my silicone spatula’s head keeps popping off.  I finally replaced it with a new one, but the look of the head reminded me of Gelli tools I’ve seen.  I also saw a silicone pastry brush (2 for £1) so got them as well.

gellikitchen


By spreading the paint with the spatula rather than the brayer I got interesting streaks with no blending.  I like that for adding blocks of colour.

gellikitchen2

I experimented with flicking the pastry brush across the top and along the edges – that turned out pretty cool, but hard to see here. It’s most noticeable along the bottom edge, I think, and the flicks in the white area.

gellikitchen3

Def. more to play with there!

The other thing I wanted to try was sponging on the paint.  I had seen that in the video by ASpriteMetamorphosis and wanted to try it out.  I sponged on the paint in the corners then pressed on the grid plate.  You can maybe see that the paint is very textured.

gellikitchen4


I pressed sequin waste in the other two corners – again, the sponging controls the areas of colour better than the brayer does!

gellikitchen5

I wanted to let the paint dry on the plate, then add white and pull but I was too impatient (it takes a long time for the paint to dry LOL!) so I pulled a Deli paper print first. I really like the texture of the sponge inside the sequin holes, and the white of the grid where it removed the paint.

gellikitchen6

Then I added the white and brayered it on.  The paint is dry now, but you can see the deli paper pull left a LOT behind.

gellikitchen7

I actually used the clean side of my silicon spatula to really apply pressure to the back of the paper and get as much under-layer paint to print as I could.  It worked really well, and as it is soft and flexible didn’t damage the paper at all. Really like this one IRL and it may end up forming the base of my WOYWW ATCs (too many acronyms?) for the 4th anniversary.

gellikitchen8

So there you go – a couple more things that you just may have hanging around.  Although in the interest of safety, I would say once you use cooking stuff for paint play, you leave it on your desk and don’t decide to scrape out the mayo jar, or baste the Sunday roast with them…just sayin’….


33 Comments

WOYWW 195 – nearly there…

What the heck is going on?

I m getting lots of error messages when I try to visit blogs of people who commented on my  post (always the first pass on a WOYWW day!) and the Mr Linky has disappeared from Julia’s.  I’ve tried three browsers so pretty sure it must be Blogger and not ME (for a change) Let’s see if it corrects itself…or is that being optimistic?

Well the quilt is progressing.  I had hoped to be able to show the completed top but alas, quilt math has done me in.

Here is the status shot:

woyww195b

Keeping in mind I was only using scraps, and working with what I had, I came up with the central block then ran out of the op-art fabric.  I did the border, then decided to do a sort of chevron of scraps either side, like so.

woyww195

What I WANTED was to make the whole border a bit of a sunburst, and thought I could make it work.  Nope.  I sewed on the two sides, then looked at it and realized I couldn’t do what I wanted.  I ripped off one side, because I thought I could reverse it and get it the way I wanted, but, of course, reversing it would only work had I done both sides the same – and clearly I didn’t, I did one both sets angled in to the middle.  I did a bit of Googling and found what I saw in my head, done by someone else.  Wish I had seen it before doing the 2nd side. DOH!

So today I am …. adjusting.  I’m planning just straight strips to fill the gap in the border, and thinking maybe a dotty binding. It’s a sort of QAYG method I saw on some blog or another, where you make the top, quilting it as you go, but then add the backing at the end and do very simple quilting (like around the blocks) to bring it all together.  Not sure if I am a fan pf QAYG, to be honest.  In some ways you have to be more precise than with the standard constructions, but so for it seems to be working out.  We’ll see how it goes when it’s quilting time.

And since I am not sharing my DESK, I’ll show a wider shot of the floor.  Helen (H) would be so proud LOL! Honestly, the house is OVER RUN with books as well as scraps.  Considering, there is not a room that doesn’t have, at the very east, a STACK of books, and more likely a bookSHELF full to overflowing.  It may be time for a cull.

woyww195a

So, happy WOYWW, and see you round at yours.  Dr. first, then shopping then a lovely long desk hop!


2 Comments

My life is over run with scraps!

Scraps of a different kind today, more for WOYWW tomorrow.

fabricmess

This is the floor next to my little sewing corner – literally.  It’s a two-tiered computer desk, with the sewing machine on the top self, where you would usually put the monitor.  I’m not QUITE sewing at eye level, but it sure saves my back from hunching over the machine.  You can see the pile of scraps (such an odd selection) that will, hopefully, turn into something fun and funky and warm and cuddly.  But that is what has absorbed me today – I was determined NOT to rush out and buy a load of fabric, to produce yet MORE scraps, so the whole thing has been a real exercise in something I totally dread … QUILT MATH.  Argh.  Is there anything worse?  Cooking math I can totally do, halving or quadrupling recipes on the fly, but fabric cutting and the general precision needed for most quilts, scares me.  Luckily I went back to just about the first quilt I ever looked at and thought Humm…intentionally wonky? only a minimum of precision needed? and I can use scraps and strips?  Oh yeah! and did that.  I have a cunning plan to use up the scraps from THIS quilt too ….. Stay tuned 🙂


4 Comments

Working on my February Project Life spread (and limited appeal printables)

My current obsession is spying on my DS via TwitchTV.  TwitchTV is a video game broadcasting site that lets gamers watch other gamers’ live game streams and recorded replay. DS plays a game called League of Legends and participates in various online tournaments, most of which are broadcast on Twitch.  He also has his own channel, where he streams games he plays solo.  He sent us the link at some point so we could watch him play a big tournament, so it isn’t like I read his emails to find it.  It was freely offered.  The interesting thing is that I can watch his stream any time he is broadcasting.  I did a screen grab last time – you can see him down in a window in the corner:

febPLfly2

He doesn’t really KNOW when I am watching him (unless I initiate a Skype chat myself, which we have done) which is interesting from my POV as I get a pretty uncensored look at his interaction with his mates.  Often, there will be a number of the players from his team all on a Skype chat call as well, so I hear him, and them, chatting. This gave me the idea for a printable – now, as I say, it is of limited appeal.  You may not want a big staring eyeball (from The Graphics Fairy), or a fly, in your PL book, but I am quite happy to have them in mine! And they perfectly capture what I am trying to say.

febPLfly

I’ve sized a set for my 2.5 x 3.5 sleeves, but this download has the standard 3 x 4 sized blocks, like so:

febPLfly3

I’ve done them in colours that I like but I hope they will work for anyone that fancies them.

I have a handful of other photos for this month, including DD and her Gelli Plate play, my quilting, DD and a little puppet she made at school, and perhaps one or two more things I think I can manage before  the month closes out.  I will possibly do the crafty life photos in the slide strip – haven’t decided yet!

Now, DD is off school and we are going to lunch.


1 Comment

Sunday-someplace-else (funny punctuation marks)

My FIL sent me this link and it made me smile.  I was quite busy yesterday , working on something that at least one WOYWWer will be pleased to see (I wonder if she will twig?) and have more of that to carry on with (slightly dependant on what the weather does, as I find I need something from town before I can progress much further)

stripblock

I’ll just add a link to the funny:

Personally, I love the Morgan Freemark one.  Sometimes things in my head already sound in his voice – it’s so distinctive.  And certainly the “I’m not angry” mark would help with forum posts.  I can be brief,  just the facts, Ma’am, sometimes and the number of time people have misinterpreted that for something else, never intended, surprises me.

Lots to be getting on with – it seems hard to remember the days when Sunday was a day of rest…..


24 Comments

More PAPER tools – and something else!

Right, so to carry on, I was looking at the Catalyst tools and thinking they looked cool, but impatient to play and too lazy (and cheap) to order some.  I had such success yesterday with paper and cardboard, so I saw no reason not to try similar.  Worked a treat. First I cut some cereal-box weight card with some decorative scissors.  I cut both edges so I ended up with a dual-sided tool.

morepapertools

Simple as dragging that across the plate – light pressure, and I wipe off the edge on my brayer-cleaning paper to remove most of the paint. You can see the different effect of the scallop v the pinking shears.

morepapertools2

Next, I tried the CLOUDS and the STAMP edge.

morepapertools4

Clouds give a very wide band, and collects a lot of paint.

morepapertools5

Love the fine wavy lines made by wiggling the stamp edge back and forth!

morepapertools6

One thing I like about this method is you can make the “tool” to fit whatever plate you have – as long as you have a big enough piece of cardboard! And you can get slightly different looks by varying the pressure and the angle.

morepapertools7

So that got me thinking – I spied the spare blocks and thought….I wonder? Yep. I cut a couple more paper strips with the scissors …

morepapertools8

..and wrapped them around the block, with the decorative edge sticking up.

morepapertools9

Mixed success.  The paper is very thin, so the paint it lifts off is minimal. See? And the paper doesn’t have much strength, so you have to be a bit careful – so getting the right pressure (light enough not to collapse the edge, firm enough to remove enough paint to make it interesting) is tricky. I wonder if a double thickness would work?

morepapertools10

So THAT got me thinking…Fun Foam!  Oh yeah! So I cut and stuck THAT around a block, and:

foamtools foamtools2

And of course I had to wrap some around a bit of old wrapping paper tube for a round version!

foamtools6

The two sides are the positive and the negative cuts from the scallop.  I do have a stamp-edge and cloud-edge as well.  They all give different spacing to the marks.

foamtools3

And you can make something a bit more like the Catalyst tools by using fun foam – just stick the foam to cardboard, then stick another piece over the top to make a bit of a sandwich, like so:

foamcatalyst

Trim the edges and wipe to remove the paint. Wiggle or not.  The foam is much softer than the card, but both work pretty well.

foamcatalyst2

So that let me play with all the techniques I’ve seen, and while my results may not be exactly the same as the commercial tools, mine were all free and immediately available.  I can carry on using them, decide which things I really like using, and if need be, buy the real ones.  Happy FRIDAY!


14 Comments

Homemade Gelli plate tools – from PAPER!

I have been having a right old play and came up with a handful of what I think are surprising tools for Gelli Plate printing.  For today I am going to focus on PAPER tools – because, frankly, if I tried to do them ALL this post would be book-length LOL!

OK, so remember a week or so back I said I had the idea to use my embossing folders as texture plates, and that I saw someone had done that?  I was thinking on that and recalled the MANY times I had tried to use my embossing folders for their intended purpose (i.e. embossing cardstock) and because I hadn’t been as attentive to the cleaning process as I should have been, I mucked up my pristine cardstock.  DOH!  So I was thinking I should do what I’ve done before and emboss a bit of thick packaging acrylic and use that instead.  Fine and dandy, but I had used up all my packaging.  So I got to thinking – would just good old cardstock (or maybe thinnish cardboard) work?  By gosh and by golly, it does!

I embossed some cereal-box weight card – I cut it to the size of my Gelli plate then embossed the whole area, not just the once thru.  No, it doesn’t line up exactly, but Gelli prints aren’t meant to be precise so I don’t care. You can see the cardboard “plate” there at the top and kind of see the plate, pre-print.

cardembosstexture

I had pulled a clean-up print , which you will see later, and added the wood-grain over it. I have to say I think it looks pretty cool.

cardembosstexture2

This is another one.  again, a clean up print.

cardembosstexture3

So that got me thinking.  If this worked, what other stuff did I have that would ALSO work? I thought about THESE that I found while tidying up. This time, I simply embossed heavy cardstock – the rubber embossing mechanism is simply not strong enough to emboss anything heavier and give a good, deep, impression.

embossrollers

The trick is to work quickly – lay the paper on the rolled-out paint and sort of pat the back – you only want to remove the paint that is in contact with the raised embossing.  Press too hard and you will remove too much.

embossrollers2

You can see the print.  The width is limited to the width of the roller.

embossrollers3 Another thing I tried – I was getting a little frustrated with masking.  The paper circles kept slipping.  So I grabbed a roll of contact paper – it has just enough grip to stick to the print.  Just make 100% sure the paint is DRY or it will stick too hard and rip!

embossrollers4

I printed another layer, with the waves in the other direction.  I like this one! You can see I have pulled of the contact paper circles and stuck them to a bit of an old plastic placement.  That lets me use them again.

embossrollers5

Next I tried wrapping the embossed strip around a kid’s block.  That worked too, but the waves are fairly light as there is native pressure from the weight of the block itself.

embossrollers6

This was pulled off the dirty plate from the previous print – remember I mentioned you can get clean-up prints with other than white, heavy-bodied paint?  This was pretty thin-bodied craft paint and it really pulled up the ghost of the last one, as you can see. The lemon coloured wavy lines across the circles leftover under the masks from the last pull, and from the roller. A by product of using the contact paper is that the paint stays put – at least partially.  Using PAPER masks gives you lovely bits that are printed to use for other things, but contact paper gives you a second pull that is pretty nifty.

embossrollers7

Just a couple more that I did, the first just waves, this way and that, about three layers of purples with masked circles.

morewaves

This one you can see a bit of the second embossed paper plate,  the diamond grid:

morewaves2

For the other diamonds, the two sides give a very different effect, EMboss v. DEboss. These are just experimental,so not brilliant pulls,  but I like both effects. Taking away the GRID:

diamond1

Taking away the middle, LEAVING the grid:

diamond2

My favourite effect with this is using metallic paint.  And as you can see my embossed paper plates have been well used and they STILL work!  When they don’t, it costs me nothing to just do another one.

diamondemboss

I like a light touch with these, just patting here and there for a more patchy effect

diamondemboss2

I did orange OVER the dirty plate and the gold still came thru! If you look back, you can see this is the same print I used the wood grain over, above.

diamondemboss3

So, that is the first set – see what I mean?  I could have added 10 more photos,  but I won’t.  I still have a couple of pretty surprising things to add tomorrow, but this should get you started – I mean, who doesn’t have paper, right?


32 Comments

WOYWW 194 – neat and organized!

As I was doing a general every-room tidy up thru the house I figured I might as well sort of my desk and floor.  I had a few ideas I wanted to try today with my current obsession, my Gelli plate, but was frustrated by having the paint all ready to go and sifting thru piles of things, looking for this stencil or that stamp or the other texture plate.  At least to begin with I wanted things separate so I could hopefully grab what I needed before the paint got too dry to pull!

woyww194a

I am totally ready to rock & roll!

woyww194

Now, I note that Julia has done a posted “made me smile” thing, hosted by fellow WOYWW-er Wipso (Annie).  In my cleaning I came across a fair few old magazines.  As is my way, I had to flip thru every one to make 100% sure there wasn’t some little gem of inspiration that I would regret getting rid of before it went to the recycling.  This ad from the 90s made me more than smile, it made me laugh out loud.  We crafters like to bring a bit of our “art” to our home decor, and I get that there are people who are as passionate about latch-hook rugs and crochet as I am about ink and paint and scrapbook layouts.  I like a bit of crochet myself, if I’m honest.  Let’s look small and the expand out view, shall we?

A perfectly nice living room corner – OK, so the plaid chair is maybe a bit much, and certainly the lamp cord should be hidden, but overall, I could live there.

woyww194c

Surprise is not the word I would use – more like horrify, perhaps?  Give nightmares to? OMG.  Check out the “new and improved” craft-enhanced space!

woyww194b

Dear God!  The only thing that would make this worse is if those puppies were playing poker! Everything about it is just so WRONG – from the jaunty beret on the teenager, to the 1000-yard stare on that cat, to the poodle’s spiral embellished jumper.  FUN , they say?  Not the word I would use…..

Happy WOYWW!  I’m doing my best but there are just some blogs I am simply not able to comment on (including Julia’s) But know I am probably visiting you even if I leave to trace of my presence!


10 Comments

Deli paper – Yeah, baby!

Doing the happy dance!  I got the deli paper I ordered yesterday and managed to drag my weary from cleaning self to my desk last night to do a quick couple of Gelli Plate pulls.  Woo Hoo!  OK, I THINK this is perhaps thinner than some you can find in the USA, and it is interleaved, so there is a fold in each sheet, but I love the sheerness of it and the fact you can actually SEE thru it to the plate.  Here is the box:

delipaper

£5.52 (ex VAT) from here!

Now, given the stated size, it may be imperfect for the larger Gelli plate, sized 8 x 10 (no wiggle room if you try to get the whole of the plate on a sheet) and there is a LOT of waste with the 6 x 6 plate, but it is the best price I could find and they offer just the one size.

Check out the prints! I think you can see a bit of the sheerness here

delipaper2

More so in the ghost print:

delipaper3

And this looks a bit lackluster on the desk…delipaper4

but more interesting up to the light!

delipaper5

Drat and damnation but I have my office to clean up today, and one more room that needs SERIOUS attention (ie the place all the stuff that needed re-housing got stashed as I worked my way thru the house) and the cupboards are Mother-Hubbard bare, so I am not sure I will get the time to have a proper play with this.  I am tempted by Julie Balzer’s upcoming Getting Started with Deli Paper class in April, just to see what she comes up with, in addition to the ideas I’ve already thought of.  I enjoyed the quick GSW Gelli Plates class (I just struggle to commit to a long complicated class, but at under £10 I can do the videos in a day and then go back for a closer look on the Mac while I play right along side) so this might be a nice one to look forward to! Particularly if there is a scrapbooking element.


3 Comments

A little collection of Project Life style printables

Life is getting in the way a bit.  I started a major tidy-up yesterday and it needs finishing.  The bookshelves seem to have become a catch-all for a strange assortment of things, the laundry was piling up (curse you, Gelli plate!) and there is personal paperwork that desperately needs sorting thru.  But before I attack those things with a vengeance, and while I await the delivery of the “deli paper” I mentioned ordering last week, I thought I would add this odd little assortment of printables.  Usually I make “collections,” all on a theme, but this is just a set of things I made in the smaller size for myself that I thought might be useful to others.

thenandnow

The PDF is here.  I thought the fairly plain Crafty Life one would lend itself to arty treatments like Copic colouring or even just a burst or three of spray inks.  The THEN & NOW pair works well for a duo of photos showing a change (like a hair cut, for example) – I used it with photos of DD and her ice skating progress. If the orientation isn’t right,  you could either punch out the white circle and mat it then reposition it on the background as you need it to be, or edit it digitally to rotate the circles.  And you can obviously punch the circle and put it on some completely different background as well.   I used the Skype one with a screen grab of my sister and her kids as we chatted last month. No use for me for the  FaceTime one at the moment but it would work with a shot of a phone mid-FT call, maybe to illustrate the distance?  Like one of you off on a business trip, or with a kid at Uni?  Just some thoughts I had, but I’m sure you can come up with 100 more!

Now, my piles o’ books are calling to me…alphabetical by author, grouped by theme, or by perfect fit?  Decisions, decisions……

Note:  And speaking of decisions…what do you think about me replacing the red dot with a small heart? It kinda just occurred to me as I walked past the pile on my desk, shifting things from room to room.  Comment if you like the idea and if people do,  I can easily sort it.  I am ALWAYS open to suggestions so if there is something you really fancy and don’t want to make it yourself, LMK!  Who knows? It might come in handy for ME!