
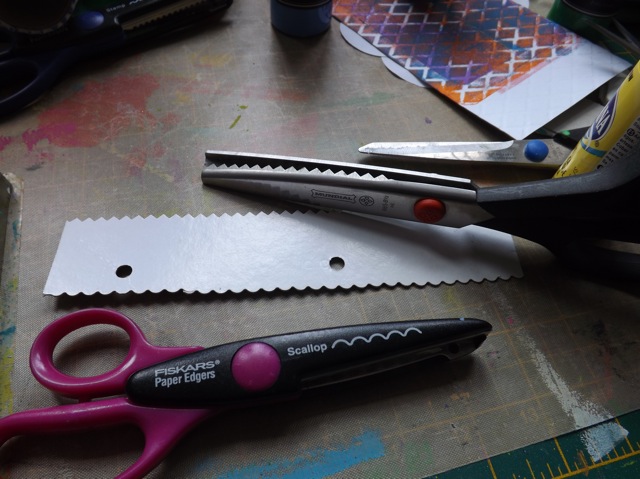
Right, so to carry on, I was looking at the Catalyst tools and thinking they looked cool, but impatient to play and too lazy (and cheap) to order some. I had such success yesterday with paper and cardboard, so I saw no reason not to try similar. Worked a treat. First I cut some cereal-box weight card with some decorative scissors. I cut both edges so I ended up with a dual-sided tool.
Simple as dragging that across the plate – light pressure, and I wipe off the edge on my brayer-cleaning paper to remove most of the paint. You can see the different effect of the scallop v the pinking shears.

Next, I tried the CLOUDS and the STAMP edge.

Clouds give a very wide band, and collects a lot of paint.

Love the fine wavy lines made by wiggling the stamp edge back and forth!

One thing I like about this method is you can make the “tool” to fit whatever plate you have – as long as you have a big enough piece of cardboard! And you can get slightly different looks by varying the pressure and the angle.

So that got me thinking – I spied the spare blocks and thought….I wonder? Yep. I cut a couple more paper strips with the scissors …

..and wrapped them around the block, with the decorative edge sticking up.

Mixed success. The paper is very thin, so the paint it lifts off is minimal. See? And the paper doesn’t have much strength, so you have to be a bit careful – so getting the right pressure (light enough not to collapse the edge, firm enough to remove enough paint to make it interesting) is tricky. I wonder if a double thickness would work?

So THAT got me thinking…Fun Foam! Oh yeah! So I cut and stuck THAT around a block, and:


And of course I had to wrap some around a bit of old wrapping paper tube for a round version!

The two sides are the positive and the negative cuts from the scallop. I do have a stamp-edge and cloud-edge as well. They all give different spacing to the marks.

And you can make something a bit more like the Catalyst tools by using fun foam – just stick the foam to cardboard, then stick another piece over the top to make a bit of a sandwich, like so:

Trim the edges and wipe to remove the paint. Wiggle or not. The foam is much softer than the card, but both work pretty well.

So that let me play with all the techniques I’ve seen, and while my results may not be exactly the same as the commercial tools, mine were all free and immediately available. I can carry on using them, decide which things I really like using, and if need be, buy the real ones. Happy FRIDAY!

26/09/2018 at 4:33 pm
These ‘homemade’ tools are awesome I am very new to Geli plate printing, so I don’t have anything what does it matter where they came from as long as it works and they look damn fine to me, Thankyou for your tutorial…Xxx
LikeLike
17/04/2015 at 1:34 am
woo hoo That is awesome! I love the tools you have made and plan to try a few of my own. I have started shopping hardward and home improvement centers to save money so this is right up my ally!
LikeLike
13/03/2014 at 1:01 pm
clever girl!! I do more sewing but you guys have got me into painting too
LikeLike
23/02/2014 at 11:10 pm
It’s chipboard, not cardboard.
LikeLike
24/02/2014 at 7:02 am
Isn’t “chipboard” just thicker cardboard? 😉 And the holes you see are because it’s the backing piece from a writing tablet. I would call that cardboard in any case as it’s not all that thick….
or is it the difference between British English and American English?? Born and raised in the USA but nearly 20 years in the UK and my “English” is an odd mix. I will NEVER accept ahe-lew-min-E-um for ah-LEW-mi-num LOL! And for me a shag will ALWAYS be a 60s dance craze or a 70s haircut…..
MA
LikeLiked by 1 person
21/08/2016 at 1:56 am
chipboard is thinner than cardboard.
LikeLike
22/03/2024 at 8:08 am
nope. It is thicker and more rigid!
LikeLike
08/02/2014 at 2:54 am
Totally brilliant!
LikeLike
06/12/2013 at 9:35 am
thank you so much for this great ideas!! 😀
LikeLike
17/10/2013 at 3:16 am
Great ideas. Thanks!!!
LikeLike
29/05/2013 at 4:10 am
Cool ideas!!! Thanks for sharing…this will save me some cash!!! 🙂
LikeLike
27/05/2013 at 12:18 am
Instead of paper or fun foam, try using plastic file folders! Or acetate packaging plastic–I’ve used both to make stencils and paint manipulating tools. As they’re waterproof and somewhat stiff, they work very well.
LikeLike
27/05/2013 at 7:52 am
Hummm. Interesting. Plastic file folders (or at least the ones I have access to) are too flimsy to be effective, and my concern with acetate (esp. if doing the pinking shears edger) the tips might be almost too sharp for the gelli plate. While I would totally use them for paint tools on paper or canvas, I’m just not sure the gelli plate surface could take it. Have you used them on your plate and do you feel it safe to do so?
Thanks for the tip!
MA
LikeLike
Pingback: DIY Gelatin Plate & Prints! | Thefrugalcrafter's Weblog
14/03/2013 at 11:31 pm
We’ve just pre ordered the gelli plate and found your tutorial pinned to Pinterest. Love your ideas and will definitely be trying some when the plate turns up. Can’t wait now.
LikeLike
26/02/2013 at 12:07 pm
love!
LikeLike
23/02/2013 at 10:52 pm
awesome tips! thank you very much for sharing your ideas….gonna try these really soon!
LikeLike
22/02/2013 at 6:16 pm
Fabulous, great way to make tools using the decor scissors that have been dusty for so long!
Thanks for the inspiration.
LikeLike
22/02/2013 at 2:36 pm
you are awesome, my mind is blown! It looks like the old paste paper technique…I think I need to whip up a geliten plate, I am missing out on so much fun!
LikeLike
22/02/2013 at 1:23 pm
You my dear friend, just made my day, how clever of you!
LikeLike
22/02/2013 at 5:49 am
I don’t have the plate, but these would have been my solution too. Love making my own tools.
LikeLike
22/02/2013 at 2:46 am
Now this is living outside the box LOL what a brilliant idea, must give this one a serious go. thanks for sharing you are so inspiring,
Eliza
LikeLike
22/02/2013 at 12:58 am
What a clever crafter you are to figure out this economical way to achieve the effect you were wanting! Enjoyed reading this post. Such fun. Lovely results too. TFS
LikeLike
22/02/2013 at 12:13 am
Great job. You are so inspiring with your creativity. Thank you so much for sharing.
LikeLike