scrappystickyinkymess


2 Comments

Back to socks – organizing my needles and taming my yarn

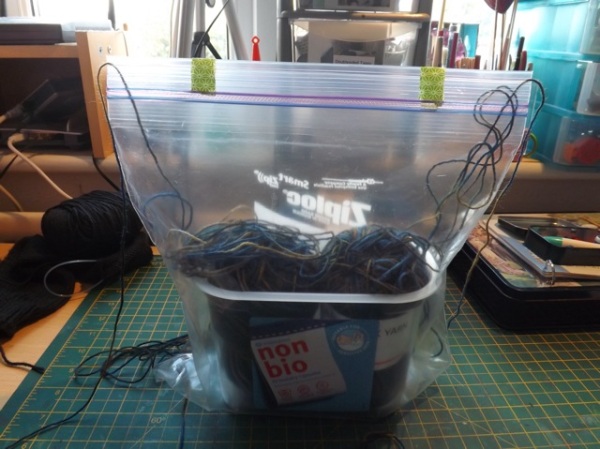
I still have two socks complete, and their companions on the needles, but I couldn’t resist casting on the two-socks on one. I was frustrated by the yarn tangle at first but the combo of an old laundry pod tub and a zip lock bag closed in the middle but open at each side tamed that for me

2yarntidy

I’m sure I’ve seen this idea used for two-colour knitting – or maybe it was crochet – but it works perfectly for sock yarn balls.

yarntidy

I also added a stitch marker in the middle – just to remind me to drop on yarn and pick up the other so I don’t end up with the socks knitted together!  And all I have to do is turn the bag to keep the yarn from tangling up.  Result!

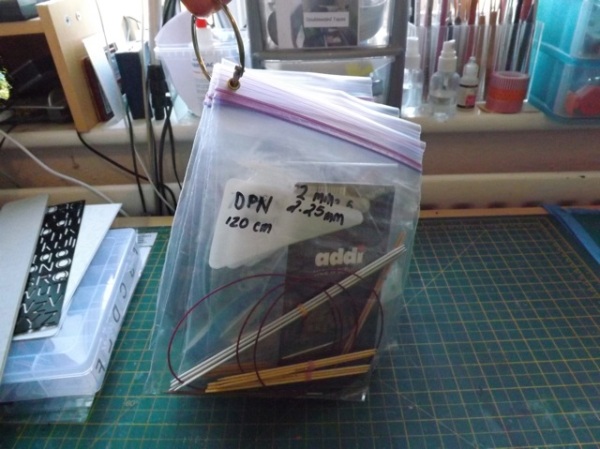
Really how ever did we get along before zip lock bags?  I have all my needles organized by size in quart bags.  On the outside I write the needle size, and the cable length for circulars, and note when I have DPNs or interchangeable needles, and have a bag for spare cables.

needleorg

They are all on a large book ring. Clearly I don’t have enough if that is all the room they take up! LOL!

2needleorg

3needleorg

I aim to have at least the one heavy-weight, warm, for-around-the-house pair complete by the weekend and the striped one soon after.  I’m interested to see how long doing two at once takes, and how crazy I am after doing the long, boring leg and foot parts and how much crazier I am turning two heels! Maybe I will do one heel at a time…. I’m such a chicken…


26 Comments

WOYWW 282 – more sticky stuff

I am still playing with Stick it.  And people who know me at all know I love fonts and text.  I watched a whole movie about Helvetica, for heaven’s sake.  I accept Stick It  is great for intricate die cuts but for ME, it was always going to be about letters.  As soon as I opened up the pack I knew it was going to be perfect for them – and it is.  But what is on my desk for this week’s WOYWW are two more experiments. The first is fabric.

woyww282stick


Didn’t they turn out nice? And this is a pretty loose woven fabric – even so, the Stick It holds the threads in place pretty darn well.

2woyww282stick

3woyww282stick

I wouldn’t really do much repositioning with fabric, but it is a nice effect.  I also wanted to take advantage of the full coverage on the back with cardstock die cuts – not all dies will work for this, as sometimes the letters are just squished together too closely, like the one from yesterday, but the QK full-alpha dies are nicely spread out.

6woyww282stick

That is just the waste trimmed and stuck over white card – but patterned paper would work just as well. And coloured vellum would be really pretty, I think.  With these full alpha dies, it’s easier to cut the whole thing.  I have always saved all the spares when I cut the full set but just in a box – and sorting thru them all to find a certain letter is a pain.  I thought I should be a little more organized.

5woyww282stick

4woyww282stick


There is also a little video on YT that demos adding the adhesive to both sides so you can stick one side and add glitter, for example, to the other.  I think you could also use it to add embossing powders or gilding flakes too.  So more to play with on another day.

Life is slowly getting back to normal and hopefully my WOYWW participation will too. I just about managed to get to anyone who commented last week but I am feeling like I need another visit-every-blog week to make up for my spotty visiting recently but now so many blogs have the added typed-number verification it all takes longer – although if I could manage to limit my comments and not go on for paragraphs, I might get to more desks  LOL!

and t update – no way I will make 100% commenting, even if I do make 100% visiting, this week.  The simple number typing took a little time but the word verification thing?  It takes me so many attempts to nail it I am giving up after 3 tries.  Sorry.  Assume I visited and couldn’t comment if you don’t see me.  I wonder if it’s just cause I am a WordPress user and not a Google user.  {sigh}

Have a great WOYWW.


5 Comments

Product review – Stick It

One of the UKS sponsors, Craft Obsessions, has a new product called Stick It.  The blurb from their site really says it all:

Stick It has been specially formulated for intricate die-cutting and electronic cutting machine applications and will remain repositionable for a period, becoming permanent over time.

It’s paper-thin and easy to use.  When applied to your cardstock or paper ahead of die-cutting, Stick It coats a uniform layer of adhesive to your intricate die cut shapes more easily than ever before.

I got a pack to play with, and have only scratched the surface of what I can do with it. So far, I am liking it a lot.  I recently got a few Memory Box dies.  I love them, but they are so fine they drove me CRAZY trying to stick them.  I had some rub on adhesive dots, but they seemed to get everywhere and had to be rubbed on after cutting.  What I like about Stick It is you add the whisper thin adhesive with the protective release paper still in place, THEN cut the die.  And of course my first thought was letters – it was always going to be letters….

stickit


These letter are the ones I cut more than any other. I love the font, the size, and now I have the new and improved version, how easy they fall out after cutting. But let’s set aside the letters for a moment and look at another property of Stick It – the fact that is stays repositionable for a time then becomes permanent.  What does that mean? Well for a start, once I had cut those letters, I could poke them all out, and the entire back of the waste was ready to stick.  Perfect to use as a stencil, and with the sticky on it, less spray ink soak-under

2stickit

OK, I did say LESS, not NO soak under.  I tend to be a bit heavy-handed with my spraying and tend also to do it far too close.  Blame me, not the product.   That bit of card was very pretty.  But I also liked the edge where I protected the desk

3stickit

This is interesting – it is a pretty thin sheet of printer paper.  Normally, waste paper or at best to be torn up for collage.  But I don’t do a lot of collage, so it might have gone in the bin.  On a whim I added a scrap of the Stick It to the back and die cut that thin paper with that super delicate die.

4stickit

And it both came out of the die and the backing peeled away better than I could have hoped.

5stickit

I have never been able to cut such thin paper and have something useable at the end before.

I just stuck it on a card blank – I’ll use it at some point but not today

6stickit

Then I cut another super fine flower.  In the back of my mind I was thinking how I might conserve the product – could I add strips across the back rather than cover every bit?  I was looking at the flower and at the bits that are meant to fall out and get tossed in the bin. I was glad then I DID cover the whole piece because, taking advantage again of the repositionable properties I could use the die cut to place the waste and create a whole other motif.

7stickit

Then, lifting away the die I could make it stretch even further – again, because I covered the whole of the back – by sticking it to the edge, trimming, and adding the trimmed bit elsewhere.

8stickit

Without the all-over stickiness I would never have dared stick such fine cuts to the EDGE – that would be just tempting fate for sure. But because Stick It gives total coverage the die is secure. The final card is made up from all the bits

9stickit

There is a tag on the front that is raised over the are it was cut from.

10stickit

There are a couple of points to note – first, there are three crack&peel lines across the sheet I  have (the smaller size) and this is essential.  I have had peel and stick sheets before, and they were a pain to peel away to reveal the adhesive.  These peel points mean you are unlikely to end up with a piece you just can’t peel away.  But to be honest, I suspect it wouldn’t be an issue anyway – also worth noting is when I wanted to peel away the backing from the small letters, it came away quickly and cleanly with a little nudge of my fingernail.  A pin or pokey tool would work too.

Stick It is also meant to work with electronic die cut machines.  I am keen to try that too, but this is already quite long and my blade is quit dull.  I may take the plunge anyway but I have another thing I think you will like queued up for tomorrow so it won’t be till after that.

The review was not requested.  I just liked the product well enough to pass on the info.  I would buy more.  And what I’ll show tomorrow is MY real reason….


Leave a comment

Kitchener stitch? HA! A Sunday-someplace-else

Well, it has been AGES since I did a Sunday-someplace-else post, where I blog about something I found elsewhere that I loved, for one reason or another.  Blogging has been tricky recently, what with the in-laws extended visit, now DDs 18th just gone, and with Thanksgiving and Christmas around the corner, and with me trying to learn something new (at the expense of a whole pile of WIPs/UFOs.) But I found something that made me so happy I could squeal.

Remember that I made that pair of socks? the ones I quite casually said had languished, totally complete for four years except for the grafting of ONE of the toes?  And remember how it actually turned out to have been more like seven years, based on the layout I had done for SI? Clearly I am a woman who does not like the grafting of toes.  I just struggle to wrap my head around it.  But then I found THIS short video, which shows how to KNIT the toes closed rather than sewing them.  And I was sceptical, frankly, but by god IT WORKS.

OK, so I am still chanting in my head purl front pull slide, knit front pull leave … knit back pull slide, purl back pull leave... but really, the toe is a thing of beauty.  My photos of it are rubbish, but I would say if you knit and if you hate grafting the toe of socks, give this a go.  Really.  I will try to get a good shot of both toes once sock two is done. I got the whole ribbing and a dozen rows done in the car to and from skating this AM so I am well on my way. I still have the second of the striped socks to finish, now I have the circular needle I needed, and I have two using the cheap Tiger yarn on another circular and got the ribbing on those well underway.  SOMEONE might be getting handknit socks for Christmas, once I feel confident in both the method (on circulars, yes, but one long one, two at a time? or two circulars, two at a time?) and the pattern and the weight (LOVE the thick worsted weight ones on 3mm needles but the find sock yarn ones are more reasonable in shoes…

Next item to research is blocking of socks – do I have to buy a sock-blocker or is there a home-made solution?

Happy half-term!

Oh and sorry to my WOYWW mates – I am determined to do my visits tomorrow!


1 Comment

Searching for the perfect method…

Socks.  Socks. Socks.  Dear me.  I did say once before, I think, that actually WEARING the socks I knit was a revelation.  Toasty toes, unlike cheap cotton and/or nylon blended socks, they are like a hug for your foot. But I am still searching for the very best way to make them.  So many options, difficult for an obsessive like me to cope with.  What do I have so far?

The first pair is in the laundry – did those many years ago on DPNs.

I’ll spare you the photo of them worn and smelly, but I do have a photo of the layout I did with them on it, for Scrapbook Inspirations – I took the photo in 2008 so when I said this pair was old, I underestimated how old.  I thought maybe 4 years. Ha!

TTturningtheheel

I don’t shy away from brightly coloured socks!

The recent pair, that I cast on and knit while MIL was here, to refresh my memory and try her favourite pattern, was also on DPNs – well, the firs one was.  The second one is on a teeny tiny Addi circular – so small I am finding it hard to hold on to! But I am glad that it’s on and hope it will ward of second-sock-syndrome.  Also quite pleased it is looking like I did find the right place to start sock two so they match at least a bit.

2lotsosocks

Then I have the best part of one worsted weight sock done, my first attempt at the Magic Loop for one sock – that is the black one.  It’s got issues, due to the ripping back (at least a row where I think I twisted the stitches) but these were only ever meant to be thick, warm, around the house socks, so I always looked at them as a practice pair.

lotsosocks

Then I have two circulars, to try the two socks on two circulars method – I am thinking that with that method (and the Magic Loop too) those first few rows, keeping the cast on edge from twisting and getting the rib established, is the hardest part.  I have an idea to try when I cast them on.  That is planned for the cheap sock yard from Tiger (£3 for 3 balls, 75% wool, 25% nylon) and might end up being a go at the afterthought heel that Moz sent me.   Eventually I will try the two on Magic loop version but am thinking I so need a longer circular for that. The cheap Pony circular that I am using for the black socks is rubbish – the cable is so stiff and the join of the needle to the cable catches the loops every time I slide the loop around.  If I had not seen about a gajillion videos of people using proper circulars with thin flexible cables I may have just given up on the method, but unwrapping the Knit-pro needles I can see it is going to be SO much easier!

There are a couple of balls there at the back that I don’t have plans for – one of them was bought back when I bought the yarn for the original pair….

And just because I thought it was insanely great, I have to show you this video.  Yep – a week of socks, all different patterns, all on one enormous (pair of? Magic Loop?) circular needles.  Seriously. I am in awe….


13 Comments

WOYWW 281 – late today

To be honest, yesterday was a bit crazy and I realized that I hadn’t snapped a WOYWW photo when it was light.  I had pretty much decided to skip it for one more week, but then, once I had sorted out a knitting problem, I decided I might as well.  So what is on my desk?  My solution for my own stupidity….

WOYWW281

Here’s the thing – I am not a “natural” knitter – I don’t feel it in my bones, like I do crochet. My great-grandmother taught me crochet, I watched her create the most spectacular filet crochet bedspreads for many of the women in my family, of my Mom’s generation, when they married and it just seemed natural to do.  Knitting is a battle.  And while I am happy to rip back my crochet, even the THOUGHT of ripping back knitting makes me feel faint.  You’d think that would make me more careful…

You may recall I was feeling quite please with myself after thinking I had finally cracked the Magic Loop for one sock.  I really had, until the heel.  No, that’s not right – the heel was FINE. Picking up the slipped stitched for the gusset was FINE.  it was a perspective issue, I think.  Somehow, I got turned around – probably not realizing where I was on the loop, and managed to somehow do the SSK leaning decreases on the wrong side of the heel.  They were lovely, that wasn’t the problem – they went the wrong way was the problem.  So I did the K2Tog on the side I should have SSKed and SSKed on the side I should have K2Tog.  Doh!

Cue cursing, and a quick check to see the safest way to rip back OMG like 15 hard-fought rows in the widest area of a sock, finding that the lifeline is GENIUS but too late for me NOW, and off I went, taking it right back to the heel-turn on one needle and the instep on the other.  I needed something to remind me – I am rubbish, clearly, at “reading” my knitting, and I couldn’t see past how perfect the stitches looked to see how they all headed the wrong way, and I wasn’t going to risk THAT with the next sock.  So I grabbed that box of alpha-beads and made myself custom stitch markers

2WOYWW281

They are slightly bigger than ideal, but on the plus side, I’m not going to lose them easily, or overlook them even if I am knitting while watching TV!

3WOYWW281

I played with a couple of methods, from the old wine-charm rings to simple cord (this is hemp-cord, also from my scrap supplies)

4WOYWW281

and they all work more or less as well as I need them too.  Because my pattern is one decrease round, one plain round, I added a plain marker (thank you Simply Knitting, many years ago…) to remind me.  So I knit the decrease then add the plain markers.  When I return to the spot, I know the plain marker means I am on a plain row.  I remove it then the next time round I can see it’s time to decrease.  Now, I expect I will eventually get better at this, and this pair of socks is always going to be the around-the-house, unlovely but warm ones that I will always hate a little because they aren’t perfect, but love a little cause they helped me conquer the Magi loop….

I shudder to think where I might fall in the WOYWW linky list, but it really is more about taking part than getting the top spot just cause I sleep badly and tend to be up {wink}


5 Comments

The Greetings Circles printables – richer colour, not huge file

Nearly there on the whole back to normal thing.  Stupid car in the shop AGAIN, DDs birthday coming up, potentially prepping for DS (+ new girlfriend) home for Thanksgiving. blah, blah, blah.  But I did tweak the more richly coloured greetings circles.  And as I have them done, I should add them no –  I know that while I am not that way inclined, there are many who are deeply in the throes of making Christmas cards, and many who may be nearly done and are on to wrapping.  I envy them but not enough to actually make the change in my own life LOL!

Pretty much the same as the other set greetingcircles

There is the second page of the larger 3″ circles as well.  You can download the 2 page PDF here.

Just FYI, if you select in your printer dialog box 2 images per page (and in mine I have to auto-rotate and scale to fit) you will get a single sheet with the smaller circles at about 1.25″ and the bigger ones about 2.25″ –  now, you MAY have a punch to fit or you may not, but the Nesties work to cut the full circle with the frame.  If you wanted the greeting without the striped frame, then you can use the standard 2″ punch on the larger ones and a 1″ punch on the smaller ones! Keep in mind that all the circles will be ever so slightly smaller if you scale to fit US letter rather than A4, and printing A4 on US letter paper is going to cut off some of the circles (I think – I keep meaning to get some A3 paper and cut it down to US letter size to test things …) but depending on the use you have for them the smaller size might prove handy.


8 Comments

A new skill…

I read an interesting article in The Sunday Times about learning a new skill – from the online version (well, at least as much as I can grab without subscribing to it )

How long does it take to master a new skill? Apparently, the answer is 10,000 hours. That terrifying number was first suggested in 1993 by Anders Ericsson, a professor at the University of Colorado. He had totted up the number of hours a range of children had practised the violin. Anything up to 4,000 hours and, well, meh. Anything over 10,000 and hello, maestro.

But 10,000 hours is eight hours a day, every day, for more than three years. So that’s out. Instead, we’ve adopted the strategy put forward in Josh Kaufman’s book  The First 20 Hours: How to Learn Anything… Fast. …

I have surely spent at least 20 hours watching videos, reading tutorials and mentally trying to conceptualize the Magic Loop sock knitting technique over the last 10 years .  As you will have seen, the current pair is on three DPNs with the fourth as a working needle.  I prefer the super short ones (which my MIL couldn’t believe) but the longer ones are totally like I heard Lucy Neatby  (sock knitting teacher) describe as “wrestling porcupines.” I have some 8″ ones that I can’t use hardly at all.  4, 5 or 6″ at most  is what I prefer.  I have a set of 5″ needles that is missing one (or perhaps two, as I only have three of them)  and I got a matching set of 6″ ones so cheap from Tiger, when I got the yarn, that I’ve just used one of them to complete the set.  Every time I work the longer needle loose I know I’ve done another row….small victories…

socksSSS

Hummm.  I may actually have two longer ones there … no matter. Back to the point. When MIL was here and we were chatting about knitting, we both expressed an interest in the two-at-a-time Magic Loop technique.  It took me a few days to make the first sock of my set, and possibly 4 YEARS before the second one was finished (and only because MIL finally grafted the second toe for me) – do I have the worst ever case of second-sock-syndrome?  Hopefully not as the 2nd one is on the needles as you can see.

Sorry, still drifting off point. The point is that we both agreed that it looked interesting but we had both attempted it before (I tried to knit my first pair of socks that way but gave up and did them with DPNs) and couldn’t wrap our heads around it.  After reading the article I was inspired to try AGAIN.  To focus my attention and crack it once and for all.  And I did.  Here is where I am as of today.

2socksSSS

These are thick worsted weight socks from a free pattern that I like because it has built-in lines to remind you to take note of your numbers as you knit and is designed for the Magic Loop.

Luckily with all the tidying and organizing, I had virtually all my knitting stuff in one place (well, except those pesky missing needles) so I had my row counters and markers.  With the Magic loop, you are always moving the cable around so I wasn’t sure where it would work so I just tied it to my tail from the cast on.  It flopping around is another reminder – when I have it on the left, I’ve finished a row. My other option was this ancient freebie from Simply Knitting – never going to happen. It would be just like me to walk out of the house wearing it still.

countermarkers

Oh, and those little markers at the bottom?  Aren’t they cute?  I was considering how to convert all the DPN needle patterns to magic loop ones, when the pattern will say move 16 stitches from needle 2 and 16 stitches from needle 3 to another needle or something like that. I didn’t have anything marked 1, 2, and 3 but I did have a ton of these little beads in my scrapbooking stash

2countermarkers

AND I had a ton of these little triangle jump rings – the oval ones are OK but getting the beads on to some of the round jump rings is hard.

3countermarkers

and pairing them up I can use them to mark on my magic loop knitting where the needles are.  I just have to annotate 1 as A, etc.

I found this short video very helpful for “getting” the Magic Loop technique.  Once I get this pair done, and the second sock from the DPN pair done, and get a much longer circular needle, I may try the two-at-a-time version.  Now I’ve done the process for one sock, I think I can see how it will work for two.

And then it’s toe-up sock and the fleegle heel…

…can you tell it’s been a LONG time since I blogged properly? The words, they JUST KEEP COMING.

{wink}


1 Comment

It’s about time….The Wonder Years (plus printables)

I have been dropping in on The Wonder Years every so often.  It seems to come up a lot, as I am forever recalling bits of episodes and using them to illustrate a point with DS.  I’ve made him watch the odd video on You Tube and he has often said it is a show that he would watch complete if it were available.  That has always been a big IF.  The show, one that I would guess most baby boomers are aware of, has been mired in music licensing issues for years, ones that kept it from being released on DVD. At some point I am sure I had a video of some episodes, probably hidden away in the US storage unit, but I have looked again and again for years for any hint of DVD releases to no avail.

Imagine my surprise to see that as of 7th October Star Vista will release season 1 on DVD (in Region 1 only)  with plans for additional seasons later in the year and next year.  Luckily we have a DVD player that plays all regions so this may end up being the only thing on my Christmas list.  And I have every intention of forcing DS to watch the whole set while he is home for Christmas if I get it.

I did do a Wonder Years quote set a while back (and indeed a couple of the quotes are the same – they are just too good not to repeat) but I decided to update the colours – with a very 60s font (Airport) and a slightly groovy wave in the logo colours from the show’s title screen, it’s just a little bit of commemorative fun from me.  Sharp readers will note a slight alteration – the actual quote for the last one is “look ahead to what would be” but for the purposes of a PL card, to my mind, “what will be” seems more..accurate? resonant? not sure, but I like it better so …

wonderyears2

It is pretty big and bold and bright, but if you like that and can use it, grab it here!


4 Comments

Greeting circles – Christmas Printables

Not QUITE back to normal around here yet…soon, soon.

But I was reminded by Julia that the next crop is one where most people abandon scrapbooking and make their Christmas cards.  I don’t really do cards  never really have, except for the kids to give out to school friends, so I just carry on with whatever project I happen to be working on.  This month it might end up being finishing off the knitting of the dreaded second sock (and DO NOT tell me I should do the two-at-one on a huge circular needle) and grafting the toes of both. See how far along I am?

moresocks

But that isn’t what you came here to see, is it?

circlesgrab

Two sizes – the smaller ones fit comfortable inside a 2″ punch:

circles4xmas

and the larger ones can be cut with a variety of circles – I happened to use the Nesties from the large and small standard circles sets:

2circles4xmas

You can see that you can get a larger and a slightly smaller one next to each other:

3circles4xmas

Check your own dies and see what works best.

I started out a few weeks back making a much more richly coloured set but it had issues:

4circles4xmas

The circles JUST fit in the 2″ punch so you had to be sure careful about placement or cut off the edge of the stripe-y frame, and the red and green had a chalkboard effect – that made the file HUGE (almost 10 mb and even using the Quartz filter to reduce the file size only took it down to about 8 mb.  I may still make a richer version but aim to get the size down. I think they will be cute as card toppers or back-to-back (or with a solid cardstock back with room for writing and the date) as a small hanging ornament, or even as a gift tag.

You can get the 2-page PDF here.