I am still not able to figure out a good overall set of instructions for easily printing my planner. But I will add the files and what I used as the basic guidelines.
Paper weight
I will first repeat that I used heavier weight cardstock when I printed mine – 160 gsm. I like the look and feel of that weight. I also used standard print quality. Just for your info, I’ve printed a month divider on the back of the Year At A Glance sheet. I can see the text thru.

I would possibly test 90 and 120 gsm. Either one might be just thick enough.
A4 versus US Letter paper
I’ve tried to make these usable on both A4 and US Letter. That meant some compromises. This is how they print on A4 – the size I use:

There is some margin. Not a ton. Just printed front and back the sliced down the middle. I don’t have any US letter paper, but here I have printed the pages on an A4 sheet, but set to US letter and Scale to Fit when printing. The black line denotes the smaller length of US letter paper. The width is slightly wider but only by 1/4 inch.

So a bigger border top and bottom, meaning less usable space. I think you need to know this is you are using US letter paper, BEFORE you start printing!
Here is an overview of all the double-page spreads. Any of them can be printed front or back of any other one, then sliced down the middle to produce two pages, with a border for hole punching. Click to see larger. You may be able to come up with combos I’ve not used!
-

-
Belongs To
-

-
Month at a Glance
-

-
Month dividers (12)
-

-
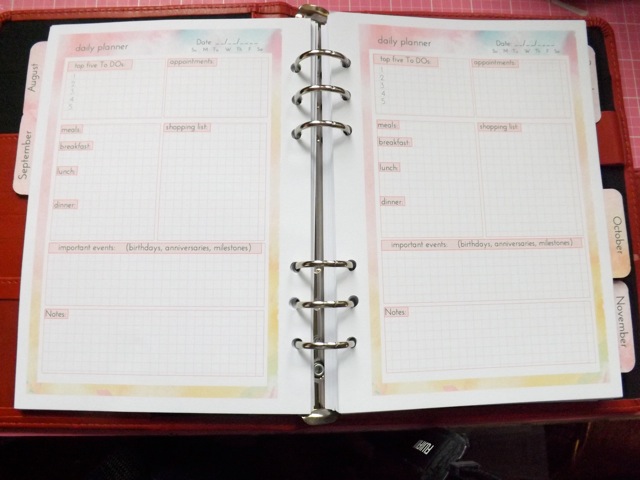
Daily x 2
-

-
Daily hour by hour
-

-
Sunday
-

-
Sunday Alternate
-

-
Notes Filler
-

-
End of Month
-

-
Month Tabs
-

-
Just months
Here are all the PDFs:
Belongs To – intro page with contact and emergency info
Year at a Glance (2015 and 2016 versions) corrected and added the year info to both
Month Dividers – quotes, incorporating Week at a Glance left page
Months_Only – to randomly insert inspirational quotes
Month Tabs – 12 with text and a few extra blank ones
Month At a Glance – to create a two-page spread
DailyX2 – print back to back to make four day sheets when cut apart
Daily HourByHour – daily variation. Use EITHER/OR (they don’t play well together)
Sunday – Daily, incorporating Week at a Glance left page
Sunday Alternate – Notes, incorporating Week at a Glance left page and notes
Notes_filler – side by side Notes pages
End Of Month – use it if needed anywhere
I cannot stress strongly enough that you really need to know how the paper moves thru your printer before you begin. When printing back to back, do a test sheet before printing a large number of pages!
A4 paper people – print as is.
US Letter people, select US Letter as your paper size and SCALE TO FIT

The simplest version.
Print Belongs To –> Print Year at a Glance on the back.
Print the Month_Tabs
Print ONE Month Divider –> Print Notes_filler on the back
For a month, Print EIGHT Dailyx2 or Daily HourByHour sheets, same on front and back
Print FIVE Sunday sheets –>print your chosen DAILY sheet on the back
Note: I realize I don’t have the Sunday sheet with an HourByHour version on it. If you really need that one, drop me a comment and I’ll try to make one.
CUT ALL SHEETS IN HALF
There will be some extras. Set them aside and check before printing the last month or two you need.
To assemble:
Start off with the Belongs to and Year At a Glance pages
- Add the Month divider (Two Notes pages follow, then Week at a Glance)
- Add six Daily sheets followed by one Daily sheet with Week at a Glance on the back.
- repeat
- Add the month tab on the daily sheet that corresponds to the 1st of the month
You can print as many Notes_Filler sheets as you like to mix in
Another addition: print a Month at a Glance for each month with Notes_filler on the back (or even leave blank on the back) and slip them in just before the 1st of the month.
The slightly more complex version:
Print Belongs To –> Print Year at a Glance on the back.
Print the Month_Tabs
Print Months_only –> Print Notes_filler on the back
For a month, Print EIGHT Dailyx2 or Daily HourByHour sheets, same on front and back
Print FIVE Sunday sheets –>print your chosen DAILY sheet on the back
There will be some extras. Set them aside and check before printing the last month or two you need.
To assemble:
Start off with the Belongs to and Year At a Glance pages
- Add the Month divider (Two Notes pages follow, then Week at a Glance) for the first month
- Add six Daily sheets followed by one Daily sheet with Week at a Glance on the back.
- repeat
- Slip the Month_only quote pages in randomly, wherever you want a quote and a notes page, or place them as closer to the beginning of the month and add the tabs to them rather than to the page for the 1st of the month.
Note: this might send things a bit skewiff, where you have a week with one day in it at the beginning or the end of a month, but if you are ok with shifting things slightly, it works OK.
As before, you can print as many Notes_Filler sheets as you like to mix in
Another addition: print a Month at a Glance for each month with more Notes_filler on the back (or even leave blank on the back) and slip them in after the month dividers
The Crazy person Version (i.e. Mine)
This is what I did – but then I don’t mind the amount of crazy it takes to assemble this. I am actually not really expecting too many people will go to the trouble of doing it this way, but I am really happy with it, it suits my needs perfectly. Making it was both a solution for ME as well as a learning experience. Now, if I decide to make one that I DO think might be useful to lots of people, I think I know what I would do.
You will need to print each of these ONCE
- Belongs_to –> print Year_at_a_Glance on the back
- Month_Tabs
For each month you will need to print:
a Month_Dividers –> print Month_at_a_Glance on the back
That is the easy part. If you print the entire Month_Dividers 12 page PDF, with the Month_at_a_Glance single page printed on the back of each of them, you will have, for each month, the divider, with a quote on the front, flip over for Week At a Glance sheet.
Now for the daily sheets.
For the days: You can choose to print the Daily_x2 file OR the Daily_HourByHour. They don’t really mix. Print the same one front AND back. That give you four Daily pages when cut in half.
This is where it gets dodgy. Because of the Week at a Glance sheets and the Monthly dividers, it isn’t as simple as just printing the number of days. Printing double-sided means multiple options for left-side holes and right side holes are required.
I found that the best thing to do was print EIGHT of the Daily sheets (either one) and FIVE of the Sunday sheets, for 32 days. Have the Year at a Glance calendar handy. Start building your weeks. Use the Sunday, Sunday_Alternate, End_0f_Month and Notes_filler sheets to make everything work out, according to where the days fall.
Honestly? Writing it out makes it seem like a lot of work. Maybe it is, but I didn’t find it that difficult. Yes, it takes more time, but it needed to, for me to get the planner I wanted.
I hope the sheets are flexible enough you can print them to create a planner that suits YOU. And at some point I’ll probably go back and use what I learned to create a version that is easier to explain!
Oh, and if you are keen on an A4 or US letter full size version, drop me a comment. I have the files and it should be easy enough to add them as a single PDF so you can print as you like.
Does your head hurt? I know mine does…..
{wink}


 I made a set of monthly calendar pages:


 Fair warning – I am not planning on adding this as a download, as it really is useless unless you buy


