scrappystickyinkymess


4 Comments

A mess, tidied, and lots of painty papers

Oh dear. When I began things were in a horrible state.

A furious effort and…

A Fodder School class, another one about limited palettes and colour mixing for collage, and I’m kinda over it. I cleared the decks after a few days of pulling gel plate prints using these three colours.

So these bottles are more than a decade old – maybe two decades. I was determined to kill them. Can you guess the flaw in my plan? Yeah, that’s right, I have no other bottles of this paint. So I very nearly killed them before watching the follow-op lesson about further layers. DOH.

I did get an interesting, if muted, mix of colours. 

Not sure what to do with them because I really do not need to make another collage project. Here is the issue – you make art, like crazy, day in and day out. It’s great. It makes you feel productive and artistic and sometimes even proud. BUT…

Unless you have a business, and you are selling what you make, where does it all go? My shelves are filled. I have boxes of books and journals and all manner of things and really no place to PUT them, to DISPLAY them, to STORE them. My walls are filled with art. I’ve no one to give it to and I can’t imagine anyone wanting to buy it. So here I sit, amongst my creative chaos and think what to do.

At least the art journaling and daily journaling is as something that feels productive, if only as a way to deal with stress, uncertainty and worry. I love making art but I just don’t know what to do with it when I am done. The way forward has to be watching all the lessons, but picking and choosing which ones really speak to me. If I am going to make a project, I damn well better have a clue what I am going to do with it when I am done.

And carry on journaling whenever I can. Cause THAT actually helps when things are difficult. A clear head is always the best place to start from. And getting stuff out of my head always helps me to that place. 


Leave a comment

Fairly happy – more layers, always good.

Well I am pretty happy so far. The ugly colours that totally did not go with the fronts are gone, or if not gone, then at least only peeping thru in a not-obnoxious way. The first layer, of white, made a huge difference.

After that it was more layers of the right colours and really it was the stenciling that made the biggest difference to my eye. I think it always does.

I am looking forward to turning them in to something useful, I’m just not completely decided on what yet, I think I am still leaning towards some sort of booklet/pamphlet sort of thing, sewn in or insert, I don’t know, but also, the two pieces are kinda the same size, at least one dimension, so I feel like there is potential there to do something interesting and not just make them a storage thing. 

IDK. In one way I feel like I am slightly overrun with books/booklets/pamphlets. I adore making them but I have a fair few that are empty. There is not enough time in the day to use all that I already have, so is making more crazy? I might be…


2 Comments

Pouches – useful or not?

I am finally getting back to my Fodder School class from ages ago, which involves making pouches from junk mail.

I think I was pretty unsure if they would be at all useful to me. Also I never get even remotely interesting junk mail. I mean AT ALL. It’s all just thin, basic, uninspiring. I did bring home a few items from my Dad that were at least more than the basic folded sheets, but still not super interesting.

I was happy enough with the beginning of it. And pretty happy with the next layers – where I got to use some of the Joggles stencils I also brought back form our trip.

But then I have NO IDEA what was in my head when I reached for some totally different colours to work on the inside. I mean blinkin’ ‘eck!

Not even remotely good as a match for the fronts!! Clearly I am currently colour-challenged. I blame the fact I still have a week to wait for my tooth to be fully repaired, AND that I will be starting on a new medication with some nasty side effects that I can only hope I don’t get. My SINAM myositis is very much flared up at the moment, I am feeling way weaker than I should and pretty exhausted all the time. Ugh. Moan over. I will grab some paint, layer on more and more and more and eventually with luck it will get to where it needs to be. 

What I will do with it after that? I am not entirely sure. 


3 Comments

Paint Swatching Fun

Finished my paint swatches. I’ve seen about 20 YouTube videos on this, and in the end I really think it is going to be helpful. I have also been watching a LOT of videos about Limited Palettes, and trying out “primary” colour combos to see which mixed colours appeal to me most. The real problem is that there are certain ones that I love in each of them – likewise ones I really do NOT like much at all.

I have to say one of my faves is Permanent Rose (as the red), Cadmium Yellow Medium, and Turquoise Blue.

I made myself a sheet to print cause I seem to always either run out of room for the swatches, or find they aren’t well organized. I guess I’m not mad keen on the purples in this combo, but it isn’t a deal-breaker.

I think I like what’s known as the split palette maybe better, even without playing with it yet. The idea that you select a black, a white, and two each (a cool and a warm) of the Primary colours seems a bit better. This is the “most common” one, from my research:

•   Quinacridone Magenta (cool but mixes to make vibrant oranges)
•   Cadmium Red Light (deep red but leans towards yellow)
•   Phthalo Blue (primary cyan)( mixes to make vibrant greens)
•   Ultramarine Blue (blue with violet tones)
•   Transparent Yellow (just a primary yellow)
•   Cadmium Yellow(a deep well-rounded yellow)

This is def. something to play with a bit more. Wouldn’t it be nice to have maybe just eight or so big pots of paint and a lot of little pots for mixed colours instead of tubes and bottles of 100 different colours? On the flip side who wants to have to mix a colour every time you need it? and what about getting the colour right every mix?

Tricky, hummm?


Leave a comment

Those paints worked a bit….

So if you saw yesterday’s post, you know I have been attempting to bring back to life some very old, slightly dried out paints I got second-hand many, many years ago. I did manage to get some useful stuff out of them by wiping the knitting needle I used to stir in the water (trying to re-hydrate them) on my 5×7 gel plate and pulling a simple print, either by adding a bit of texture, or even by just spreading it with the brayer and picking it up.

I actually got some pretty prints, and the final pick up one from everything dried on the plate I think is a stunner!

I rather like this one as well!

The best pick-up print from a plate that looks kinda meh.

I mean looking at it you wouldn’t think I could get much off it, but:

I cannot tell you how pretty it is IRL. Soft and grungy with a hint of texture, and little flashes of metallic paint here and there. I don’t know what to do with it but I think scanning it is step one! I will never get over the difference between a scan and a photo

I am still leaving the paints to sit and giving them an occasional shake, but will hope to find time for a proper play this weekend!


11 Comments

WOYWW 712 – dried up paint, resurrected?

A strange one, something on my desk with an actual purpose, progress but not project!

Happy WOYWW.

So I had this drawer full of small bottles of paint. Lumiere metalics and something called Sorbets. Thing is, I am pretty sure I got them at a WOYWW crop from the sale table, a good six or so years ago. I might have used them very occasionally, but I lean more towards inks that paints, except when gel printing.

What I have been doing is trying to soften these up. Adding a little bit of water, shaking them around, stirring with a thin knitting needle, and unclogging the tiny tips. I found it quite easy to pop off the tip and put it in a small jar filled with hot soapy water, I let it soak, give it a good shake every so often, and hopefully in the ens I will have clean tips to put back in the bottles!

If I do manage to bring them back to life I vow to use them up posthaste (post haste? post-haste? LOL!) I mean why hoard them? Use ’em or lose ’em, clearly.

Cat is sticking with me, although Son will be home by the time this goes live, and if history repeats itself Cat will cling to him and steadfastly ignore me till he goes again. Ah well. She loves to lay on the sofa beside me and as she is white and sheds a LOT I think I need to give up black clothes for now. Her other spot is on a towel-covered pillow on top of a box. This usually sits in Son’s office (my ex-sewing/ironing room) but I moved it to MY office/craft room at the beginning of his trip. She is looking quite intently at very small gap under the table, where she can hear a bird in the chimney.

So there we go. A bit of a change-up from the usual catastrophe of a space. I have had not great blood test results, after having to cancel last month’s test due to catching Covid, so suspet a change in medication will be required. Not a welcome change, but required. Might slow me down a bit.

Hope you have a lovely desk-hop. I know I will…


10 Comments

Gelli Skins

I had a play with something posted on the Gelli Arts FB page, making acrylic skins with Slick paint and gloss gel medium, and it was pretty cool.  Not used the scribble version (I did white and black versions but only spread the gloss gel over the white one so far) yet, but I was looking at it and thinking about it and an idea began to form.

I thought of a few substitutes.  First, freezer paper rather than page protectors (possibly palette paper might work too) for the surface to build the skin on.  For two reasons:  the freezer paper can be cut (so if you want to cut the skin with it better supported, doing on freezer paper makes sense) and second you can store the skins right on the paper.

Second, I thought, OK scribble.  Nice but what if….?

1. Cut a bit of freezer paper bigger than your plate.

gelliskin

I tried this two ways – both worked, but one produces a thinner more fragile skin and the other a thicker one.

Method 1: do your gelli plate as if for printing.  I don’t feel like you need open areas if you don’t WANT them, not for the purposes of creating a skin. The open areas will be transparent (or nearly so) in the end and that will mean when layering it over something else, the something else will show thru. I used just plain old acrylic paint.  Tube, rather than craft paint, because my feeling is that the thinner craft paint won’t work as well for the next step.

That next step is to carefully pull your print onto the plastic-coated side of the freezer paper.

2gelliskin

As you can see this IS doable.  But you cannot be vigorous in your rubbing.  The freezer paper won’t be gripped by the plate, it’ll slide around if you get too aggressive.  What I found worked well was to place my hand in the middle of the freezer paper then smooth to one side, then switch hands, hold and smooth to the other side. I think you can see that print above is not too bad.

Let it DRY.

Next, spread on gloss gel medium, all over the print.  Be generous and be sure to extend the medium outside the edges of the print. Lesson learned from Method 2 is build up the medium at the edges.  Makes peeling it easier! My first experiment is a little thin at the edges.

3gelliskin

Let it dry. Completely.

Once it is dry, roll the edges, loosen with your fingernail, but be gentle, slowly peeling the skin off the freezer paper.

4gelliskin

Spreading the gel with a palette knife or brush leaves thinner areas.  These can tear thru when you peel the skin off.

5gelliskin

I’m not sure it matters when you come to stick it down.  My gel medium was a pretty discount brand so it didn’t dry totally clear, but you will see later it doesn’t really matter.

Method 2: do the plate as for printing just like Method 1 but mix in a bit of gel medium to the paint before you spread it on the plate.

6gelliskin

While the print is drying on the freezer paper, cut yourself a frame.  Mine opening was about 5  1/2  x 5  1/2 inches for the 6 x 6 plate print.  I used cereal box weight card and two thicknesses.  I pinned the print flat to a cork tiles I have for stamping.  Best buy ever, soooo useful.

Lay the frame over the now dry print.   Squeeze a  line of gel medium at the top of the print

7gelliskin

Using a strip of firm card or plastic, pull the gel down, filling the frame for a smooth, fairly thick, uniform coat of gel over the print

8gelliskin

You can fill in any gaps gently with the palette knife.

I added a border of duct tape to the frame, for stability and to make the edges wipe-clean but not till after I took the photos.

Let this dry. It’ll take a while. Once it’s dry, peel off the skin.  This method uses more gel medium, for sure, but oh my! did it peel off like a DREAM.

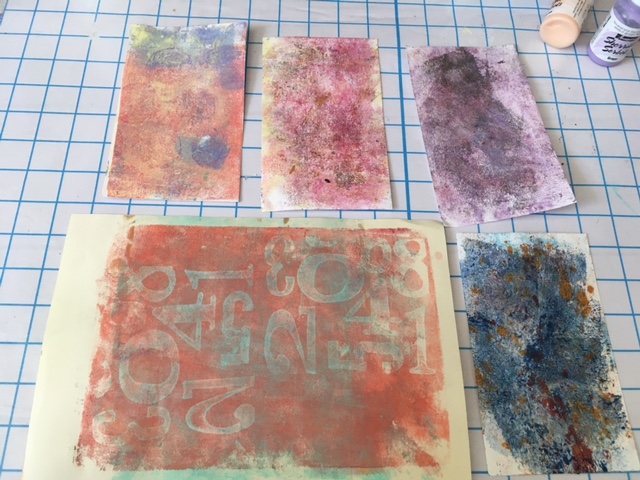
Exactly reversed – left is METHOD 2 and right is METHOD 1

9gelliskin

and cause that looks like just a plain old print:

10gelliskin

I still have to try a few things:

  • using iridescent medium rather than gloss
  • trying the scribble bit with metallic paints
  • cutting shapes from the skins with dies – circles seems obvious, but what about letters? Will sandwiching the skin between freezer paper  let it cur cleanly?  I think it will…..

So you are probably thinking Why make a skin rather than pull a print right on to something?  For me it’s about control as much as it is about the shiny look of the skin and the texture.  I can move it around, see where it looks best, I know what the bit looks like already, no worries about smearing a print or getting it in the wrong place.  Plus it’s kinda fun to do, and that can’t be underestimated LOL! But always interested in your thoughts on my wacky experiments…

Now loose tiles need sorting, repair man due to call later.  SUPER foggy (like Victorian London foggy, minus the smell, I imagine) outside, can’t see the end of the drive, and shopping a must, fridge cleaned out, so I’m off for the frankly scary trip up to the main road.  But first, one more cup of coffee…


5 Comments

Emulsion paint?

So as I have been wandering the wallpaper aisles lately, snatching up wallpaper samples for Gelli printing, I keep seeing (and being tempted by the colours) little tester pots of Emulsion paint (for walls.) I almost bought a couple of pots a week or so back, but as I wanted to use it on my Gelli plate, I felt like I should do a little research first.  This page (and the live page seems to just crank away without loading, but the cached page is here) answered my questions, that basically there is very little difference in wall paint and “craft” acrylic paint except, perhaps, the % of acrylic resin to other cheaper alternatives.  And what I knew it as in the States, LATEX paint, is a bit of a misnomer, because there is no actual LATEX (a natural product from the rubber tree plant) in so-called latex paint. What is in it is a synthetic polymer that has the same properties but a different chemical make-up.

I dug around a bit more, and from what I can see that is echoed other places. One difference is  perhaps the pigmentation (how colour-rich it is) and the “body” of it.  Wall paint is pretty much never going to stand up like a blob of acrylic paint from a tube! and to me wall paint smells more/worse/different.  On the flip side, these tester pots of pretty, pretty colours, were 80p per 75 ml pot.  That is a lot of paint for 80p!  and the “Value Paint” I recently got, because of the colours, was double the price and so thin an anaemic looking it was a waste of money. The prints from these look MUCH better, in intensity of colour.

emulsion

It seems to work pretty much as I expected.  I could brayer it on, stamp over a texture with another colour and pull a print (leaving a totally clean plate) – although getting the paint on was harder as it comes in a big, wide-mouthed pot not a squeeze bottle.

2emulsion


3emulsion


I could print over it with a mask

4emulsion

and use a stencil both with it and on it

5emulsion


and I could stamp on it with Archival ink and it did not smear.

6emulsion


Not the best piece I ever made but it was more about testing the methods I tend to use with the paint pots than making a perfect print.

Now, I am not ready to give up my proper acrylics, but if I wanted a particular colour and couldn’t find it, or was drawn to a particular shade, I would use emulsion, without questions.  If I were proper arty and I wanted to make a piece to hang on my wall, I might use some of the same paint on the piece so it matched.

Now, I really need to tidy things up a bit so I can finish a gift item  – I am making a little book that I want to evoke the cover of the source of the poem for someone who loves it like I do:

2Gbook


I am using Gelli prints and using the turtle wrap but altering it a little. I am liking it so far but still a way to go.  I dragged out, for the first time in EONS, some Ma Vinci stamps.  I was sad to hear she is selling up and closing down, I love her stamps and have a few alphabets that need to see the light of day a bit more.  This one was a firm fave but I had sort of forgotten all about it.

Gbook


I think I need to drag out a few more of them and have a look at them again. . .


5 Comments

Gelli plate, Acrylic medium and Pearl-Ex

While the power as out the sun wasn’t shining, so apologies if some of the photos are a bit dark.

I had a good long experimental play session today.  I had some ideas I wanted to try, the first being additives to the acrylic medium. I did that first on the fish (the one I pointed out as having “something going on” that you couldn’t really see) where  I used silver metallic paint . While it worked well, giving a sheer soft glow, I was sure that gold would work better and that Pearl-Ex (or perfect Pearls or some other mica powder) would be better.  It was.  None of the photos will really capture the sheer-ness of the shimmer, not like I see it IRL, but maybe they will give you enough of an idea for you to have a bash.

pearlexgelli

The first thing I did was to mix up the acrylic medium with the Pearl-Ex.  I wanted a nice smooth paste, the consistency of paint, and I wanted the mica powder to be just a bit, so when the medium dried the sheer quality wouldn’t be lost.

Now, you can see I tried a few things over it, a bit like the GA video where they daub on Distress Stain and the medium acts as a resist.  The issue is the stain, ink sprays, and mica sprays all dull the shine of the powder at least a bit.  In that sense, the metallic PAINT mixed with the medium is maybe a bit better. It does still have a subtle glow to it, but you can’t really see it here.

pearlexgelli3

With the little smidge left, scraped together, I could do a dimensional effect through sequin waste! You can see it there above at the far left.

pearlexgelli2

I had used a sea green Pearl-ex for this one, but then I went for gold.  Oh that was fab. I think you can see it best in these shots:

pearlexgelli5

You can see it slightly, but angle it and the sheer shine comes thru more:

pearlexgelli4

And it’s really nice when layered over standard pulls.

pearlexgelli6

I had also experimented with pulling a print on the shiny side of an old CD.  The CD grabbed a fair bit of the paint from the plate, but there was a fair bit left so I pulled that on paper.  You can clearly see the impression of the CD here.  And the CD itself is way cool – as is adding superfine glitter to the Acrylic medium, although the samples were done using a really rubbish stencil.  While you can see that it works the samples are  just not all that attractive.  Neither are some of these, to be fair, but I like the glittered effect well enough that I’d like to showcase it better.  This may end up being a multi-post day LOL!  I have a couple more things I played with that I feel might need some further experimentation and/or refining before I share.  I want to play enough that I can offer some guidelines for how to get the effects I got.

But oh I DID have fun…..