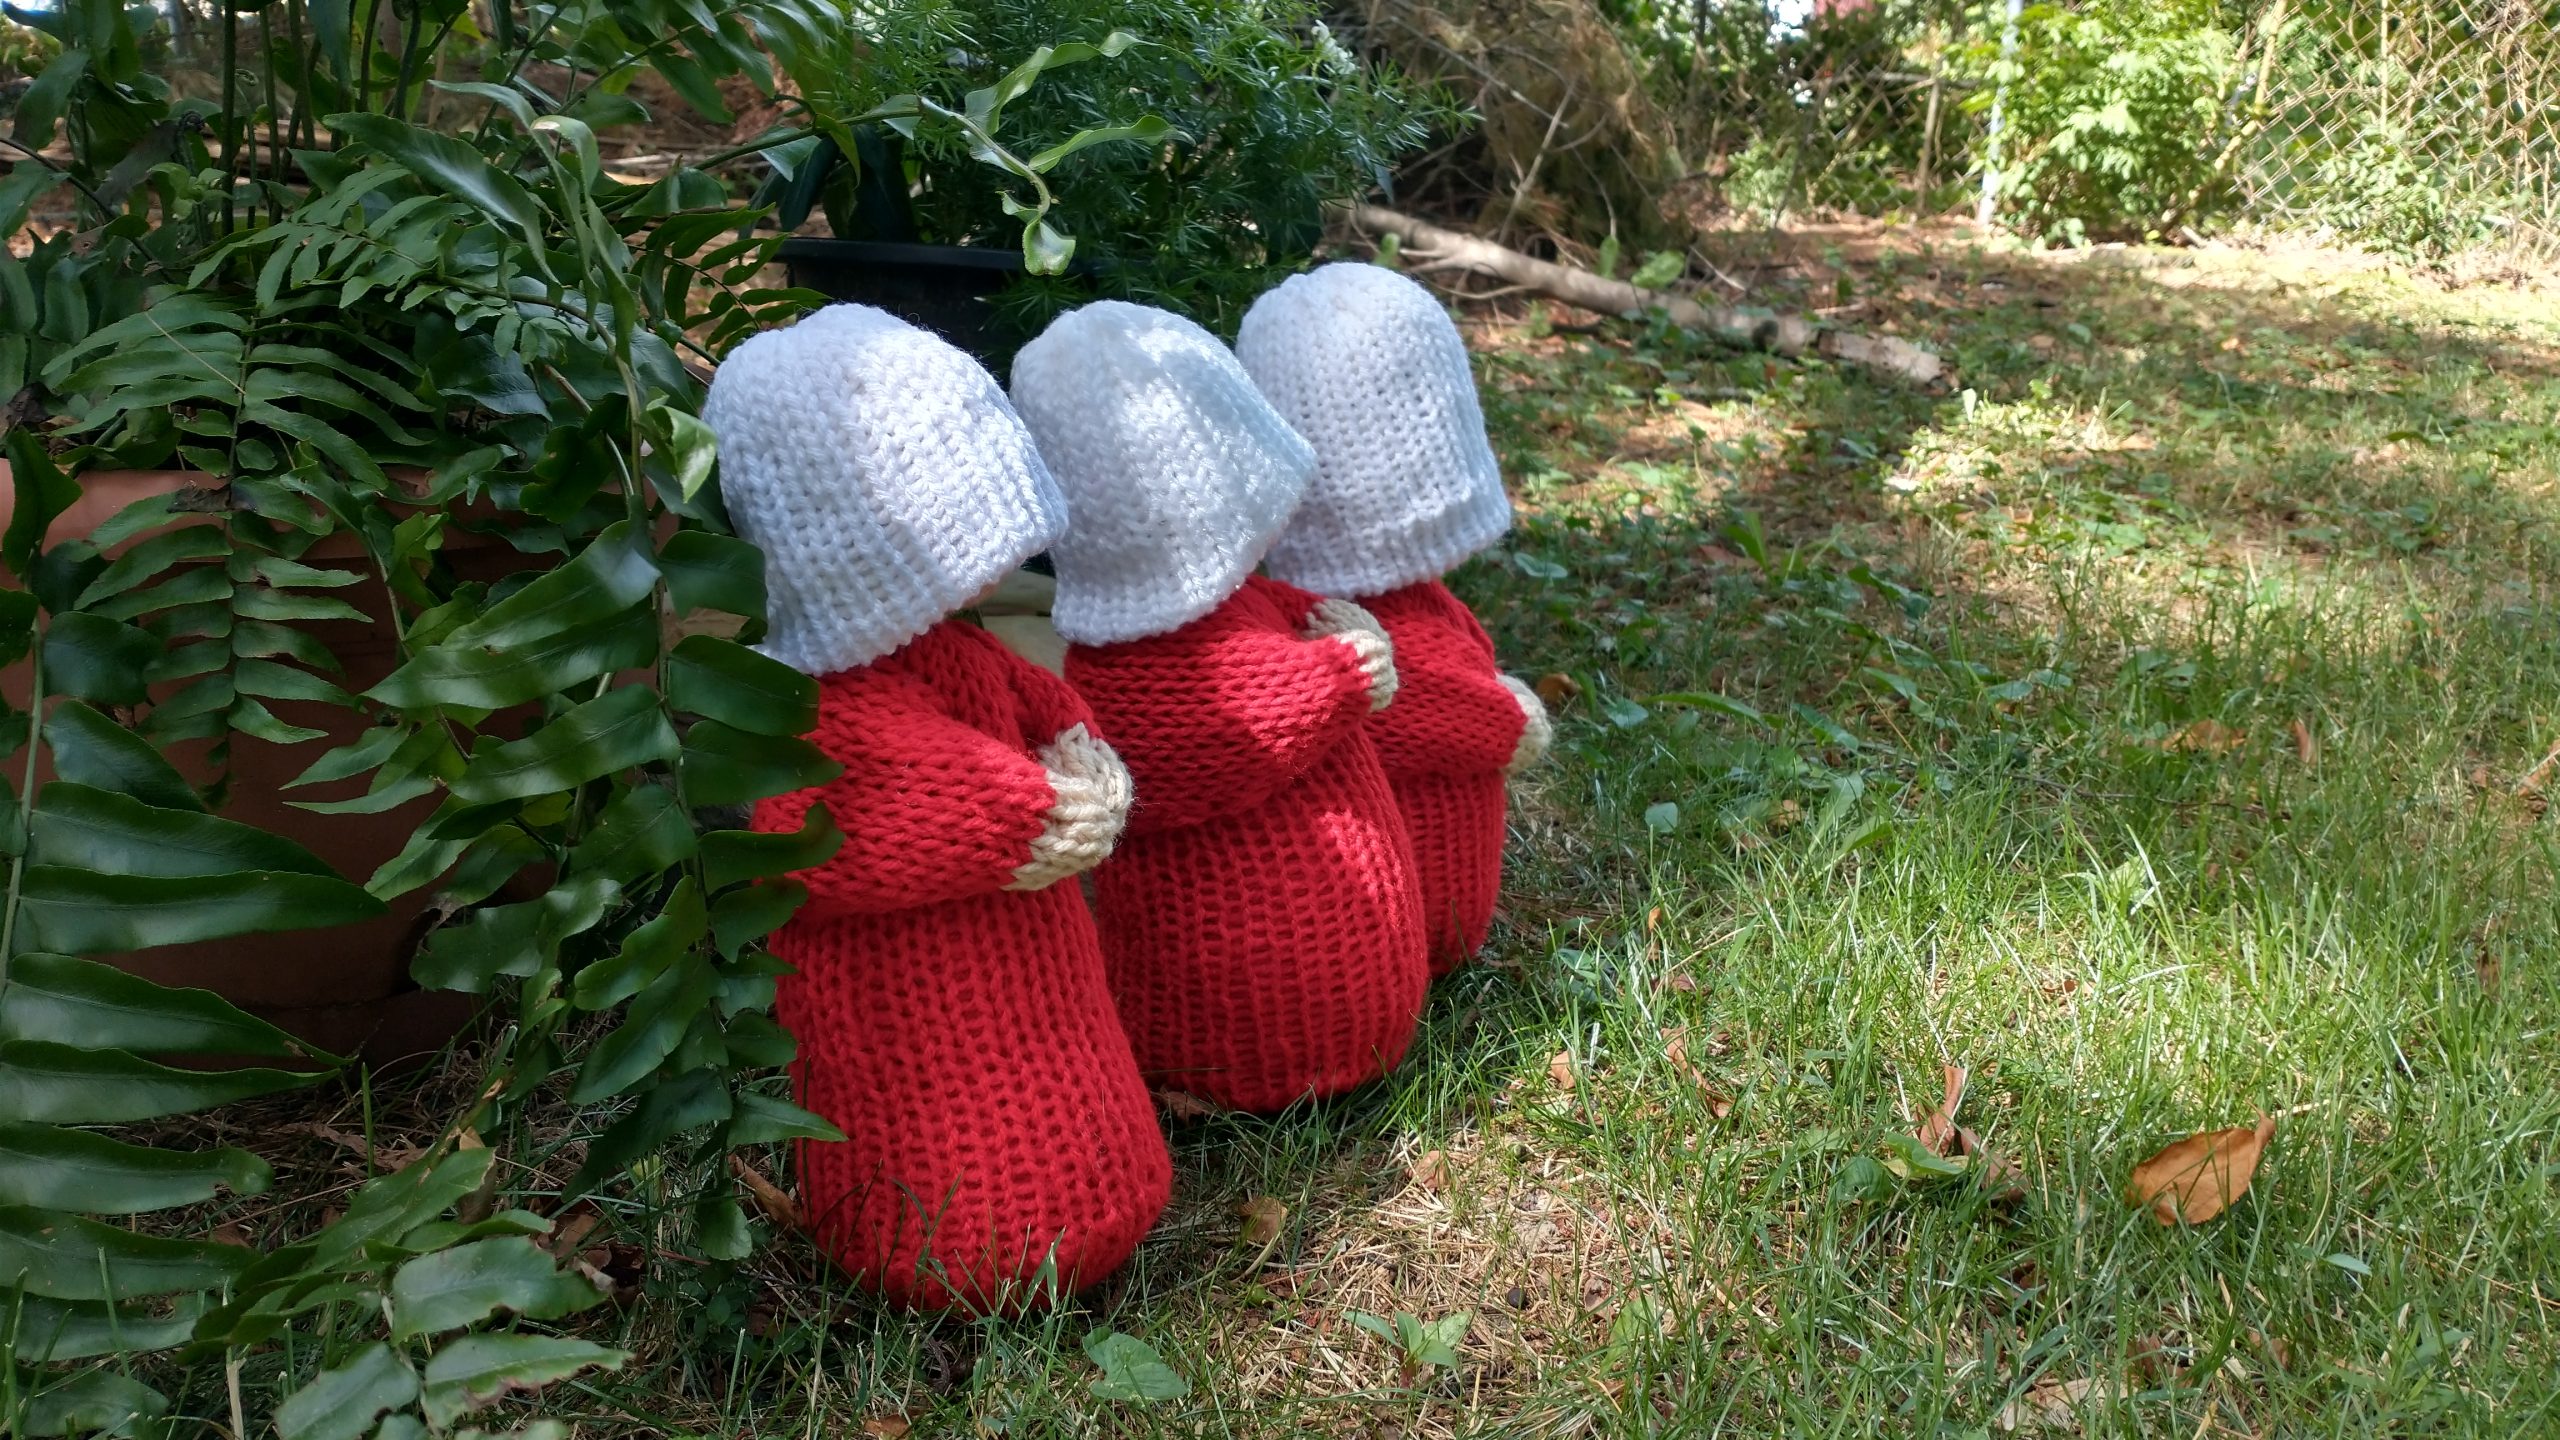
Well. Lest you think I have been resolved to the decision to strip rights away from more than half the US population, I am still outraged and still processing how best to be active in the struggle. Voting is always critical but there is a desire to do more. This is not meant to actually DO SOMETHING other than keep it at the forefront of my mind.
I saw a simple little pattern shared on Ravelry (but first spied on one of my knitting machine groups) for a little handmaid doll. The pattern is super simple.
While the pattern is written for a knitting machine they are all easy tubes so totally possible to do in the round (or even as a flat piece you seam, if that is how you prefer to knit) so if you fancy having a go, I’d say do it. It’s just body, arms+hands, hat and base.
My own version is slightly different, some changes were more successful than others (as usual) but even so I know what I need to do to correct where I went astray. The first thing is I would cut the disk of cardstock in the base from red card. I had a white one hanging about on my desk so I just used it. I like how it makes her stand easily but don’t like you can see it. Might try to slip a Copic tip into the gaps and colour it
Also I wasn’t super keen on the way the hat fit. I added a little bit of stuffing under the brim to give the hat more of the right shape and would need to figure out how to properly stick that in place in the future. I also left long tails so I could tie the hat at the back, again, more like the ones from the book.
You can see I maybe overstuffed her, so the arms are less floppy than in the sample photo, but I guess I am OK with that.
Overall I think she is fab and she will sit to remind me there is still a fight to be had. Back to arty farty stuff for WOYWW, after a bit of a tidy AGAIN. Yeesh.
I did say I would not share it till it was done and it was. I had my Drs. appointments , so arranged a trip to Franklin’s in Salisbury on Thursday (well, The Hubster went for me) and they were super helpful. When he arrived looking, a bit lost I’m sure, they took from him the ziplock bag that had a skein of ugly neon orange yarn I bought thinking it would work and it did NOT and the ball band for the lime green I came up TWO PUFFS SHORT of, and matched it then did a simple exchange, even without the receipt. Gotta love real life good customer service.
Then, right before the hottest day of the year (29 C/ 84 F ) I cranked out those puffs, completed the row and filled in the gap. In the cool of the evening I joined up the bits and…
Here is a detail of one of the diamonds that make up the star pattern:
Still not sure where it will be going. I think I just want to look at it for a bit, as I really really like it a lot but am in NO WAY tempted to make another.
I was also working on another couple of small knitted projects, gifts for my grand-niece and nephew, and they might have mad it into the mail by the time this post publishes. One is a super cute freebie dragon and the other is a cranked unicorn rag doll. Bother were fun, turned out super cute, and I hope will be happily received. Not the best photos but I struggle to get the most interesting bits in one shot LOL!
Still working thru the lessons of Journal Petite and will maybe catch up on the couple I have done over the weekend in my post tomorrow. One of them is possibly my favourite one….
Yeah, yeah, I know, the progress seems to be inching along. But as I am very near the halfway point I thought I should share it. The actual pattern is now really emerging, and you can also see the size of it a lot better!
I switched up the placement of the few lime puffs so actual am down to just one missing row in the top half. Size-wise it measures just about 60 inches across and will measure 48 inches top to bottom.
I could do a couple of things –
I could square it to 60 inches square up by filling in the perimeter with white.
I could square it up to 60 inches across by whatever high by extending the top line and the bottom line of white to intersect the side-most white puffs.
I could fill in whichever with black or another colour,
I could leave it as a hexagon.
The last is the most probable, if I’m honest. I am looking forward to it being done. LOL! Bet you are too.
I do have a handful of other images I’ve collected that might end up being my next attempt, if there is one. I was a small hex-based quilt I liked and charted that out. It had some overlapping areas where the colours were … mixed is perhaps my best description, achieved with patterned fabric that “reads” as a combo. Impossible with yarn really but I thought it MIGHT work with a variegated yarn? This is the working design but we’ll see. I might totally go off the thought of cranking out another 272 puffs…
So many things. The blanket is moving along nicely and is looking really good. But there are problems. The biggest one being I began cranking and assembling it based on the guidance I saw in various places. The uniform pattern is 22 pin machine, 17 rounds. Yeah. Na. Going back to the previously mentioned varying weights of yarn (because I stupidly went for the colours I wanted and not sticking to a single brand – lesson learned!) all work better at 15, some work even better at 14, and for Hayfield, I cannot get the 32 puffs on the light colour from a single skein. I COULD have, had I begun the process with 14 rounds per puff, but having done nearly half of them (and sewed them in strips) before I recognized the issue, I am screwed. Here is where I am, the turquoise flower is the middle of the blanket. You can begin to see the pattern here.
The lime yarn is the issue. I have EIGHT puffs and I need NINE to fill the empty spot and need ONE more to complete the diamond on the right (off the edge of the table) so two puffs short. Doh!
The other issue is that my machine does NOT like the Hayfield at the tension I need. I has worked HARD over the last couple of weeks and need cleaning and possibly, if the internet is to be believed, some grease/lubricant – silicone based, NOT WD40 (although the silicone version seems to be OK) – and that means taking it apart. WHAT?! But I have a lot more cranking to do. I took a moment to count up the puffs I need. Eek.
Thank is a LOT of cranking. I think I am going to carry on with the yarn that it seems to tolerate then follow a YouTube tutorial for cleaning and adding a couple of shims to the handle. By all accounts that improves the performance a LOT, and once I do it, it will seem less intimidating for the future. And doing the 22 pin machine means that I will have a chance to practice on the slightly cheaper machine before the big one needs attention.
Still a bit terrified of screwing it up but it needs to happen.
Still hoping I can get all mu circles (paper) done, but in the meantime I will share that other project, completed. I alluded to the fact that I had something that would have done the trick, easier, but I couldn’t find it. I refer to the cardboard wine carries you can get at a lot of the supermarkets
I have had some in the past, used them to make holders for Project Life cards
and I am sure I stashed a few for possible future use. Can I find one? Nope. So I thought about how I might make something similar in a simple way. I got a few sheets of A3 cardstock, added a strip of double sided tape and cut them into strips about 4 x the height of the paper. From there I simply made them into tubes, reinforcing the join with some old patterned tape, and stuck them in an old photo-storage box.
One of the things that slow down my cranking is my yarn not flowing freely out of the skein. Keeping all the skein upright means that once the first few puffs have been cranked and the yarn is looser inside, it flows with no effort.
Now if there is a massive snarl inside the skein – and these days, that happens far too often – I might still have to tease out what my mate Kirsty calls a prolapse LOL! But overall, I will most often get to a point where I don’t have to pull out a chunk to crank with abandon. And on the plus side pretty much everyone is going to have some form of card and some sort of box. You could even staple the tubes. so long as the staples are on the OUTSIDE! But yeah it totally keeps my yarn moving. Had I not already recycled my Volvic flavoured water bottles tha would have been my preference. And I think I will plan on holding on the my empties till I have six and re-make this then. I’ll share when I do!
OK Still prepping for our guest – gosh, is everyone out of practice for the whole having guests thing or is it just me?? DOH!
What a clusterf*ck. I have been madly cranking out my blanket and watching Stranger Things with The Hubster and Darling Daughter. In a fit of annoyance and not having just the right yellow, I went online and ordered some yarn. I ordered from Love Crafts. I never much liked it, but when they bought Deramores it made sense, I guess. When placing the order I noted my address as my old one, so I changed it. Clearly I did not realize that this was only going to change my BILLING address. WTF? I went on, blissfully unaware that my yarn was going to be delivered to a house we no longer occupy – not even sure anyone does at the moment. Try though I might, they are very clear that it’s on you to make sure the address is right. Well, I did TRY to do that and either thru a confused web page design or a confused “elder brain” I didn’t manage it. The site offers lots of unhelpful advice (like “maybe the local post office can help” when they deliver via courier or “contact the current occupiers” when they are not known to us as it was a rental house that is 90 minutes drive away) and the courier, who has not received the package yet, says to contact the sender if you need to change the address. It must happen a LOT if they have a special section of the help page to let you know there is nothing they can do to help if you made a mistake.
So there we go. I have absolutely no idea what is going to happen to my yarn. To be honest, I really only needed the yellow, the rest I bought was for stash so I will probably just go to Hobbycraft and buy it there and go back to ignoring Love Crafts.
In the meantime I have soldiered on with my pattern, trying to work around the missing yellow. I did try to get a decent photo but it’s big. This is laid out on our US King size bed in the guest room – bed stripped after the in-laws departure. The room is not big enough to get far enough away to capture it
So I had a go at a panorama shot. It kinda works.
You can see the beginnings of a pattern, although it is likely to be a bit confusing. I am not mad keen on what looks like neon orange here but is actually slightly more subtle (but not a lot) so I will have to see how it looks with the darker orange added in. I am 100% sure I made the right call, opting for only 15 rounds (including the cast on!) in the puffs. Rather than it looking super pouffy, they look much more like hexagons once all the “sides” are sewn in place. I just need to keep the tension the same if possible.
I have tails beginning and ending for each puff, so I tend to use those to attach, rather than just using one long piece of a single color. I weaves in the ends at the same time, so win/win.
We have some errands to run today and I am working on another circle project, but not yarn this time, that I am anxious to share. It’s just pretty time consuming and a bit slow going, even though I am using some stuff from my stash for a lot of it. Maybe I will get the time to work on that this afternoon and share at least a bit of it tomorrow. But as DDs time in education winds down, things are getting a bit more hectic so who knows. She’s off this week and has a LOT of stuff she wants to do with Mom, and I will always defer to her. I’m just happy she WANTS to still do stuff with me!
I just wanted to quickly (unlike yesterday!) show how you can use the hexipuff sheet to design your own blanket. I have two new babies in the family, a niece and a nephew, and while the flower blanket is very sweet, even in blues it isn’t even remotely boyish to me. SO I printed my hexagon sheet from yesterday two to a page as I suggested.
Just by cutting a sliver off the sides in the middle you can easily overlap the half-hexes to get a full sheet that is about 19 hexes tall by about 22 hexes wide – or vice versa if you rotate the page. Alternatively, you can use my old favourite online graph paper site and specify a LOT of options to get just the sort of size you need.
Doing the math, the hexes measure between 2.5 and 3 inches across. This is going to vary with your tension and your yarn, pretty much the same as every knitted project ever. So you are looking at an overall dimension of 47 to 57 inches in one direction and 55 to 66 inches the other. Of course you don’t have to use all of the hexes. it will depend on your design. So a stroller blanket is 30×35 inches, a toddler blanket 42×52 inches, a crib blanket 45×60 inches…lots of options will work here, maybe only needing an extra border row or using only part of the sheet.
I grabbed my coloured pencils and sketched out a quick design:
Cute enough, not super complex, and can be made a lot easier and smaller with a solid background. Or how cute would it be to have just the centre star with white hexes dotted around like smaller stars for a kind of night sky effect? What about using white yarn with some sparkle for those stars or a solid background of purple shot thru with silver? It could be super cute for sure. Here’s another idea – what about a shaped blanket? End at the yellow frame for a really unique stroller/pram blanket!
If you are a hand knitter, the basic hexipuff is 20-22 stitches by 15-17 rows and the Addi is between a 4.5mm and a 5.5mm (US size 7, 8, 9) and for DK or light Aran/Worsted weight yarn. You may need to test out your yarn and needle combo and measure to be accurate.
I’ll add in one more pattern I saved that I quite like as well. just to get your creative juices flowing!
Easy, cute and great for yarn scraps!
That’s me done for the weekend. I am still in shock from checking the distance from me to Shrewsbury, where the WOYWW crop is meant to be. 5-7 hours by train or 3+ hours by car. Oh dear.
I mentioned in my WOYWW post that I am working on a blanket. I have three circular knitting machines and the small i-cord mill and while I love using them I don’t seem to make a lot of finished projects. Many people who have these machine do craft fairs where they sell all manner of things – hats, lovies
blankets, and sometime even sweaters. I guess for me the issue is that you have to be a size that works with the number of needles on the machine. A lot of people complain that the hats are too tight for a fully grown adult. I find this to be true. A lot of people knit for charity, where I guess it isn’t super important the fit – they think that every hat, even a slightly smaller one, will fit SOMEONE. Fair enough.
I have always loved the hexi-puff blankets. They look like this:
Now, I have to admit I am not mad keen on the flowers or the owl. But using up yarn in this manner is great, cause I have a lot of bits and bobs. The ongoing problem is that I have a mixed bag or weights and fibers and even between the same weight the actual weight of the yarn varies a lot. There is heavy DK and light DK. Look at Stylecraft Special DK and Hayfield Bonus – both are £1.99 a ball but the Stylecraft has 322yds/294m and Hayfield has 306yds/280m ! The WEIGHT is the same but the amount of yarn is way off. From experience I know Stylecraft is much thinnner. I always research the YARDAGE of a yarn before I assume it works when a pattern specifies x balls of yarn. Do the math or be disappointed!
But I digress…
I had a look, instead, at some patterns for QUILTS using hexagons. There is a much wider variety of options. I found a few I liked and started cranking. Blimey but it’s tiring work. The big difference is I can’t really sit comfortably to do it. Lots of people who do this as a business have custom set ups, usually something like a low table with a hole in it so the knitted tube can flow without touching the table the sits on. Puffs are only a few rows so that is not an issue but I’m tall and my table is not. I have been searching for a way to do the cranking but finish off the puffs in comfort. I finally found a method that works well for me.
Basically I cast on, crank out my rounds, cut the yarn then add in some smooth, high contrast yarn and let the piece just drop off the machine. Once I have a pile of them I can sit in comfort in front of the TV or with my knitting mate and finish them off by threading the tail onto the needle and slipping thru the final round of stitches. Easy Peasy. You have to pull both the ends then cinch the puff into a flat circle anyway so better to do all that sitting easily!
Slip the tail thruRemove the wasteUse a crochet hook to catch a stray
Once I have all the puffs completed I string them onto a long piece of yarn IN ORDER of the row. I label it then move on. It makes the assembly process so much easier.
I can mark off the rows as I complete them. I also created a sheet of hexagons for colouring in. It is only 11 hexes across but it is easy enough to print two and tape them together. My hexipuffs are about 2.5 to 3 inches across. Usually I see them specified at 17 rounds. Na. I do 15. Te 17 round ones are SO puffy I don’t like them. Plus at 15 rounds I can get what I need from a single skein of yarn, at 17 I come up short. Also, remember you can print that PDF two to a page
Simply cut and paste if you prefer more hexes and/or smaller areas to colour. Think of this like a colouring book you can use to design your own blanket.
Yeah so that got long, and there is a lot of randomly useful/mildly interesting info in there for Addi or Sentro crank knitters. Hope it wasn’t too boring for the papercrafters.
We are having some work done around the house and things are going to be a bit crazy. It may or may not impact my ability to do crafty things, as I also have a face-to-face with my consultant, a 2 hour drive away. Not fun, but required.
I am still making laces, and have been playing with AGLETS.
They are metal tips for shoelaces. Ideally I would use a proper crimping tool to close them but while I feel pretty sure we have one I am not too sure where it is. Crimping the ends of the laces with a regular pair of pliers is possible, but not beautiful.
I had to fine-tune the crimping a bit to fix the flat bits (which do NOT fit thru the eyelets very well!) but they did fit in the end:
Over all. I prefer the clear plastic 3mm heat shrink tubes as the yarn shows thru.
I made a little PDF, cause I know people like things in that format so they can download them and save them so here it is.
I really love the idea of having laces that match my hand-knitted socks LOL!
I can see there is a new AJJ challenge so I really must try to fit that in, amidst all the work in the house!
I am still awaiting the thing I need to make my laces perfect, but I will add my progress for anyone who wants to have a play in the meantime.
I tried wrapping the tips with thread and with electrician’s tape. The thread was far too fiddly and the tape was far too thick to fit thru the holes:
I tried tacky glue, which kinda worked, although it was messy and took a long time to dry.
But the low-tech solution – if all you want to do is knit the laces and thread them thru – is one of the loop-hole yarn needles – so often the easiest solution is a solution, even if it isn’t perfect!
So I am still awaiting the shrink-tubes (that are designed for cables but which look to me very like the tubes at the end of your normal laces) that will worth this out in a very professional way.
I am pretty sure an embossing gun will shrink the tubes (cause I suspect the lighter might catch the yarn on fire so do NOT do that!) and if so, I am going to make more cause they are super cute!