scrappystickyinkymess


3 Comments

Excavating layers of past work.

I will share more of this, but I am trying to make sense of the piles of papers I have created over the years, mostly gel prints but not just that. I have stashes of things in multiple places, that are where I stuff experiments, finished pieces that I have no clear purpose for, but also things like images or pages I ripped out of magazines that I thought I might find a us for or I just wanted to save. I have also found a bunch of complete pieces – I have collected up some of these to share, but am not sure how best to use them. I must have had a plan once….

This piece was using a hand-drawn stencil I cut – the left is just a sample and the right is one I liked well enough that I framed it and it’s on my art space wall.

Not sure what my intention was for his piece, but it is might pink, isn’t it? LOL! Hard to see but the central book page is actually mounted above the background, for a more 3D look. I suspect maybe I meant to frame it but never did.

These three were experimental pieces with no real intention for them, then (when I made them) or now! I think the heart was using the gel plate as a stamp, by mounting it on a large hunk of acrylic block – common now, but I had never seen it done back when I made it. I still really like the middle one a lot.

This one is pretty recent, Distress inks and Vaseline resist on tracing paper with a stencil. Love the colours, but it’s backed with heavy mat board so unless I deconstruct it….

This is a piece I love, using a homemade stencil – I think an image from one of my subscription resources. Still use it. Actually it might be both the stencil and a mask? Might have to drag it out to know for sure.

And finally, a pile of recent work – some of the postcards that didn’t make the cut for a recent swap, some background tags and some completed ones, all within the last few months. Destined either for happy mail or swap extras.

While this is by no means all the hoarded stuff, these are the things that I would call closest to being finished items, rather than samples or experiments. I’m kinda thinking the first seven might actually work repurposed to perhaps fill the last few pages in one of my art journals. I have two that really only need a handful of pages in each to be complete. And it might give purpose to them, with the addition of a quote or some text of some kind. The swap/happy mail goodies will get used, no doubt, but some bits could help fill those journals instead, if I prefer.

It’s interesting how much stuff you can amass in 20+ years of arty-farty pursuits. I suspect I could cover the walls of more than one room as if with wallpaper if I wanted to. Hoe nightmare inducing would that be? LOL!


3 Comments

So much going on. Printables to begin.

Been a bit since I did some of these, but I did promise so ….

I created a sheet for myself of words that I would use as pairs. Any combo – I could pick them, to accompany a piece already created, or I could draw two at random, which could be fun and surprising, to work towards. Mediocre Scream? Ruthless Self-Portrait? Phenomenal Boredom? Zesty Madness?? I mean any combo could produce a sense of something expected or something odd. I always like a nice typewriter font in lower case and I also did an all upper case one. These are the ones I gravitate towards. Hope you find them usable too.

I used words from some previous printables, just things I had already printed and were lying around on my desk, to make the text on those tags from last week and that exercise prompted me to make these.

You can download the three-page set here and print them all or select only the page you want in your printer dialog box.

Grab them here!


2 Comments

What? A Saturday post?

I KNOW. Unexpected.

I have been having a bit of fun playing around with creating digital paper using the iPad and Procreate. I made a piece (yeah, I know, not really my style, is it?) and I thought I would share it. It is not big enough/high quality enough for printing (ie not a PDF to download) but I would love feedback on it. I guess the intended use would be as a junk journal signature, with some sort of companion piece to be printed on the back, making it foldable into signature shape.

Is it meant to be all misty and indistinct, so you can still write on it. I played about with making some tags as well, and a little fold-over.

I mean, it’s not award-winning or anything, but I had fun doing it and I learned something in the process. Now I just need to sort out how to make papers that are more MY style, maybe even using scans of my own prints. THAT could be both fun and useful.

Don’t get used to it. LOL! I don’t plan on adding in regular Saturday posts. Life is far too hectic at the moment and I am not feeling my strongest but I did want to share this out-of-the-ordinary play.

I have been toying with the idea of doing much, much more of this. Apparently I have a Creative Fabrica id – who knew? [ID: #1841799] and it is possible to seel there. Been doing some research on that and it looks like an interesting place to begin. We shall see….


1 Comment

Determined. Not just PLAY but actual items made

I seem to have fallen into the trap of endless play days with nothing that you can call real finished pieces. Gel prints I love bit haven’t used for anything, endless experimental pulls that are piling up, just so so much stuff.

I am making a conscious effort the make stuff. So I had a play with those bits of card I pulled from the mostly dried up paints and made some tags. I always need things for extras in a swap envelope, or Happy Mail , and these will fit the bill quite nicely. The UK tags I get are not huge and I wanted to use the hole protectors too so I punched them out, then covered the tags with the papers.

I used bits and bods from my desk t decorate, including chopped up sheets of my various word printables and some collage fodder.

I ended up making six of them and in the process had a bit of an idea for a set of printables based on the two-word combos I ended up using. They should be fun and I’ll sort them in a couple different fonts then share them with you all. I like the idea of drawing “one from column A, one from column B” to get an odd and maybe surprising phrase to then build a piece around – tag, ATC, art journal page, whatever.


Leave a comment

Those paints worked a bit….

So if you saw yesterday’s post, you know I have been attempting to bring back to life some very old, slightly dried out paints I got second-hand many, many years ago. I did manage to get some useful stuff out of them by wiping the knitting needle I used to stir in the water (trying to re-hydrate them) on my 5×7 gel plate and pulling a simple print, either by adding a bit of texture, or even by just spreading it with the brayer and picking it up.

I actually got some pretty prints, and the final pick up one from everything dried on the plate I think is a stunner!

I rather like this one as well!

The best pick-up print from a plate that looks kinda meh.

I mean looking at it you wouldn’t think I could get much off it, but:

I cannot tell you how pretty it is IRL. Soft and grungy with a hint of texture, and little flashes of metallic paint here and there. I don’t know what to do with it but I think scanning it is step one! I will never get over the difference between a scan and a photo

I am still leaving the paints to sit and giving them an occasional shake, but will hope to find time for a proper play this weekend!


11 Comments

WOYWW 712 – dried up paint, resurrected?

A strange one, something on my desk with an actual purpose, progress but not project!

Happy WOYWW.

So I had this drawer full of small bottles of paint. Lumiere metalics and something called Sorbets. Thing is, I am pretty sure I got them at a WOYWW crop from the sale table, a good six or so years ago. I might have used them very occasionally, but I lean more towards inks that paints, except when gel printing.

What I have been doing is trying to soften these up. Adding a little bit of water, shaking them around, stirring with a thin knitting needle, and unclogging the tiny tips. I found it quite easy to pop off the tip and put it in a small jar filled with hot soapy water, I let it soak, give it a good shake every so often, and hopefully in the ens I will have clean tips to put back in the bottles!

If I do manage to bring them back to life I vow to use them up posthaste (post haste? post-haste? LOL!) I mean why hoard them? Use ’em or lose ’em, clearly.

Cat is sticking with me, although Son will be home by the time this goes live, and if history repeats itself Cat will cling to him and steadfastly ignore me till he goes again. Ah well. She loves to lay on the sofa beside me and as she is white and sheds a LOT I think I need to give up black clothes for now. Her other spot is on a towel-covered pillow on top of a box. This usually sits in Son’s office (my ex-sewing/ironing room) but I moved it to MY office/craft room at the beginning of his trip. She is looking quite intently at very small gap under the table, where she can hear a bird in the chimney.

So there we go. A bit of a change-up from the usual catastrophe of a space. I have had not great blood test results, after having to cancel last month’s test due to catching Covid, so suspet a change in medication will be required. Not a welcome change, but required. Might slow me down a bit.

Hope you have a lovely desk-hop. I know I will…


3 Comments

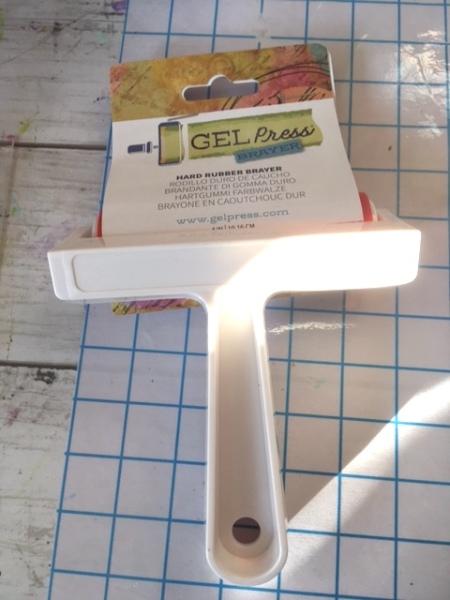
Do you have this annoying brayer?

I have a Speedball brayer that I love, but it is quite old. I have been buying different sorts of brayers over the years, just to see if there is one I like as much, and also to acquire a few different size options. I find you cannot trust Amazon listings when they say “soft rubber brayer” – is usually is not soft at all -and you have to look out for references to printmaking, where a hard brayer is more the norm. I have a bunch now, not all great but I use all of them.

I recently decide to buy a Ranger/Dina Wakely/Dylusions branded brayer because I wanted a very small sized one. Big mistake.

The darn thing started out just fine, but very shortly a clear design flaw was revealed. If you look closely att eh curl of metal that holds the rubber brayer in place, you can see on MY brayer it is really really tight against the rubber core (bright pink in the photo) and guess what that means?

When I try to roll the brayer over paint on the gel plate, the rubber will not roll. It drags across the gel plate and smears the paint, leave gaps or wonky coverage. Now it isn’t just me. In the FB artist group I frequent, many people complain about it, for a variety of reasons. My issue is one big one, but another is how darn squeaky it is. OK, so maybe only annoying and not really a performance issue, but still…

So I looked at my issue, thought about what it would take to solve the problem and came up with a solution. I disassembled a clothes peg and wedged on side between the metal handle. This spread the bit that grips the roller in place so it no longer squeezes the core and keeps it from rotating. Aa bit of electricians tape holds it all in place.

Doubt this will solve the squeak, and for £12 from a major brand, you would hope this to be made better. I suppose it is dependent on how much spread you need – too much and the roller will just slip from the curl of metal and fall out!

As a sidebar, I also got a GelPress Economy Brayer (4inch) for about £9 and that seems like it works about as well as the Speedball one (at nearly £20) does. I like that the roller pops out for cleaning too.

Sorry. Boring post, but hopefully it will help someone out.


Leave a comment

Having fun with an old old tool

Now, you will have to go back a full decade ago to see the first time I made one of these. It is a page protector, sliced in strips, front one way back the other, that I use to flip and flop and mask of areas of the gel plate, when printing. The washi tape just makes it easier to see the slices.

The idea is to roll out the paint, flip over the vinyl, and print. You can easily add texture to get interesting overlapped areas

And the paint trapped below the vinyl can then be used on the main print (left) or a secondary one (right)

and the mop up prints have just a hint of the lines, which I think makes them interesting in their own right.

The final piece looks like this

and you can see I made use of that sheet of ATC mark-making elements on it for some final drama!

I thought as the 12×12 page protector isn’t QUITE big enough to use with the 12×12 plate, I might try making another version with contact paper instead. I have some ideas, as do some of the folks in my artist group. I will be interested in seeing how it all develops.

Busy week.


3 Comments

ATC mark-making stencil from Toughprint paper

Fun! The artists group I am part of does ATC swaps and I have been looking thru my mark-making stencils and stamps, looking to one to use. I have a bunch of stamps I make where the elements are…arranged I guess, in what is meant to be a “random” layout. I will often get a bit heavy-handed when stenciling and as my mind wanders I end up stenciling the whole area. So I created some using simple images that I like, but arranged them so I can’t over-do it.

As I mentioned yesterday, I just did my design, printed it on the Toughprint paper, then cut it. It did amazing except the tiny little dots in the one design. It got some but missed out more.

I solved that by punching out the dots with my Cropadile!

I grabbed a bunch of papers from my desk and cut them into ATC sized bits, just to test out the designs.

I really like them all. They are quite small scale, and all on one sheet, which is nice. I like the scattered nature of the motifs, and they stencil nicely. A big win!

I have a few other designs I might play around with. I am trying to think of some more unique marks. I am also on the hunt for the exact little man silhouette I used on this piece. I found lots but not this exact guy. Driving me MAD, it is. I found one of the little ladies cute from a transparency, and the file where she came from but the stocky dude is not there.

{sigh}


3 Comments

Interesting material to cut stencils and masks

I have been playing with my Scan&Cut. I feel like I need to always mention I have the oldest version, the CM300. so bear that in mind when I talk about how I do things. This one was cheap in a Black Friday Sale and I am happy with it. Less so my mat issues. But hey ho.

I get annoyed with all the steps sometimes, when I am designing something like a stencil. In reality it isn’t so many but I just want to do it as easily as possible. I had the idea to print on my transparency sheets. But of course they are clear, so all the mat grid lines show and the S&C is going to want to cut them, isn’t it? Then I thought I could back it with paper, but then all the little bits that get cut are not going to be anchored in any way and that sounds like a disaster. I thought about backing the transparency with white contact paper. I still think this could maybe work. In the end I went looking for white transparencies (yeah. right.) and actually found what I wanted. Sadly, it seems to be a discontinued line but I then found this stuff:

I figured out the settings *I* needed to cut (using the regular depth blade) but not before I screwed up royally and:

Yes. That is my window as seen thru the hole in my cutting mat. An ACTUAL HOLE.

{sigh}

The big difference between the initial stuff I found and this is the other one is thicker. This is 174gsm, so more like 50lb. Not as thick as I would like it but not dissimilar to transparency sheets. All I have to do is make my design, print it on the sheet (and I have the Laser printer version) and pop it on my S&C mat. Scan to cut and away we go.

Those guys worked well, but I need to thicken up the stalks before I am truly happy with them. I’ve experimented with placing the resulting bits printed side down and the reverse of the paper side down, Not sure there is a significant difference, and certainly not when the piece is coated with paint.

Of all the things I have cut stencils from, this is, in combination with the Scan & Cut, the easiest. The S&C clearly identifies the laser printed lines (more on that tomorrow) and I only have to create my design and print it, then scan-to-cut and cut. No converting it to an SVG, no need even to use the CanvasWorkspace tool. I love how flexible it is so the things I cut would easily work in an art journal or collage. Sometimes the flexibility works against it, but mostly I like it a lot. Where there is trouble is super thin lines, like those leafy fronds. I mean, it works, but slightly thicker lines would be better.

Is it as heavy as I might like? No. Hands down the best stencil material is my old HiTi dye-sub printer photo sheets. It just performs best. You can’t print on it, which is it’s only downfall from my POV. I’ve heard from an arty friend there is some Xerox paper in the USA which sounds a bit like this stuff. No idea if this exact brand is sold in the USA but have a look for Waterproof Paper and see what you find.

I know I am not done playing with this paper…