scrappystickyinkymess


8 Comments

Printable birthday bank – and PINK hair

So I was pretty much dead in the water as my connection is still at dial-up speed.  I am sure it will get sorted tomorrow, but for today everything is an effort.  And sharing the other connection with DD (and DH for that matter) is pretty bad.

It started out yesterday as killing time – well not really, more trying to learn a new skill.  I wanted to turn my version of Petrina’s bank template into a printable.  I had downloaded these CUTE retro kid’s birthday party images from (where else?) The Graphics Fairy, with the intention of turning them into PL cards, to go with the retro moms and retro dads I already made.  I will do, I suspect, but for now, they are here as a BOY version and a GIRL version of the little printable banks.

printablebank

It goes together just the same as the original one.  The girl version has the girl in the “featured frame”

printablebank2

and the little grouping is the same on both

printablebank3

And for the BOY version, this frame and the girl one switch places. Actually, in the PDF, the coil slot is on the other side of the figure.  On the original, everything was reversed and the template was INSIDE the structure.  I had to switch it so when you stick the flaps the coin slot isn’t in the way.

printablebankboyI thought it could be fun to do with a kid – maybe you cut the coin slot.

The other task for the day was sorting out DDs pink hair.  We used a highlighting product designed to give a bright colour effect even on dark hair, and by gum and by golly, it totally worked.  DD can’t help but preen, and I can’t help but be stupidly pleased at how well it came out.

pinkhair2

Adorable.

pinkhair

Now, we have about 6 bags of food marinating in the fridge for a massive BBQ session – that means no real cooking to be done the rest of the week.  All reheat, stir-frying, slicing over lettuce for salads, and mixing with pasta.  Easy, breezy summertime cooking.


1 Comment

BIG CARD pages added…but not quite done.

Sorry email followers.  I don’t mean to SPAM you, but as I am testing things about post formats it will send you new ones.  Just ignore them.  I promise it won’t be too many more.

After a few days of no power issues, of COURSE, just as I was allowing myself to relax, the circuit blew last night after dinner.  “Magic Hour” indeed. Annoying, but more so when I brought back my Mac in that my internet connection was rubbish, and it just kept dropping thru the morning.  No support till Monday, and DH is pretty convinced they only need to reset the dslam at the exchange (which they have done before) to solve the problem for NOW.  But if the power keeps blowing, the exchange is going to keep thinking the connection is unstable and keep dropping the sped lower and lower every time.  Right now I am on DDs connection, the old Talk Talk one rather than my Spitfire one son everything is SLOWER.

New theme again – The fonts in the side bar of TwentyEleven bugged me.  This one is called Yoko, and I like it a bit better, except I thought it had a 2-column option. It does for the menu pages at the top, but thew body is 3 column only. Bah!

I am working on the BIG CARD pages.  I am loving the Gallery option for showing the images in a mosaic, but I wish it were possible to make the images a link, or add a link when they display, so if you want to read the full post you can.  I have to check and see if there is some way to make the caption a link.  Until then, I will have to add all the clicks as text.  But this is what you see on the pages for each suit.  I had forgotten some of the techniques I used, but I am sure I will revisit them soon.   I love how some of these look, if I do say so myself!

BIGCARDdiamonds


1 Comment

If you’re going to be crazy, you have to get paid for it or else you’re going to be locked up.

Experimenting with a different “new theme” and the Post a Quote post style.  I figured I might as well do a Hunter S. one…


16 Comments

A little housekeeping….

As you can see I have switched themes for my blog and made a new header.  Actually I made a couple of them, and now I am just trying to decide between the one up top now,

headerbat.jpg

and this one:

headerbatleft

Care to wade in?

I have also removed the cluttered sidebars, and am in the process of organizing them in the menu drop-downs under the header.  I’ve grouped all the printables in one place, but you can see that the PL stuff, the Christmas stuff, and the “other Freebies” stuff  all have their own page.  I’ve also started using Galleries as a way to keep the pages reasonable – Looking in Other Projects you can see them in action.  They are tricky in some ways  because I can’t quite figure out how to make the individual Gallery photos into links.  Bear with me.  Everything is still here, and hopefully in the end it will all be easier to find!

Am am pleased to have my Gelli Plate stuff organized in menus (finally) and now just need to go back and tag things properly – the best example is that for a long time I tagged my BIG CARDS as CARDS.  When I finally created the BIG CARDS category I didn’t go back and re-tag them.  I will now. It will take AGES, but will be worth it in the end.  I can’t tell you the number of times I’ve been looking for something on MY OWN BLOG and had to resort to Google to find it. Shocking.  I guess I might as well collect them all into a menu too….


{sigh}


12 Comments

It’s a bank! It’s a display stand! It’s a Gelli project…

You know me by now, I think, if you read here often.  I get obsessed with a project or a tool or a technique and am not happy till I feel like I have exhausted all the possible uses. And often, if I am obsessed with more than one thing, I’ll do a bit of a mash-up.  The results are not always a success but in this case I think it  is.

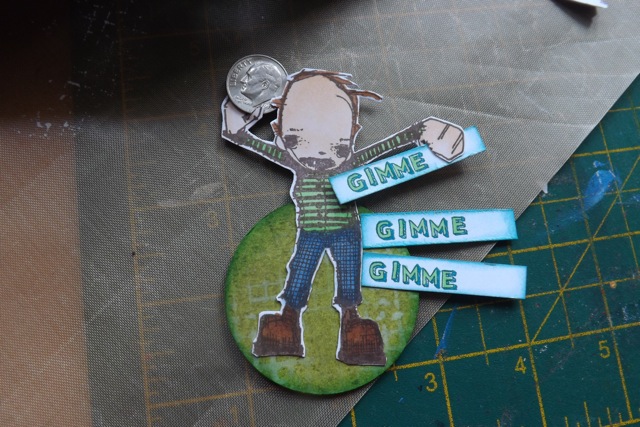
I had so much fun making the little Gimme Gimme Gimme bank from Petrina’s template.  I had said to her that my original idea was to use it as a bit of a display stand for ATCs.  My thinking was that it would be a nice little thing to have on my desk to display ATC trades.  Not that I am really likely to need it till the 5th Anniversary of WOYWW, as I don’t do ATC trades regularly.  I have been considering taking part in the ATC trail on UKS so who knows….

I’m going to start with the template.  I’ve altered this from Petrina’s original, with her OK.  I use the SAME template for the different versions. This is what it makes:

banktemplate13

An ATC Display stand

SDCbank6

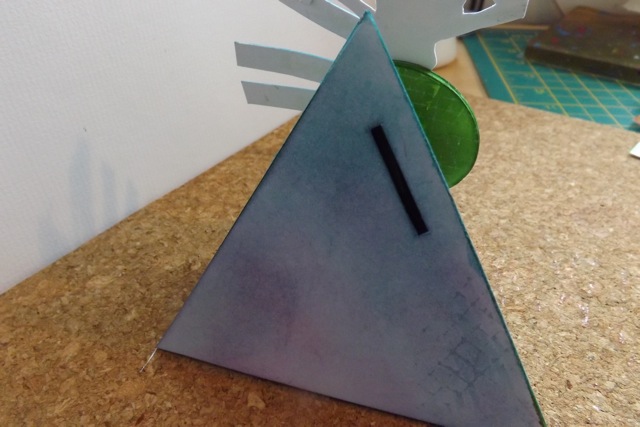
A bank, with a coin slot on the back

gellistand

A single-slot display stand

And there is one more use that I need to work out a sample of.

Decide what  you want to make.  I think it’s pretty obvious what is needed for each option, but I’ll try to mention which bit is needed for which version in the steps.

1. Print the template. Cut out the elements.

banktemplateWhat you see is the BACK of the of the project, or at least that is how I think it is easiest to do it.  The instructions tell you to punch three of the circles, and you should be able to do that from the non-template areas of your printed template.  Only one circle is printed.

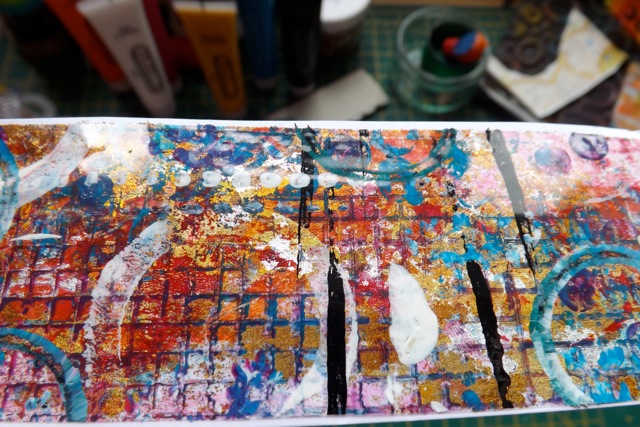
2. Score the lines and fold as VALLEY folds.  This puts all the printed areas INSIDE. This would be handy if, for example, you wanted to print the template on the back of a Gelli print, or cardstock or patterned paper – or if you wanted to decorate with inks and stamps, like the bank seen in detail here!

banktemplate2

3. FOR A BANK ONLY:  Stick the extra triangle to the inside of the BASE.  Stick the 3 circles in a stack.

banktemplate3

4. Decorate the various triangles.  Note the two that make up the FRONT.  If you want to coordinate them, or decorate them so they are views as one area, your can.

banktemplate4 banktemplate5 banktemplate6

5. FOR A BANK ONLY: Cut out the circle and the coin slot.  Again, if you plan on making this just as a display stand, don’t make the cuts!

banktemplate7

6. FOR A DISPLAY STAND ONLY Cut the display notches.  Also, you can choose to cut just one, just two, or all three of them, as you prefer!

I find it easiest to fold the front, and cut the notches with scissors…

banktemplate8

then open and snip.

banktemplate9

I am not sure about this step!  I snipped off the point of the triangle, thinking it would make it easier to slip in whatever you will display.  But I am not sure it’s an improvement.  Some of my ATCs are quite thick, and for them, it helps,  But super thin ones, it’s less of an improvement.  Think carefully which will be more useful for you.

banktemplate10

7. If you want to, you can alternatively either cover the triangle with Gelli print pulls on the sticky side of contact paper OR stick those pulls to whatever paper you want then cut them to decorate just like the ones above.

contactpapergelli contactpapergelli2

8. FOR A BANK ONLY:  attach the circle stack to the base, over the smaller hole, with a brad.  That will allow you to rotate it out of the way and get the money out!

banktemplate11

9.  Although the template will say GLUE on the INSIDE of the flaps the adhesive goes on the BACK OF THE FLAPS so you can stick it together on the inside. You can see the position in the photo above.

banktemplate12

I probably could have milked this for about 4 days worth of blog posts, but it made more sense to me to show all the variations at once – that way if one doesn’t appeal, another might!

I had the thought too that this might be adapted to make a “card” – or at least something that is a card as much as the display stand one is a CARD, IYKWIM.  The issue is that you have to be super confident in your recipient! will they take the time to assemble it?   Unless yo are sure, it’s just not worth the time.  But I have a bit of an idea for that too….

If you made it all the way thru, well done.  I have a gazillion other things I could say, but I won’t.  It may take another post or two after all…..


23 Comments

WOYWW 212 – playtime!

Hello there WOYWWers!  I am playing and playing.  My plan today is to carry on with the original idea for the pyramid thing from yesterday.  Petrina and I have been chatting via email and she is happy for me to alter the template slightly so I’ll probably give that a go first, then carry on with creating.

My desk is looking like this today – not too bad, for a change.

woyww212The one thing worth mentioning is those brush looking things on the left.  Sorry in advance for the upcoming rubbish photo.  I took it then it got dark before I uploaded it, and only then found it was blurry.

woyww212aPopped in to town with DD yesterday to sort her new glasses, and I found these in a store called The Works.  They are soft rubber tools, perfect for the Gelli plate.  I saw some at an art shop for over $20 so £2.99 is a deal.

I have a little pile of Gelli pulls on contact paper, but a couple of them I have to hide, lest someone who I don’t want to see them, sees them.

woyww212b

And to update – the electrician was here again yesterday, for HOURS, but he seems to have fixed the power issues – turning off the kitchen light no longer trips the circuit YAY! It’s safe to leave my Mac on. Fingers crossed .

Looking forward to desk hopping today – shopping and ice skating, as ever on a Wednesday, but I really want to see what everyone is up to!


5 Comments

SDC105 – a bank

It’s been a while since I ‘ve done the SDC Challenge, and 105 – anything but a card, appeals.  I probably need a few new stamps, if I am going to insist on only using the Stampotique range, despite them opening up the challenge to using any stamp.

How it came about: One of my commenters, Petrina, does the most wonderful business-card sculptures.  They are pretty freakin’ unbelievable.  Anyway, I had grabbed a template from her freebies section for a little pyramid stand thingie, with the idea that it would be a great little thing for displaying ATCs.  I had a plan, but something came up and it got pushed to one side in my head.  I did THIS instead.

SDCbank6The thing is, the template isn’t just a stand, it’s also a bank! Download it here. Having JUST had to transfer some money to DS at Uni, the idea for this project was one that I could SEE in my mind before I even started to work on it.

There were a couple of issues – first, the template is probably designed for US money.  No t sure a 50p piece or a £ coin would fit.  If I do another one, as a bank, I would alter that.  Also, I think I would make the back so it opens like a flap, to access the money.  I wouldn’t want the recipient to have to destroy it to get at the money!  One more thing, which this will explain:

The template has the little triangle cut out to create the holder for the card. But it is very thick.

SDCbank2

 For a card, it probably works perfectly.  But I wanted a little figure. So I decorated the template with distress inks, stains, and stamping

SDCbankI punched out a bunch (like 6 or so) circles from pretty heavy cardstock.

SDCbank1I decorated one of them and made a stack – that fit fairly snuggly in the slot

SDCbank3

Then I stamped and coloured the little figure and stuck him to the circle stack.

SDCbank5Could I find a 5p piece?  Nope.  Not even down the back of the sofa.  I DID have a dime in my US money stash, and that worked fine.

SDCbank7I took the additional step of adding a 2nd layer of cardstock to the back of the template, just to make it that little bit stronger as a bank.  Probably no need it you are doing it as a display stand or something similar.

SDCbank4So there you go! So easy, and it might be something to keep in mind for the kids and summer holidays.  If you cut the slit and the slot, they should be able to decorate and fold and stick.  Then they can bug you Gimme Gimme Gimme all summer long…..till it’s full!

bankbackI’m betting you can already guess what the “original idea” for this was…. but you’ll have to wait till I finish it.


19 Comments

Gelli play with contact paper (tools too)

How funny is this?  I was playing with my Gelli plate, after a long time away from it, and doing the packing tape thing.  I tried sticker paper (too dull) and while I had the Mac shut down (still power issues and the electrician is not available till tomorrow AM – argh!) I was playing with contact paper.  leida (a commenter) suggested shelf paper and I realized that shelf paper and contact paper are (I think!) the same thing.

My experiments began with pulling the prints with the sticky side of the contact paper (I have a HUGE roll of it) but soon branched out.

Remember I had shown embossing on thick card and using that as a texture tool?  Well, one thing I had done, but not sure I ever mentioned here, was to emboss an old plastic place mat to use the same way.  I liked that because it is washable, but I only had a couple and use then for a few things.  It occurred to me that index cards covered with contact paper could work the same.  They do.

Cover with contact paper. Two cards are better – thicker and deeper emboss that way

gellitextureEmboss.

gellitexture2You can either press onto the plate to texture it or brayer paint onto the raised surface and press that onto the plate.

gellitexture4 gellitexture5Either way, it wipes clean with a baby wipe.

gellitexture3Another thing I discovered was a different use for that foam tool – the one with a strip of pinking-shear cut fun foam between two bits of card?

dottylinesHow cool are the thick dotty lines you get with it used as a stamp?

dottylines2 dottylines3The contact paper does pull a great print, as good as the packing tape.

prepull contactpaperAnd rather than adding foil flakes, I had a go adding glitter.  As long as you are sparing with it, the contact paper still sticks – although a layer of gel medium to on whatever you want to stick it to will help if you get too heavy-handed.

contactpaperglitter2 contactpaperglitter

contactpaperglitter3I really like this one! I have an idea for something using this style of print. but need to work one or two things out.  You may be able to tell that for this one I added the first layer of the paint thru a stencil (the diamonds) which gave me plenty of open areas (this technique requires that) I think I prefer that to the deli paper masks.

Oh and the Kool Aid hair dye?  Rubbish on dark hair.  Or 4 hours wasn’t enough.  Luckily I had a can of foam mousse (from ages ago when DS did his hair for Red Nose day) and DD was happy enough with that.  It says last for up to 8 shampoos, but after this morning’s shower it was very faded.  I doubt it will last thru another day, let alone the week!


13 Comments

Gelli tape and sticker paper

So I DID find my packing tape and had a bit of a play with the Gelli Arts technique.  Love it.

I like what happened.  I did the pulls then stuck one to tin foil, rubbed on Indigo Blu foiling flakes for one,  and the other stuck it to a page of one of the MANY out of date A to Zeds we have from when we lived in The Square Mile.  I must have 10 of these.

gellitape

That one I made into an ATC – or at least the beginnings of one. I got around the too-small tape by leaving a bit of the page on show.

gellitape2

I love the foiling flakes on the back – it looks fab IRL, less so in the photo:

gellitape3

Either in the video or on the blog it mentions that the tape is limiting, sizewise, and you can also use clear self-lamintating sheets.  Didn’t have any of those, so I did what I often do and looked at what I DID have to see what might happen if I used that instead.  I DID have a pack of Avery Clear label sticker sheets.

What happened is the sticker sheet, which is designed to dull any glare, really took the prints down to a very matte effect.  It   dulled the colours over paper and over tin foil, made the foil look a  dull silver-gray.  Again, not sure how well the photos show this.

gellitape4Here is a close shot:

gellitape5It’s interesting, a different sort of effect, and one I think I will play around with a bit more.

But not today….today, Kool Aid hair colouring.  Well, I SAY Kool Aid.  Two of the packs (sent by my MIL when I was planning on dyeing yarn with them)  are WalMart brand so no idea if this will work at all, especially on DDs brown hair.


2 Comments

Gelli printing play time – tin foil

Th electrician did NOT solve the power problem.  Grrr.  So I am not having my Mac on unless I am sure I won’t turn off the wrong light switch and blow the circuit.

I have been wanting to play with my Gelli plate since the WOYWW crop and Fairy Thoughts Janet mentioning a technique with packing tape.  Can I find my two big rolls of clear tape?  Of course not.  I’m sure I will but in the meantime, I did something I’ve been itching to try – printing on tin foil.  I have some very heavy weight foil and thought it might work well.

First I smoothed the foil over a square of heavy cardstock, just to give it some stability.  I painted over it with matt glaze medium –  I wanted to give the foil some tooth and didn’t have transparent Gesso, only white, so I improvised.

gelliontinfoilAs you can maybe see, the foil retains a bit of metallic sheen, but not total shine – I would say it’s more like the dull side of the foil with the glaze on it.

Loaded the plate and decorated it. I made sure to do at least part of it where the bare plate was on show, and used a stencil then printed through that, techniques to preserve at least some of the foil shine in areas.

gelliontinfoil2I also pulled a print from the plate after the foil print. You can see where the foil was folded around the cardstock on the edges.

gelliontinfoil3

I slipped the foil into an embossing folder, but didn’t emboss it, just squeezed the folder together and rubbed.  It gave me a more gentle texture.  I think had I left the foil on the cardstock, then embossed it, it would have been sturdy enough to use the piece on a card, or stuck to a canvas, although peeling the foil away from the supporting card means it is very flexible so could easily be used to cover something curved.

gelliontinfoil4As I type this I can see what I think is one of the rolls of clear packing tape peeping out from under a pile of rubbish on my desk.  So I may get to try that out after all!

Tomorrow, DD want’s to try putting some colourful highlights in her hair – I unearthed a handful of Kool Aid packs I had bought for dying yarn.  A couple of the ones I have left may work with DDs darker hair, so we will give it a go.  Since it’s temporary and will wash out, and not “chemical” at all, we should be fine.  I suspect it’s more likely that the colour impact will be very slight without bleaching her hair first, and that is not something I am prepared to do!