scrappystickyinkymess


Leave a comment

Trauma Teddy, Bobby Buddy, whatever.

{sigh} I have been fighting with the WordPress editor all morning.  I made a post but when I viewed it there were too many weird things happening (like 20 tin, near invisible lines at the end, and text that just kept getting smaller and smaller till at the bottom it was almost unreadable.I kept editing it and in the end I just gave up and deleted it.

I have no idea what was triggering it but I am not going to do it all over again and have it be more of the same.  So here is my PDF.

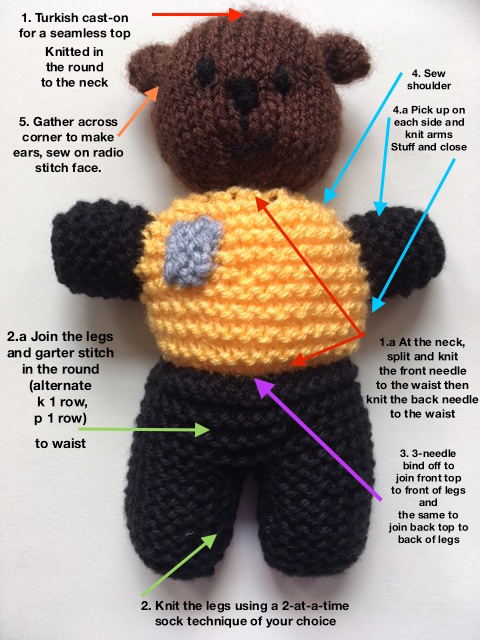
I did try to make a schematic/visual image of it, kinda like to Trauma Teddy image that is all over the internet, without much luck!

The original is pretty streamlined.  MINE is a bit chaotic, LOL!

My pattern is based (size-wise and stitch count) on the one available for the Dorset Police Bobby Buddies program – Get their pattern here

I wanted a minimal sewing version with no attached pieces. Almost got it! The radio will need to be stitched on for the Dorset Bobby Buddies. 
So long as there are NO BUTTONS or BEADS, this is suitable for that program and should also work for ANY trauma teddy scheme, if the size works.

I WILL add the photos of how to fold the unstuffed bear to match the right sides together and do the SECOND 3-needle bind off.  It;s the only bit that is even remotely tricky.

Once you have done the first 3-needle bind off

You need to fold the head over on to the body

Then fold the legs over on to the head

Then finally fold the upper body (yellow)over the legs – it’s hard to see because of the black, but the right side of the upper body and the right side of the lower body should be matched up for the second 3-needle bind off.

There are links within the PDF for tutorials or videos for some of the less common methods, like the Turkish cast on.

I’ve already sent off a bag of these and have more on the needles.  If you are in the UK, especially if you are in Dorset, feel free to join in the program.

And sorry to subscribers who got a link that disappeared.  Honestly, that post was a MESS. You didn’t miss anything! 🙂


3 Comments

Trauma Teddies with very little sewing

NOTE:  I’ve removed the download as I have done a much more detailed PDF with links to tutorials or videos and removing some of the fiddly things like the head shaping and all of the purl stitches.  I want a final OK from the Dorset Bobby Buddies scheme before I post it.  Bookmark this and come back to it! (22 June 2018)

One of the ladies in my knitting group sent a message that the Dorset Police were calling for Trauma Teddies and included a new knitting pattern for it.  There is another more standard pattern out there, either written-out or as an image:

What they all have in common is the huge amount of “making-up” they require! I am NOT a fan of the sewing up at the end of any project and if I can figure out how to do it without, I will. Even if it is a little tricky to accomplish!  And while I am always a “belt and braces” person when sewing up for small kiddies, I still worry that an arm might come off, and ear get detached, whatever, and make the toy a hazard.  Silly, maybe, but an all-in-one method suits me on so many levels.

So I made one.

On the left is the one from the pattern from Dorset Police.  It is a really nicely proportioned teddy, and any wonkiness is totally down to my making-up skills.  Trust me – he does have two ears, I promise! The one in the middle is my first attempt to alter the pattern on the fly to make it an all-in-one version.  And the right hand one is my final pattern version.

Gosh that blue background (one of my office chairs) does it no favours! Let’s try that again with just the two:

Better – you can’t see the little antenna on the radio but other than that ….  So just a closer look at my version, with an idea of how I made it all-in-one:

Crazy, right?  But other than a few stitches above and below the arms and a couple of stitches to gather the ears (and the decorative stuff like the face and adding the radio) there is no real “making up” to do.   The only thing that is a little tricky is the second 3-needle bind off – and that isn’t that difficult so long as you don’t do any stuffing till you have accomplished it.  That way you can freely manipulate the body into position.

Yes, there is a bit of purling here, but if I am honest I don’t mind that – it gives my knitting muscles something a bit different to do!

I did write up a pattern but it assumes you are familiar with all those things (two-at-a-time, Turkish cast on or Judy’s magic cast on, a 3-needle bind off, pick-up and knit, garter stitch in the round…) so it isn’t going to be for everyone.  The simplicity of the original pattern (knit every row, no real shaping) is going to be a lot better for someone who wants to just knit fast and sew it all together at the end.  Whichever, charity knitting is all good!


3 Comments

Getting back to arty pursuits….slowly

Well, son is safely back in LA (or as safe as one CAN be in LA) and much of the trauma and turmoil of recent months has settled down a bit.  We have a decision on DDs further education from the SEN panel and it is good news from almost all aspects, my health is as good as it has been since the onset of the NAM, my meds are reasonably well figured out, and I have found the time and energy to be creative.  We have made progress on the house and the garden and at least for today, the sun is shining – no mean feat for June in England!

I thought I would share the pages as a result of the Permission to Play class by Carolyn Dube.  I felt so out of practice, my mojo well and truly gone walkabout, that I thought a structured class that stressed no rules, just play, would be a great way to stay focused.  And I feel like that DID happen.  I made the ATCs last week, while beginning on the cardboard pages of the journal for the class.  But then life intervened and they sat, bare and unloved, waiting for me to be ready.  This morning, while DH and DD were off ice skating, I started Breakfast at Tiffany’s  on Audible and by the end of its 3-hour run time I was pretty much done with the pages and the lessons up to the binding.

The covers are bits of a beer carrier box, I think.  I’ve had them squirreled away for a few years, awaiting a project.  I like the hand-hold holes!  The left page in the photo above is a total OOPS, or Outstanding Opportunity Presenting Suddenly, as CD calls a big mess! I have been feeling like my desk is smaller than it used to be and I finally figured out that it is, and why – I lost the HUGE WIDE window ledge in the old house, that extended my desk widthwise, and as I don’t have my computer desk, my working space and the side desk all in a row, I am working on a MUCH smaller area!  That causes overlap

The reverse of one of the pages sat on top of my paint palette and picked up a lot of colour, in shade that couldn’t help but make mud.  With some spray ink and some white paint thru a stencil it ended up being OK, but def. one for the back of the journal LOL!

Other pages:

The only one that I managed to identify something in the Spark is the middle one above, with what I see as a very dejected fellow leaning against a wall.  There is also one Spark page that is still bare.

Overall I am pretty happy with the pages as a base for more stuff.  I feel a need to let it all fester in my brain for a bit before moving on.  I am also inclined to consider another binding method than the ribbon – I’ve never been a fan of ribbon binding and while it does seem like the best option from a practical for a class standpoint, I just feel I will end up being less happy with it.  I’m hoping the festering will either present me with another suitable option or the time will let me come to grips with it!

On a side note, while watching the class I was tickled pink to catch a glimpse of something on her shelf:

I thought Hey! I recognize that! and indeed it was a little thing I sent her 5 years or so ago. I surely intended to cut apart EVERYDAY to make EVERY DAY and didn’t.  DOH! So me.  And so nice of her to display it despite the error.  Oops.

I have another project on the go, unrelated to art, that I will also share, but not today!


3 Comments

My ATCs done!

Boy, am I out of practice!  But I managed to finish my ATCs so I am happy.  And I not only used and old tool that I thought was only fit for the bin (the Creative Palette) but I used something I bought and had not used yet.  It is a little stamp set from Tiger that cost me all of £3 and is so useful.  Doubly so since I bought two, recognizing that it would be useful to have multiples of letters and more than one upper case set.

You can see it comes with both a circle and a flat piece.  What I love is that the flat piece can be arranged either in a long strip of in two or more lines.  I may even get a third set to extend the amount of typesetting I can do.  To be fair, the font is dead simple, not anything to add any real style, and since I stamped the text then cut it out, printing the text would have worked as well.  But had I decided to stamp directly onto the background I could have.

You can see a couple of the ATCs – here is the whole set:

You can see I added a few little resin dots here and there.  I actually really like them! And it got me doing SOMETHING creative so for that it is all good.

Now off to help clear the dining room and hubby’s office – having one hardwood floor sanded and oiled, and a new wood floor added to make hubby’s home office warmer in winter.  The cold air actually BLOWING up from below the floor made working in there a challenge.  Also, dearest son will be visiting from tomorrow, as he breezes thru Europe on his way back to LA.  So I may be otherwise occupied and back to not crafting for a few more days.  Oh well, it was fun and I’m sure I’ll get back to it soon….

fingers crossed…