
Last week, a UKS member, Soojay, asked about very small calendars. I showed again how you can reduce the size of the PDFs using your printer dialog box, and while that works, after a fashion, I was intrigued by her idea of keyring calendars. We chatted back and forth about it, and she promised to make one and send me a note when she blogged it. She was true to her word and I see it is on her blog today. Cute, so cute, and making good use of my printables. But NOTHING like I imagined! We’ll get back to that in a moment.
I am nothing if not impatient. I hate to wait for ANYTHING. And yet I make people wait all the time LOL! As soon as the words “keyring calendar” penetrated my brain, I was off.
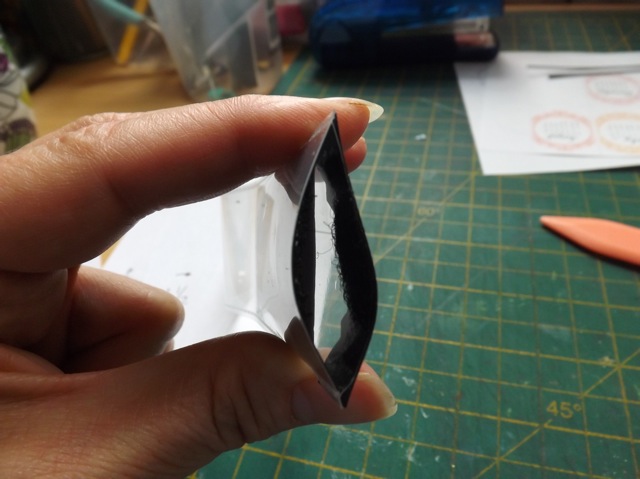
The problem, as I saw it, was protecting the little slips of paper with the month info. Had a think. What made sense? Sleeves. Small ones. What did I have? These, mean to house negatives:


Given how they are assembled, there are only four usable strips. Cut to the outside of the sealed areas to get a sleeve that is open top and bottom only

I am keeping the top section of smaller pockets for something else. I’ll say no more…
Now the size of the sleeve is set. The printables have to match. It wasn’t difficult to resize them and get two full sets of 12 months on a single sheet. You can download that here.

These are small. They end up just about 1 1/4 inch wide by about 2 1/8 tall. The inside of the sleeve is about 1 1/2 inches and you can cut to the height you want. And frankly, I got fed up having to trim all four sides of things so I’ve made them share a cutting edge where possible. Lazy? Me?
NOTE: There is another sheet to expand this set, with the last 5 months of 2015 and the first 5 months of 2017. Get that here!
I suspect the printables will fit other sleeves, as I am pretty sure negatives are a standard size. Not that many people still develop film and get negatives anymore…
Once you cut all the blocks, you can secure them into a block by smearing glue along the top edge, to make a tear-off version. Punching a hole and adding an brad works too, a staple or eyelet, less well.

PVA glue is best, but these are what I have. They both work ok.
While that is drying, cut a bit of backing cardstock. I stuck a photo to the back so the reverse is decorated too. I added a half-circle of velcro to the bottom edge., and the corresponding bit to the INSIDE of the sleeve. A thin strip will work too, but again, dots were what I had. I also cut a bit of cardstock to stick on the outside, over the velcro, punched with a decorative edge punch. DO NOT STICK THE CALENDAR TO THE BACKING CARDSTOCK.

Why? Well you need to be able to get the calendar block out to tear off the month on top to get to the next month. If you stick it, that is going to be mighty difficult!


The velcro dot is going to hold the month block a little up from the bottom edge, so the cardstock doesn’t obscure the calendar. Flexing the sides will make it easier to slip the calendar out.
I punched a hole and added a larger eyelet to the top for the split ring keyring – it was always the challenge to secure it so you weren’t having to stress the hole by taking it off the ring.

I rounded the top corners with scissors. Not required, but I like how it looks. And size-wise? Not that much bigger than a standard keyring photo fob.

Right so now you have seen mine. Well, now look at Sue’s version on her blog here. You can’t see the cover in this shot, but it’s very pretty.

Two things to note: Her’s is way scrappier and prettier than mine, and there is none of the faffing about to tear off the months. You can see all the months, which makes it easier to look ahead if you need to check a date. Her’s is bigger, but not by a lot. I think you could easily cut the months from the PDF, stick them back-to-back and slip a pair into a sleeve, punch the hole in a corner, then add the cover and thread them all on a split ring or book ring. Sort of a combination of the two.
But I thought it was interesting. The words “keychain (or “keyring” as you prefer) calendar” just brought up a totally different image in my mind. I think mine works, but it is nothing like the original. I’m sure, in time, I could come up with something pithy to say about what that means, but not today. I just heard from DH that a deadline has moved a week (or more!) closer than I expected and I have to kick into high gear on something very much NOT crafty.

Pingback: Keyring Calendars – updated for 2017 | scrappystickyinkymess
31/08/2016 at 4:10 pm
I am wondering when you will finish the 2017 one of this keychain calendar. I would like to have it when you do. Thanks so much!!! Love your calendar stuff!!!!
LikeLike
01/09/2016 at 12:52 pm
The problem is that under the previous Mac OS I was easily able to save the calendars in a smaller size by setting it to print multiple pages on a single sheet. Now, under El Capitan, the new OS, I seem to only be able to print multiple COPIES of the SAME page on a single sheet. That means you would have to print 4 copies of the calendars in order to get all of the pages.
Also, WHICH of the calendars? I show a few options in this post! Maybe I will play around with converting one of the 2017 ones I have made (maybe the lace one – it’s so pretty!) and post that tomorrow, even if it is only for multiple copies. Otherwise I’ll pop back here and let you know it was a big fat FAIL.
Fingers crossed!
LikeLike
01/09/2016 at 3:16 pm
Any of the little ones you can use for keychains is fine. I like all of them.
LikeLike
Pingback: Free Printable Coloring Calendar Skip To My Lou
Pingback: Keychain calendar additional months | scrappystickyinkymess
07/07/2015 at 4:24 pm
Ha Ha I LOVE it! -I DO like your and may well have a go at making something like this too.
I use mine at work all the time and as I need to sometimes see more than one month at a time , thats why I made it more of a tiny book. It stills on my desk – so needs to look pretty too. Either way – Thank you SO much for making them tiny xx
LikeLike
07/07/2015 at 12:09 pm
You amaze me with your inventiveness!!! Love reading your posts and seeing what you will come up with next…
LikeLike