
OK, so I managed to capture all I think you need for this. But first, a remarkably tidy desk for WOYWW this week!

The process for creating a Word Search background for any use is way easier than you might think. What I use is this link – geared towards teachers, it allows you to create a word search grid simply by filling in the options online.
There is flexibility here, but this is what I did. On the menu screen I changed things to suit me. Just added a random word and selected COLORS for the word list. You have to pick SOMETHING in order to create a grid, it won’t let you create just a grid of random characters. So far as I can tell this just adds the one word to the grid. It might be interesting to add a list of RELATED words in the CHOOSE YOUR OWN WORDS section and NOT tick the EXISTING WORD LIST. In the generated grid, ones that you type will appear in the grid but not be highlighted unless you change the colour of them. Imagine I LOVE YOU highlighted, but other love related words there in the grid – SWEETIE, KISS, HUGS, ADORE, etc. Then the recipient will “see” them even if they aren’t the focus IYKWIM. I would select FORWARD WORDS ONLY cause backwards ones may not be even marginally noticeable. I edited the original grid and I didn’t want a lot of actual words in there, but thinking on it, it might be cool.

I make a few other changes – I make the grid 15 x 25 (or 25 x 15 depending if I want landscape or portrait orientation) and select lower case and Verdana for the font. That really doesn’t matter as I change the font in my program anyway. Comic Sans is the default and I blinkin’ HATE Comic Sans. If you wanted to create a grid with actual words you can make the changes on the right, to forward only words, for example. But again, as I edit it anyway you don’t really need to. This is what you get:

One cool thing is you can copy and past the grid as INDIVIDUAL characters and NOT as an IMAGE of the grid. That makes each character totally editable. Just selecting them grid to COPY>Paste you can see that:

All I do is then paste THAT into my program then change the font to a monospaced one. I used Cousine. I then select the letters to change and to make the words I want to use as the sentiment:

Obviously this is personal preference but I usually make the letters all a medium grey, so the words (in this case THINKING OF YOU with OF and YOU intersecting) really stand out when I make those letters both BOLD and the colour I want. One word of caution – I mentioned it above, but make sure you select a MONOSPACED font. This means that each character takes up exactly the same space within its block and is placed in the block in the centre. That means they will all line up as a perfect grid. Non monospaced fonts won’t!
NEW INFO! PSE spaces the characters differently than my program does. Making the text bold makes the letters not line up perfectly. PSE doesn’t have kerning so other than changing the point size of the SPACES between the letters, space by space, I don’t know how you would do this in PSE. BUT Ifa, on UKS gave this a go and tells me that you can do it in Word on a PC and the spacing stays the same. I’ll try to see if I can push DS off his gaming PC and give it a go.
You can make the grid fit an area in a couple of different ways – either create a much larger grid then select just the dimensions you need (say 4 x 6 for a card topper, or 3 x 4 for a Project Life printable) OR mess about with the font size, so it fills the space, or tile the grid if you wanted to fill a 12 x 12 scrapbook page!
I had a thought. I will go ahead and add the card toppers I created as PDFs for you. If you like the idea but don’t want to go thru the steps to create your own, you can use these.
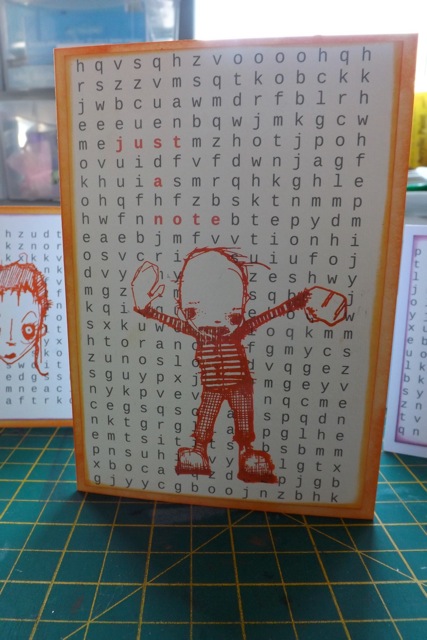
Portrait orientation, JUST A NOTE PDF
Landscape Orientation, THINKING of YOU PDF
I ‘ll also add them as a .png – that will allow you to edit the colour, but I tried and you can’t edit the text as text. You can resize them.
Portrait orientation, JUST A NOTE PNG
Landscape Orientation, THINKING of YOU PNG
Just click ENHANCE > Adjust color > Adjust Hue/Saturation then tick COLORIZE and use the sliders to change to a colour you like.

From there it’s simple…or is it? It IS simple but takes a few photo to explain so as this is already way longer than a usual WOYWW post I think I’d better save that bit for tomorrow. Maybe by then I will have some different samples to show you. Can’t wait? If I say MASKING, will that be enough info for you to have a go yourself? Probably …..
Here is a card from yesterday for you so you can see what it looks like all in this post:
Happy WOYWW!

Pingback: Well, that was a surprise! | scrappystickyinkymess
15/08/2013 at 7:49 pm
WONDERFUL idea, what a great background! I’m glad you stopped by this week, Mary Anne–the atcs are very flat for mailing, it’s hard to resist the urge to put lots of 3Dish embellishments on them!
:)Happy woyww!
LikeLike
15/08/2013 at 6:08 pm
I hope you don’t mind — I pinned this tutorial!
Kay
LikeLike
15/08/2013 at 6:05 pm
Holy moly MaryAnne! I’ve always wanted one of those word background stamps and now I don’t need one (thanks to you)!!! This is great.
If only I could make it to the next WOYWW crop! I definitely should put that on my bucket list!
Thank you for visiting me already. I knew it probably wouldn’t be until today that I managed time to get around to desks.
Happy WOYWW
Cheers,
Kay (23)
LikeLike
15/08/2013 at 3:16 pm
What a fantastic idea for a card!
Happy Woyww,
Sandy #17
LikeLike
Pingback: Making the Word Search notecards | scrappystickyinkymess
15/08/2013 at 4:20 am
Wednesday snuck up on me again 😛 Cute card!!
LikeLike
15/08/2013 at 12:48 am
Your lovely tidy desk definitely puts mine to shame this week…..lol. It looks great and I am loving this wonderful idea of the word search background. Fabulously fun for all types of cards. Happy WOYWW! Danie (a very late #133)
LikeLike
14/08/2013 at 8:14 pm
I love the finished result, such a great idea but I’m afraid you lost me with the instructions LoL!
Thanks for visiting me earlier.
Happy WOYWW. Susi #105
LikeLike
14/08/2013 at 7:39 pm
how fun! great tutorial and cute card idea! Happy WOYWW! Lindsay #104
LikeLike
14/08/2013 at 7:21 pm
Thats absolutely awesome! I have to bookmark this page. Thanks for the Birthday wishes,
Have a great week, Hugs, Shaz #45 xx
LikeLike
14/08/2013 at 6:12 pm
That’s a great idea but I’d never get my head around it! I can just about cope with blogging!! Hugs. Pam xx
LikeLike
14/08/2013 at 4:36 pm
That looks fabulous, very clever! I love the little creepy boy over the lettering! Looks great.
Back from my holidays wishing you happy WOYWW and a lovely week.
xx Monique #97
LikeLike
14/08/2013 at 4:30 pm
Now that is cool, I’m going to have a play with it. Thanks for sharing. Take care. Zo xx 98
LikeLike
14/08/2013 at 2:14 pm
Hi Mary Anne
that is a great idea for cards and for keeping kids busy during holidays or long car journeys.
Love the cards you have made using it
Enjoy WOYWW and have a great week
Hugs Ria #43
LikeLike
14/08/2013 at 1:50 pm
Oh yes, your little odd weirdo peeps really do look fine stamped over the word search grids! You lost me on the second paragraph but I may just have to have a go at this… but i don’t have any weirdo peeps… and it wouldn’t be the same without them! 😦 Annette #9
LikeLike
14/08/2013 at 1:25 pm
We love this idea, we’re adding it to our future projects file, thanks.
LikeLike
14/08/2013 at 12:07 pm
Thanks Mary Anne for another brilliant idea – you’re so clever! :o) AnnieC #96
LikeLike
14/08/2013 at 11:06 am
DEEST? I meant detest!
LikeLike
14/08/2013 at 11:06 am
We use word search creating websites all the time for school but I really like what you’ve done with it, picking out the important words in the different colour is a very clever idea and works so well! A great effect. And I DEEST comic sans too….bleurghhh.
Hugs, LLJ 60 xx
LikeLike
14/08/2013 at 10:29 am
Didn’t understand a word of it but I shall know where to come for advice should I ever need to make one!! Is there nothing you cannot turn your hand to? (housework doesn’t count)
Happy WOYWW Cindy #85
LikeLike
14/08/2013 at 9:13 am
What a great idea! And I love the little man you stamped on them.
~ Kate ~ #76
LikeLike
14/08/2013 at 8:31 am
I don’t quite know what to say about this except – brilliant! Just the sort of research a gal like me needs. Love the card..those Stampotiques never fail to make me smile!
LikeLike
14/08/2013 at 7:56 am
This is FUN. I have PS, not PSE, but will give it a try in WordPerfect (I don’t have Word). I can see all kinds of uses like Merry Christmas, etc. thanks for teaching us this fun trick. Happy WOYWW from #1.
LikeLike
Pingback: Word Search Filler Cards for Project Life | scrappystickyinkymess
14/08/2013 at 6:55 am
you are such a whizz on the computer…. love these backgrounds!! Happy WOYWW… be warned, it was a big shop…. Helen 21
LikeLike
14/08/2013 at 6:30 am
Now that’s a very clever idea, thanks for sharing. Happy WOYWW from
Ann B 36
LikeLike
14/08/2013 at 5:09 am
Gosh the possiblities are endless when the internet is available. Would never of thought of this idea though, good for you it is really great.
Happy WOYWW
Eliza & Yoda 14
LikeLike
14/08/2013 at 2:03 am
Thanks! This is a cute idea for cards, and maybe even scrapbook pages!
LikeLike
14/08/2013 at 1:40 am
What a cool idea! Happy WOYWW!! I haven’t posted yet… 🙂
LikeLike