
 Let’s start with a paper pack. DD is so sweet. When out shopping with her Dad on day she spotted this paper pack in the store and exclaimed immediately that she HAD to buy it for me.
Well, it isn’t REALLY my style, but I could never tell HER that. Problem is, every so often she asks me if I have made something with it yet. I thought I had better do so pretty soon so she would know that I liked it and that she had made a good choice. The things we do for our kids…. The one thing about this paper is it’s fairly thin weight – ,far to thin to create a card from, but perfect for covering slightly thicker card.
Then, when compiling the BlogBits section for the UKS HomePage I came across this tutorial from on of our sponsors, A Trip Down Memory Lane. They did a Cyber Crop in July and I what collecting links and was quite taken with this little Twisted Card. I thought it was a cute way to make a holder for a gift card. DD had been invited to a birthday party and when I asked the Mom what sort of thing the birthday girl might like, was told a gift card would be perfect. So a gift card holder was in order.
That really does seem to be the done thing nowadays. When DS was young I would have NEVER give money or a gift card – it was all about finding the perfect gift and DS was as excited to shop for it as we hoped the birthday person would be to get it. But after getting three copies of Artemis Fowl and at least two copies of Coraline (in addition to the one I bought him) I can see the sense of it.
So we have three things all colliding – the paper stack, the twisted card tutorial, and the need for a gift card holder. It would have been easy to just make the card, but you know me. I always have to put a spin on things, and I did with this as well.
The tutorial calls for a 4 x 12 inch piece of paper, scored on the diagonal. I began with an A4 sheet of fairly light card, the Text & Graphics card from Staples that is 160 GSM. I found thicker card didn’t fold very well. I cut at 4 1/2 inches lengthwise. That makes it about 11 3/4 inches but it really didn’t matter.
I punched with a border punch all along one edge, but started the punch about 1/4 inch or so in, not right to the edge.
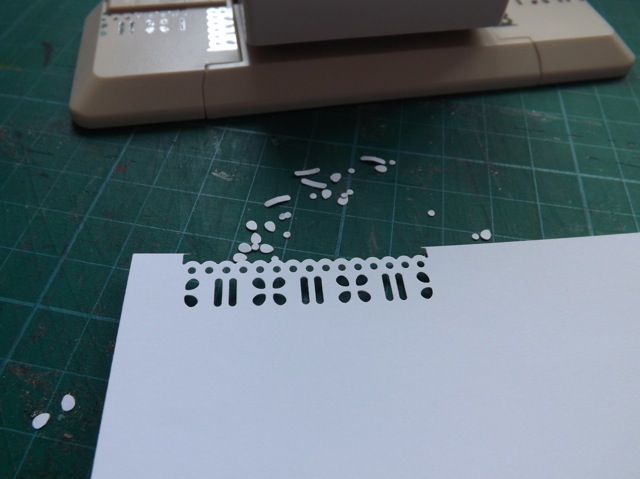
When I scored it diagonally I didn’t score to the CORNER but to just past the punched area, like so:


This just makes the fold along the card and not thru the punched area.

You will have to trim off the tiny overhang – how much and how you trim it will depend on what punch you used.

Now you simply carry on with the tutorial, scoring and folding the card in half. If you want a border around the patterned paper you use to cover, the templates in the PDF work OK, although the border is bigger than you might like.

If you shift the templates away from the edge, and carry the cutting along the same lines, just extending it, you can get a bigger piece to cover and thus a thinner border

To be honest I found it easier, once the card was folded, to just unfold it and cover the areas the trim the overhang to fit. That also meant I could play around with the position. Given the odd skew to the card, paper with straight lines don’t look straight when you add them along an edge.

See? The green was added along the diagonal. For the inside, it was butted up to the bottom, inside the fold.

Can you see that you can have the punched edge along the OUTSIDE of the card or along the INSIDE pocket, depending on how you fold it?

For this edge to edge cover, it’s easier to fold the card diagonally then cover the areas with the paper THEN punch. I didn’t step-by-step that cause I punched, then covered, then re-punched on this one. For MOST of them I covered the base but leaving the punched area plain cardstock, like these:


Again, you can see the big scallop card and the most finished one have the punched edge along the outside of the card, but the lacy one has a plain front, and the punched edge is inside, along the diagonal. I thought these would be quite cute not only for gift cards but for the Grandparents, or cousins, with a photo stuck in the pocket created by the diagonal fold. Maybe you can JUST see it in the lacy edge one?
Most pf these are not finished-finished, just mostly done to keep on hand. Cards of this size fit a 6 1/4 x 4 1/2 envelope so that’s handy!
And best of all when DD gets home today I can show her I used that paper pack – it’ll make her day.
While making them I had another idea but that will have to wait for tomorrow….

Pingback: A little Christmas Round-up | scrappystickyinkymess
Pingback: Just a few Xmas tags for 2017 | scrappystickyinkymess
05/08/2014 at 4:52 am
you can also use them for making gelli prints
LikeLike
04/08/2014 at 7:55 pm
Well..at least dhe thought of you. I love folded cards and this one is super cute. DD will be so proud.
LikeLike
04/08/2014 at 4:17 pm
Loving these! An excellent choice, Maddie I’d say. x
LikeLike