
I have been planning this one for a while, but kept putting it off cause I’ve been busy. I am against the clock so forgive the perhaps less than perfect sample, but focus on the IDEA. DD and I are having haircuts today (what is it about short hair? It really needs more maintenance than long hair grabbed in a gripper!) and then ice skating and shopping so my day is pretty full.
First, the Mennonite Foldnote. I did a post on this YONKS ago, but it occurred to me that it might work nicely with the Gelli plate for a piece of mailable art.
This would be a breeze with a larger plate, but as I only have the 6 x 6 one, I had to jump thru hoops to get something “clean”, as I worked thru printing on each isolated section, fortunately none of them bigger than 6×6 starting with an A4 sheet of paper. There are no measurements given past the first one, as none of the rest of them are really needed. My photos aren’t perfect, so search for Mennonite Foldnote and you may find better step-by-steps.
Start with a sheet of paper. I was using plain printer paper – although slightly thicker paper may be nicer, it will add weight and if you really plan to mail it you may need to check the weight before you just drop it in the post. Also the dimensions – in the UK that matters as much as weight. With A4 it comes up about 5 x 6 (a bit less really, but being generous)
1. Fold the top right corner over leaving a 1 1/2 inch gap at the left side. If you have a ruler that is exactly 1 1/2 inches lay that on the left and fold the corner over to meet it. Easiest way.


2. Fold the bottom left corner up to meet the lower edge of your first fold.
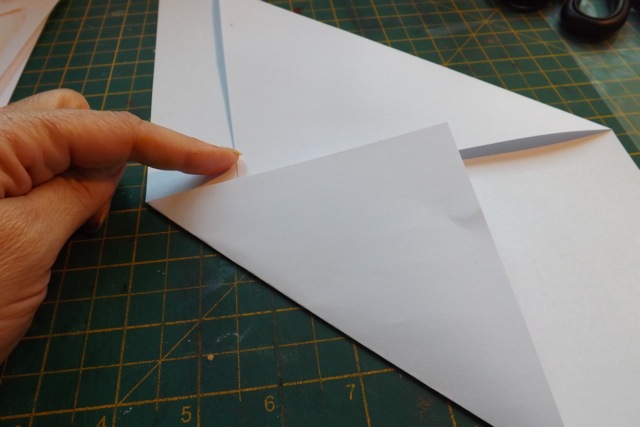
3. Rotate slightly so the now bottom right corner is pointing straight down then fold it up. Notice the right edge – you can see that little bit of overlap in the circle. That closes the note. Other than that, the placement of the fold is flexible. And it will be different with US letter paper.

4. Flip it over, so the fold you just made is at the top. Fold the bottom up so the straight edge of triangle meets the top edge of the foldnote. See the arrows?


5. Flip it over and fold the triangle down.

Now, if you have a big plate, it is super easy to just mask the address areas and print over the whole of the front. Done. I had to jump thru hoops to isolate and print on each of the areas, using some masks and scrap paper to protect the areas I didn’t want to overprint or print on at all. If you wanted to print on the INSIDE areas, except the centre section, to write on, you would simply mask the centre and print on the whole sheet. I had to stop in order to post before I have to dash, but doing the inside is pretty much the same.
1. Mask the address areas. Be kind to your postman!

2. Print on the front. Keep the little triangle folded back out of the way.

3. Cut a mask to cover the front. I also stick a plain sheet of paper to the BACK side, to try to keep it clean.


4. Print, area by area, manipulating the folds and using a cover sheet to keep our fingers from getting too mucky and transferring paint to what you want to be clean areas, print on each section.

I used similar colours but you can go wild with various combos if you like.

See how mucky the mask over the centre is? It really is worth doing.
5. Stamp OPEN or OPEN HERE on the small triangle.

6. Write in the centre section, either right on the note, if you used decent weight paper, or add a plain block of heavier paper if you used thin paper and want to.

A I said I have to get a wriggle on so didn’t have time to print on the inside sections surrounding the block – and in fact you may want to write on ALL the inside sections, so it may not be required at all! Up to you.
7. Re-fold and seal the note by sticking the stamp over the tip of the triangle. Make sure the stamp is well adhered to the paint-y surface!

Now, who shall I send it to?

Pingback: Gelli Fun - Carolyn Dube
Pingback: Gelli Fun | Carolyn DubeCarolyn Dube
08/08/2013 at 2:37 am
Super duper awesome cool! So clever! Thrilled you shared this with the party!
LikeLike
07/08/2013 at 1:30 pm
Very cool!
LikeLike
06/08/2013 at 11:29 pm
Wonderful – clever as always. Thank you for sharing.
LikeLike
06/08/2013 at 10:32 am
That’s a very neat way of making an envelope – I like the little triangular fold at the tip. You are certainly having fun with that Gelli Plate!
LikeLike
06/08/2013 at 10:10 am
That’s great! A very good idea, and I love the vivid colors. Thanks for sharing and squeezing it into your busy day 🙂 Suzanne
LikeLike
06/08/2013 at 9:54 am
Oh my! The things you think to make! You are never out of ideas! Love this post! Thank you for sharing!
Lots of hugs!
Cardarian
LikeLike