I have been meaning to get a tutorial (of sorts) done for my iPad Gelli printed packing tape project, but as DH liked the quick and dirty version I did already, and I had already Gelli printed right on the other cover, and we didn’t have ANOTHER one going spare, I wasn’t sure how I could do that. I wasn’t interested in spending £35 on another cover. But I thought I could go ahead and do the steps without sharing a final project. Started that, and as it is such a long process (due to the drying time needed between layers on the plate) it just got darker and darker. Some of the photos at the end of the process aren’t brilliant but they should still convey the info you need.
I would ask that your read thru all the steps before starting. The template may SEEM like a bit of a pain but it will really pay off in the end. Having said THAT, if you at least read thru it, you will be able to better identify the steps you feel like you could skip, or alternative ways to do it.
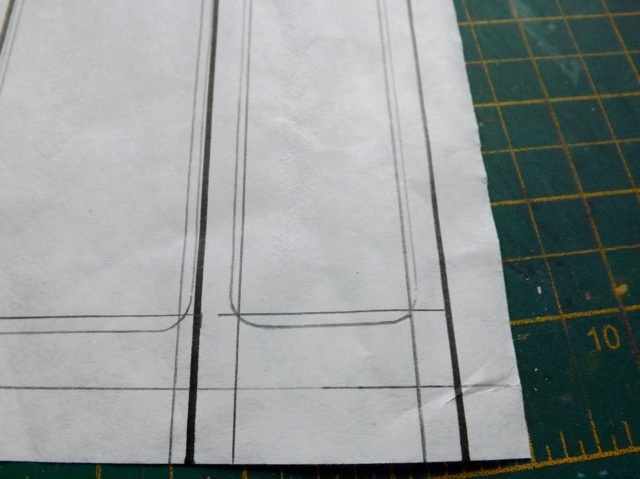
1. Measure the bars of the iPad cover. Cut templates.
Measure from just a hair inside the edge of the raised area. You need the tape to make contact with the hard FLAT surface, not the soft FLEXIBLE area that allows the cover to fold to create the stand.

I am showing you this on the back of the cover, but that is only because the front has already been painted and it will be too visually confusing!
You will quickly see that only two of the bands are close to exactly the same size. One is much bigger, one is a hair smaller. You can deal with this as you like – make them all the same (smaller) size, make three the same and one to fit the biggest band, whatever.
I used the EK Success more acute corner rounder (mines yellow – are they all yellow and green for the softer rounded corner??). That one fit the corner curve of the bands best, to my eye.
2. Cut a piece of Freezer Paper, at LEAST 9 x 11. Bigger may actually work better.
If you don’t have Freezer paper, you could use a Teflon baking sheet (one of the cheap ones) or perhaps Baking Parchment or waxed paper. The KEY is that there has to be one side that the tape will NOT STICK TO and one side you can write on. Freezer paper is ideal.
3. Lay the plate centred on the paper side of the Freezer Paper. Draw around your plate – I used the 8 x 10 Gelli plate as it fits, near perfectly, the standard iPad cover. Mark out 2 inch bands. The packing tape is 2 inches wide. See where this is going?
4. Centre the paper templates in the drawn bands. Trace around them. Keep them – you will need them later.
You can see that widest band is pretty close to 2 inches.
5. Draw a line about 1/8 inch INSIDE the lines of the templates. If you want more of a secure border, make it wider. I squared off the corners. Life is too short to round them on an inside curve.
Why go to all this trouble? Well, the packing tape sticky is what is going to hold the decorated strips to the case. You doubt me? The one I posted a couple of weeks back has been in use (HARD use) since then and the tape still sticks perfectly well with no additional adhesive added to it. This slight edge around the entire border of the design will help overcome any parts of the tape where the sticky is to sparse. And holding down the EDGES is the most important thing.
I may experiment with masking the tape itself at some point. That might be easier, it might not.
6. Cut out the innermost lines.
This is going to help you in two ways. FIRST, it will help you see where to leave unpainted or open areas (the corners, some of each edge) as you decorate your plate. SECOND, the paper side is going to block the paint from those areas of the packing tape you want to remain sticky. And THIRD, the non-stick side will let the paint stick to the tape, but let the tape peel off the paper where the paint has been blocked and where it is still super sticky – without losing that sticking power!
7. Lay the plate OVER this template so you can see the lines thru it. I’ve put it on the top so you can see better.

I’ve tried to place my masked (unpainted areas) so there are plenty that cross the lines.

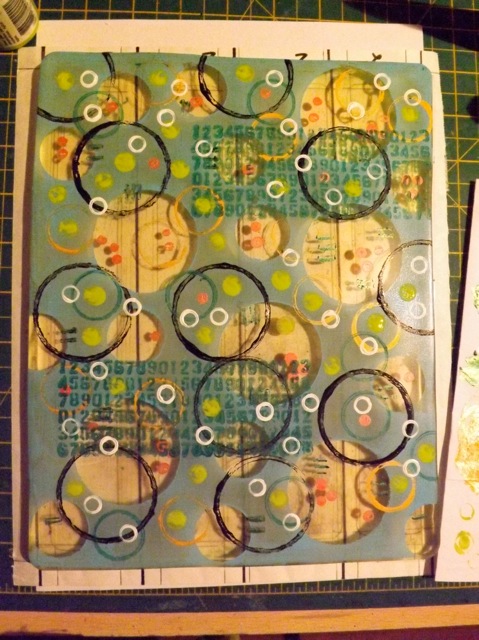
8. Carry on with the decorating. Keep focused on the open areas and take care not to completely block them.
Note the text stamp – this is NOT an overall pattern. The open areas are just as plentiful as the painted areas. The unpainted areas will stick. See how dark it got? All those layers, all that drying time!
Let it all dry between each layer, DRY dry, not mostly dry, BONE DRY.
9. Lay your template over the now dried paint.
THIS is where your template is really going to pay off. You are going to VERY CAREFULLY, especially for the first one, lay the sticky side of the tape over the aperture. The tape should fall within the 2 inch lines you marked out. Once they are all laid out, burnish with a bone folder, the back of a spoon, an old credit card, whatever. You want every bit of that paint to get pulled up by the tape. You want the slight border, where the aperture is smaller than the template, to stay clear and sticky.
10. Pull off the entire sheet. Stick the painted side to another piece of freezer paper or waxed paper – anything you can peel it off and don’t mind cutting thru. Go back to your templates. Use them to cut out the bands.
I hoped I would be able to see the original lines thru the paper and the tape, and maybe using a different colour might help with that, but in the end I found using the templates was easier for my “old eyes” – this is one of those places you may feel you can skip my added steps for the elderly LOL!
What you will have is a strip of packing tape with the Gelli print on the sticky part, but with plenty of bare sticky areas

AND a thin border around the whole strip that is stuck to the plastic side of the freezer paper.
Peel away the freezer paper from the edges. You can now stick the tape to your iPad cover.
This one used only a stencil that had lots of open areas. One quick painting and pull and done.
You’d be surprised how LITTLE sticky is needed for it to grab on to the rubberized surface of the iPad cover!
Obviously it would be SO MUCH SIMPLER to make the template then pull the WHOLE PLATE onto the sticky side of a large sheet of contact paper, and use the backing you peeled off to back it for cutting the bands.
So it was bugging me not to be able to show it finished. I figured why not just stick the new strips over the already painted and Mod Podged front? So I did, and DH said, in a word, WOW!
What you are seeing is the cover that had the print pulled right on to it, with the new packing tape strips stuck over the top.
I just love the glimpses of the original print showing thru the open areas of the packing tape! And the packing tape clings just fine to the Mod Podge. So now I will have to wait for another cover to come my way before I can play again. Unless I can convince DH to let me peel off the stencil one and have another go at it…..
And now the power is finally back on I have another packing tape idea I am keen to try – nothing so complex as iPad covers, but I hope I’ll have fun with it anyway….


14/01/2014 at 4:36 pm
Wow! That is so cool! I’m just starting to learn how to use my gelli plate. I tried using the packing tape and it turned out great. I’m looking forward to learning more about how to use it!
LikeLike